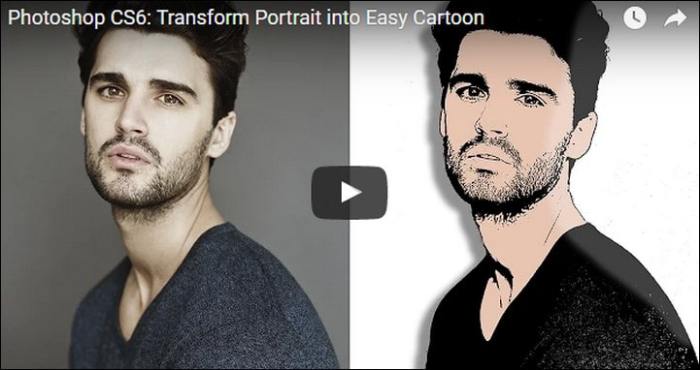
How to Turn a Photo into a Cartoon with Photoshop provides a comprehensive guide to transforming your photos into captivating cartoon illustrations using Photoshop. This step-by-step tutorial covers everything from fundamental techniques to advanced effects, ensuring you can create diverse cartoon styles.
We’ll explore essential Photoshop tools, color adjustments, shape simplification, and filter applications, all presented in a clear and easy-to-follow manner. Expect detailed explanations and practical examples to guide you through the entire process.
Introduction to Photo Cartoonization
Photo cartoonization, a popular image manipulation technique, transforms photographs into stylized cartoon-like representations. This process leverages Photoshop’s tools to simplify shapes, enhance Artikels, and adjust color palettes to achieve a distinct cartoon aesthetic. The core principle is to reduce photographic realism to a more abstract, exaggerated, and often playful interpretation.The basic steps typically involve adjusting image layers, using filters, and employing selection tools.
This results in a visual shift from a realistic depiction to a caricature-like image. Specific tools and techniques are employed to control the level of cartoonization, allowing for varied degrees of simplification and exaggeration.
Basic Steps for Photo Cartoonization
The process of transforming a photo into a cartoon image involves several key steps. Each step builds upon the previous one, leading to the final cartoonized result. Understanding these steps is crucial for achieving the desired outcome.
- Image Preparation: Begin by opening the target photo in Photoshop. Ensure the image is in a suitable format and resolution for editing. This step sets the foundation for the cartoonization process.
- Layer Adjustments: Create duplicate layers of the original image. These layers will be used to apply different effects without altering the original photo. This crucial step allows for non-destructive editing.
- Artikel Enhancement: Employ selection tools (like the Pen tool, Magic Wand, or Lasso) to define the edges and contours of objects within the image. This creates a more distinct Artikel, a key characteristic of cartoons.
- Color Simplification: Use adjustment layers (such as Hue/Saturation, Curves, or Levels) to reduce the range of colors and create a more limited color palette, typical of cartoon style. This will result in a flatter, more vibrant color scheme.
- Shape Simplification: Utilize various filters (like Stylize or Artistic) to further refine the image’s shapes and reduce photorealism. These tools can significantly impact the cartoon-like aesthetic by making the image’s elements simpler and more pronounced.
- Final Touches: Adjust the contrast, brightness, and other parameters to finalize the cartoonization effect. This involves refining the overall look and feel to create the desired cartoon style.
Tools Used in Photo Cartoonization
A range of Photoshop tools are employed to achieve the cartoonization effect. The choice of tools will depend on the desired level of detail and complexity.
| Step | Description | Tools Used |
|---|---|---|
| Image Preparation | Open and prepare the target photo. | File Open, Image Size, Resolution |
| Layer Adjustments | Duplicate layers for non-destructive editing. | Layer Duplicate |
| Artikel Enhancement | Define object edges using selection tools. | Pen Tool, Magic Wand Tool, Lasso Tool |
| Color Simplification | Reduce color range using adjustment layers. | Hue/Saturation, Curves, Levels |
| Shape Simplification | Use filters for shape refinement. | Stylize, Artistic filters |
| Final Touches | Adjust contrast, brightness, and other parameters. | Brightness/Contrast, Levels, Curves |
Photoshop Tools for Cartoonization
Transforming a photograph into a cartoon involves a combination of precise editing and creative manipulation. Photoshop offers a robust toolkit for achieving this, encompassing both basic and advanced techniques. This section delves into the key tools and their effective application in the cartoonization process.Effective use of the Pen Tool, Eraser Tool, and adjustment layers, coupled with strategic application of filters, is crucial for crafting compelling cartoon effects.
Mastering these tools empowers you to shape and refine your images, moving beyond simple transformations to create truly unique and stylized cartoon interpretations.
Essential Photoshop Tools
The core tools for photo cartoonization in Photoshop are varied, each offering unique functionalities for specific aspects of the process. A nuanced understanding of their capabilities is paramount to creating convincing cartoon renditions.
- The Pen Tool: This tool is indispensable for creating precise Artikels and shapes. Its vector-based nature allows for clean, scalable lines that are vital for establishing cartoon character silhouettes and defining the contours of objects. Using path points, you can manipulate curves and angles with precision, ensuring a smooth and accurate translation of photo elements into cartoon form.
- The Eraser Tool: This tool, often overlooked in the cartoonization process, is crucial for refining Artikels and removing unwanted elements. By utilizing different eraser tool settings, you can achieve smooth or hard-edged effects. The tool can also be combined with other tools to refine features and create a cartoon aesthetic, particularly in areas where you want a sharp contrast between areas of the image.
- Adjustment Layers: Adjustment layers provide a non-destructive way to modify the color, tone, and contrast of your image. They allow you to apply changes without permanently altering the original photo, providing flexibility for adjustments and iterations. This is critical in the cartoonization process, enabling you to experiment with different color palettes and tonal ranges while retaining the original image data.
Examples include levels, curves, and hue/saturation adjustments, which are invaluable for creating the distinctive color palettes often associated with cartoons.
Filter and Adjustment Functionality
The effectiveness of Photoshop’s filters and adjustments is essential for achieving the desired cartoon look. Understanding their specific functionalities allows for targeted application.
- Stylize Filters: Some filters, categorized under “Stylize,” are specifically designed for generating cartoon effects. These filters often offer options for enhancing the cartoon look through tools like “Emboss” or “Stylize” options, which help create a characteristic cartoon style.
- Blur Filters: Filters like Gaussian Blur, Motion Blur, and others, when applied strategically, can create the softness and simplification often found in cartoon images. For example, strategically blurring areas can suggest volume and depth, a common characteristic of cartoons.
- Color Adjustments: Tools like “Hue/Saturation,” “Vibrance,” and “Color Balance” allow for precise color manipulation. These are fundamental for achieving the specific color palettes and vibrancy that are common in cartoon aesthetics. For example, a muted palette might evoke a classic cartoon style, while a vibrant one might create a more modern or stylized feel.
Comparison of Tools
| Tool | Strengths | Weaknesses |
|---|---|---|
| Pen Tool | Precision in outlining, vector-based scalability | Time-consuming for complex shapes, requires precision |
| Eraser Tool | Control over hard or soft edges, removal of unwanted details | Potential for over-correction, not suitable for all shapes |
| Adjustment Layers | Non-destructive editing, flexibility for iterations | Requires understanding of parameters, potential for over-saturation |
| Stylize Filters | Quick application of cartoon effects | Limited control over specific aspects, may produce undesirable results |
| Blur Filters | Creation of softness, depth, and simplification | Overuse can lead to loss of detail |
Adjusting Image Color and Tone
Transforming a photo into a cartoon style often hinges on manipulating colors and tones. This involves understanding how adjustments affect the overall aesthetic and choosing palettes that align with the desired cartoon look. Mastering these techniques will enable you to fine-tune your photo’s transformation into a distinctive cartoon rendering.Adjusting hues, saturations, and brightness levels is crucial for achieving a specific cartoon style.
These adjustments can create vibrant, exaggerated colors, or muted, simplistic tones, depending on the effect you aim for. Understanding the interplay between these elements allows you to precisely control the visual impact of your cartoon image.
Color Palette Selection for Cartoon Images
Choosing appropriate color palettes is essential for establishing the mood and style of a cartoon image. A carefully selected palette can dramatically enhance the overall visual appeal. Cartoon styles often feature bold, contrasting colors or subdued, pastel tones. For example, a whimsical cartoon might use bright, saturated colors, while a more serious or nostalgic cartoon might utilize muted, desaturated tones.
Want to know how to transform a regular photo into a quirky cartoon in Photoshop? First, you need a solid grasp of the software’s tools and features. Understanding the fundamentals of Adobe Photoshop is crucial for this process. For a complete beginner’s guide on what Adobe Photoshop actually is, check out this resource: What Is Adobe Photoshop?
A Beginner’s Guide. Once you’re familiar with the interface and essential tools, you’ll be well-equipped to tackle the various techniques for creating a cartoon effect from your photos.
Color Adjustments and Their Effects
The following table demonstrates how various color adjustments impact a cartoon image.
| Color Adjustment | Effect on Image |
|---|---|
| Increased Saturation | Makes colors more vibrant and intense, often enhancing the cartoonish look. |
| Decreased Saturation | Makes colors less vibrant, often leading to a more subdued or muted cartoon aesthetic. |
| Increased Brightness | Makes the image brighter, highlighting details and potentially increasing the cartoon’s overall energy. |
| Decreased Brightness | Makes the image darker, potentially creating a more dramatic or moody cartoon effect. |
| Hue Shift | Changes the color tone of the image, allowing for experimentation with different color schemes and cartoon aesthetics. |
| Color Balance Adjustments | Adjusts the balance between red, green, and blue channels, creating a specific color temperature and tone. |
Techniques for Altering Hues, Saturations, and Brightness Levels
Photoshop offers various tools for adjusting hues, saturations, and brightness levels. The Hue/Saturation adjustment layer is a powerful tool for precisely controlling these parameters. This layer allows for independent manipulation of hue, saturation, and lightness, giving you precise control over the image’s color characteristics. Another method involves using the Levels adjustment layer. This adjustment layer provides a more granular control over the tonal range, enabling fine-tuning of brightness and contrast.
Adjustments to the brightness and contrast are typically applied with the Brightness/Contrast adjustment layer. This layer allows you to increase or decrease the brightness and contrast of the image, leading to a more cartoon-like rendering.
Simplifying Shapes and Lines
Transforming a photograph into a cartoon involves simplifying complex shapes and contours to achieve a stylized look. This process focuses on extracting the essence of the subject while discarding unnecessary details. A crucial aspect of this simplification is the creation of clean, bold lines that define the cartoon character’s form and features.Effective simplification requires an understanding of basic geometric shapes, like circles, squares, and triangles, to represent the subject’s features and forms.
This approach gives a cartoon its unique character and aesthetic.
Techniques for Simplifying Complex Shapes
Employing a selection tool, such as the Lasso Tool or Pen Tool in Photoshop, is essential for isolating and simplifying complex shapes. These tools allow you to trace the Artikels of objects with precision. By strategically adjusting the selection, you can create simplified versions of complex shapes. Afterward, fill the selection with a solid color to clearly visualize the simplified form.
Creating Clean, Bold Lines
Sharp, bold lines are vital for a recognizable cartoon style. To achieve this, adjust the stroke settings of your selected shapes. Increase the stroke weight and use a hard-edged brush for crisp lines. Experiment with different brush styles and sizes to find the best balance between precision and visual appeal.
Converting Photo Details into Simple Shapes
Photo details, like hair, clothes, and facial features, can be effectively converted into simple shapes. For example, intricate hair can be represented by stylized curves or lines that mimic the overall flow. Clothing can be approximated with basic shapes like rectangles or trapezoids. Facial features, such as eyes and noses, can be simplified using circles, ovals, and triangles, maintaining a sense of proportion and character.
Defining Shapes with Sharp Lines
Defining the simplified shapes with sharp lines enhances the cartoon aesthetic. Use the Pen Tool in Photoshop to draw sharp, defined lines that delineate the shapes. This ensures that the boundaries of each shape are clear and the image maintains its cartoon style. The Pen Tool allows for precise control, creating the clean lines essential to the cartoon effect.
Applying Cartoon Filters and Effects
Transforming a photo into a cartoon often involves using Photoshop’s array of filters and effects. These tools can significantly alter the image’s appearance, mimicking various cartoon styles. Mastering these techniques allows for the creation of diverse cartoon visuals, from the vibrant colors of pop art to the dynamic lines of a comic book.
Photoshop Filters for Cartoonization
Various Photoshop filters contribute to the cartoon look. These tools offer pre-defined effects that can be customized to achieve specific results. Understanding their functions and parameters is crucial for creating a polished cartoon aesthetic.
- Artistic Filters: These filters provide a range of stylized effects, including ‘Chalk & Charcoal’, ‘Watercolor’, ‘Film Grain’, and ‘Plastic Wrap’. They can add texture and visual interest, transitioning the image from a realistic photo to a cartoon-like representation.
- Stylize Filters: These filters concentrate on altering the image’s edges, contours, and overall style. Filters like ‘Find Edges’ and ‘Sharpen’ can be utilized to delineate shapes and enhance the visual impact, resulting in more defined cartoon lines. The ‘Glowing Edges’ filter can create an aura around objects.
- Blur Filters: Blur filters can be used to soften edges and create a smoother, more cartoonish appearance. The ‘Gaussian Blur’ filter, for example, can soften details and provide a subtle cartoon effect, while the ‘Motion Blur’ filter can suggest movement and add a unique visual dimension. Experimenting with different blur values and types is crucial for a varied look.
- Pixelate Filters: These filters alter the image’s resolution by enlarging or shrinking pixels. A pixelated effect can produce a coarse or blocky cartoon style. This filter can emphasize the graphic nature of the cartoon.
Achieving Different Cartoon Styles
Specific filter combinations and adjustments can replicate different cartoon aesthetics. For example, combining a stylize filter with a pixelate filter can create a comic book effect.
- Pop Art: Employing vibrant colors, bold lines, and simplified shapes using the Artistic Filters is key. The ‘Poster Edges’ filter can also be a useful tool to add a pop art look. A high contrast between colors and strong Artikels are also characteristic of this style.
- Comic Book: This style usually involves strong Artikels, shading, and a bold, dynamic look. Combining a stylize filter with a pixelate filter can achieve this. The use of ‘Find Edges’ followed by a ‘Sharpen’ filter can also contribute to a comic book appearance.
- Cartoonish/Animated: A combination of blur filters and artistic filters can create a cartoonish style. The ‘Gaussian Blur’ can soften edges, while the ‘Chalk & Charcoal’ filter can add a sketched appearance. A combination of artistic filters can be used to achieve a more animated style. Experimenting with color saturation and contrast is also vital.
Filter Usage and Examples
| Filter | Description | Suitable Use Cases |
|---|---|---|
| Artistic Filters (Chalk & Charcoal) | Creates a sketched or hand-drawn appearance. | Adding a painterly or illustrative touch to a cartoon. |
| Stylize Filters (Find Edges) | Enhances the Artikel of objects. | Defining the shapes of characters or objects in a cartoon. |
| Pixelate Filters (Mosaic) | Reduces the resolution of the image. | Creating a blocky or coarse cartoon effect. |
| Blur Filters (Gaussian Blur) | Softens the edges of an image. | Creating a smooth, rounded cartoon look or adding depth. |
Creating a Cartoonish Background
A crucial aspect of photo cartoonization is crafting a background that harmonizes with the cartoonized subject and enhances the overall aesthetic. A well-designed background can significantly elevate the image’s impact, guiding the viewer’s eye and setting the mood. This section explores methods for creating complementary and visually appealing backgrounds.Creating a background that effectively complements a cartoonized photo involves careful consideration of style and color palettes.
A simple, yet engaging background can provide a strong contrast or a cohesive visual narrative, depending on the desired outcome. The process involves understanding the character of the cartoon and how the background can amplify or counteract the mood.
Background Styles for Different Themes, How to Turn a Photo into a Cartoon with Photoshop
The background style should complement the subject’s cartoon style. For example, a vibrant, colorful background might suit a playful cartoon, while a muted, minimalist design would better suit a more serious or dramatic scene.
- Playful Cartoons: These often feature bright, saturated colors, bold patterns (like stripes, polka dots, or swirling shapes), and simplified forms. Think of a background with a bright gradient or a repeating pattern of cartoonish flowers or animals. This style conveys a sense of joy and whimsy.
- Serious or Dramatic Cartoons: These often utilize muted color palettes, soft gradients, or a single dominant color to create a sense of depth and atmosphere. Consider a background with a subtle gradient of blues and purples, or a dark backdrop with strategically placed highlights to add drama. This style conveys a serious or mysterious tone.
- Sci-Fi or Fantasy Cartoons: These might incorporate futuristic or fantastical elements, such as nebulae, glowing objects, or abstract geometric shapes. A background featuring stylized stars and planets or a space-themed design with shimmering lights would work well.
- Simple and Minimalist Cartoons: These prioritize clean lines, minimal color, and simple shapes. A solid color background, a large-scale geometric pattern, or a plain backdrop with a few strategically placed lines or shapes can effectively complement this style. The focus remains on the cartoon character itself.
Designing Simple and Stylized Backgrounds
Effective background design hinges on the simplification of shapes and the use of contrasting colors. A few key tools and techniques can significantly improve the process.
- Shape Simplification: Transform complex shapes into simpler, cartoonish forms. Use basic shapes like circles, squares, triangles, or even abstract forms to create a background that complements the character. A curved line could become a simplified arc or a rounded corner.
- Color Palette Selection: Choose a color palette that complements the cartoon character’s colors and the overall mood. Use contrasting colors for emphasis or similar tones for a harmonious look. A color palette with three to four colors is often sufficient for creating a visually engaging background. Consider the saturation and lightness of colors to maintain visual harmony and to amplify the character’s traits.
- Using Layers: Photoshop’s layers feature allows for easy modification and combination of different elements. Create layers for different parts of the background to add depth, create textures, and build layers for visual impact. This technique allows for independent adjustments to each component of the background, enhancing flexibility and control over the final outcome.
Examples of Emotive Backgrounds
The right background can effectively communicate the intended mood.
- Joyful Background: A background with vibrant colors and a whimsical design, such as a field of flowers in bright hues or a playful pattern of stars. The background evokes a sense of fun and lightness.
- Mysterious Background: A dark background with a few strategically placed highlights, such as a gradient of deep blues and purples or a night sky with a moon. The background sets a sense of intrigue and mystery.
Adding Details and Finishing Touches
Bringing a photo to life as a cartoon involves more than just simplifying shapes and applying filters. The final touches, subtle yet impactful, elevate the image from a basic cartoon to a polished piece of artwork. Adding details, shadows, and highlights, while maintaining a consistent style, is crucial to achieve a visually appealing and engaging cartoon rendition.
Adding Subtle Details
Adding subtle details, such as eyelashes, wrinkles, or clothing textures, significantly enhances the cartoon’s realism and expressiveness. These small elements bring depth and personality to the character, moving beyond a mere representation and toward a compelling illustration. Carefully chosen details should not disrupt the overall cartoon style but should complement it, adding interest without being overly complex. A simple line to indicate a shirt collar, or a few short strokes to define hair, can drastically improve the final product.
Creating Shadows and Highlights
Shadows and highlights play a vital role in giving form and dimension to a cartoon character. A well-placed shadow can define the contours of an object, while a strategic highlight can draw attention to specific features. These elements should be subtle and in keeping with the cartoon style. Avoid harsh, realistic shadows, instead opting for softer, more stylized variations that complement the overall design aesthetic.
A slight darkening under the chin or a small highlight on the cheek can significantly enhance the image.
Maintaining Consistency in Style and Detail
Maintaining a consistent style is essential for creating a cohesive and visually appealing cartoon. This means ensuring that the details you add follow the same aesthetic principles as the rest of the image. If the character has exaggerated eyes, for example, the eyelashes should also reflect that exaggerated style, not a realistic portrayal. The overall style should be consistent from the simplification of the shapes to the finishing details, ensuring a unified aesthetic.
Consider the overall tone and theme of the cartoon when making these decisions.
Elements to Consider for Finishing Touches
- Hair and Clothing Details: Pay attention to the hair style, clothing folds, and textures. Consider the character’s personality and the context of the scene. A messy bun on a mischievous character might contrast with a neatly styled hairdo on a sophisticated one. Clothing wrinkles should complement the character’s pose and action.
- Facial Features: Pay attention to the character’s facial expressions. Subtle details like a slight frown or a raised eyebrow can enhance the character’s emotions and personality. Consider the eyes, nose, and mouth; ensure they align with the cartoon style.
- Background Integration: The background should complement the character. Consider adding small, subtle elements to the background that subtly interact with the character, without detracting from the main subject.
- Color Palette: Maintain consistency in the color palette. The colors used for highlights, shadows, and details should align with the overall color scheme of the cartoon. A harmonized palette enhances the aesthetic appeal of the image.
- Overall Composition: Review the entire image to ensure that the added details contribute to the overall composition and balance. The addition of details should improve the visual appeal, not disrupt it.
Common Mistakes and Troubleshooting
Converting photos to cartoons can sometimes lead to unexpected results. Understanding common pitfalls and troubleshooting strategies can significantly improve the quality of your cartoonized images. This section details potential errors and provides solutions to help you achieve a polished final product.Troubleshooting effectively involves recognizing the source of the problem. By identifying the specific area where an error occurs, you can implement targeted corrections, thus maintaining the overall aesthetic quality of the cartoon.
Incorrect Selection of Cartoonization Tools
Choosing the wrong tools can significantly impact the final outcome. Some tools are better suited for specific effects than others. For example, using a tool designed for sharpening might introduce harsh lines that are undesirable in a cartoon style. Conversely, using a tool designed for smoothing might lead to a loss of detail and texture. Carefully consider the intended effect and select tools that align with the desired outcome.
Overuse of Filters and Effects
While filters and effects can enhance a cartoon image, applying too many can lead to a cluttered or artificial look. Overusing filters can diminish the natural appeal of the image and create an unbalanced composition. Start with a few key filters and gradually add more, evaluating the impact at each step. A balanced approach is crucial for maintaining a visually appealing result.
Inadequate Color Adjustment
Incorrect color adjustments can alter the intended cartoon aesthetic. For instance, an image might appear flat or washed out if the colors aren’t properly adjusted. Ensuring consistent color profiles and understanding how different color adjustments interact with the cartoon style is essential for a harmonious result.
Turning a photo into a cartoon in Photoshop involves several steps, many of which rely heavily on understanding how layers work. A solid grasp of Photoshop’s layering system, as detailed in Understanding Layers in Photoshop: A Simple Explanation , is crucial for achieving a smooth and effective cartoon conversion. Knowing how to manipulate and combine layers will significantly impact the final result of your cartoon photo transformation.
Misinterpretation of Shape Simplification
Simplifying shapes is a key aspect of cartooning. However, oversimplification can result in an image that lacks detail and appears generic. Maintaining essential details while streamlining the shapes is crucial for a balanced cartoon representation. Consider the underlying subject matter and retain essential features to maintain a recognizable form.
Problems with Background Integration
Integrating a background can be challenging. A poorly integrated background can distract from the subject and negatively impact the overall visual appeal. A background that doesn’t complement the cartoon style can result in an image that looks out of place. Choose a background that harmonizes with the cartoon style and maintains a cohesive look.
Troubleshooting List
- Problem: Harsh lines in the cartoonized image. Solution: Reduce the sharpening effect or use a smoother filter to refine the lines.
- Problem: Flat or washed-out colors. Solution: Adjust the color balance, saturation, and contrast to achieve a more vibrant and lively cartoon aesthetic.
- Problem: Overly simplified shapes that lack detail. Solution: Retain essential details and features, avoiding excessive simplification.
- Problem: Poorly integrated background. Solution: Choose a background that complements the cartoon style and maintains a cohesive look, ensuring the background does not overshadow the subject.
- Problem: Too many filters applied. Solution: Start with a few key filters and gradually add more, carefully evaluating the impact at each step.
Different Cartoon Styles and Examples
Transforming a photograph into a cartoon involves more than just applying filters. Different cartoon styles evoke distinct moods and visual characteristics. Understanding these styles allows for a more nuanced approach to photo cartoonization, moving beyond a generic “cartoon” look. This section explores various styles and the techniques to achieve them in Photoshop.
Cartoon Styles and Their Characteristics
Various cartoon styles offer distinct visual appeals, from the classic, exaggerated animation look to more stylized and modern interpretations. These styles are defined by specific artistic choices in line weight, color palettes, and shape simplification. Mastering these techniques allows for a more targeted approach, ensuring the output aligns with the desired aesthetic.
Examples of Cartoon Styles
- Classic Animation Style: This style often features large, exaggerated eyes, wide grins, and simplified shapes. The colors tend to be bright and bold, with a focus on strong contrasts between light and dark areas. Imagine the characters from Looney Tunes or Disney cartoons; these are prime examples of this style. Character features are emphasized, and backgrounds are generally simple, allowing the characters to stand out.
- Comic Book Style: Comic book cartoons frequently use thick, black Artikels around figures. Colors are vibrant and often limited to a palette that enhances the story’s mood or theme. This style is characterized by dynamic poses and a strong sense of action or narrative. The use of speech bubbles and panel layouts is essential to the style. Consider comic books like Marvel or DC as illustrative examples.
- Manga Style: Manga cartoons often feature distinct character designs, with exaggerated eyes, large heads, and unique hairstyles. Color palettes are varied, and the overall aesthetic is visually captivating. The style emphasizes detailed character expressions and often utilizes specific shading techniques to convey emotion. Anime, a related style, also utilizes similar characteristics. Referencing manga and anime artwork will aid in understanding this style.
- Stylized and Modern Style: This style utilizes a more contemporary approach to cartoonization. Shapes and forms may be simplified, but the emphasis is on creating a unique visual language. Colors can be bold, muted, or a blend of both. The emphasis is on a particular aesthetic rather than mimicking classic cartoon aesthetics. Modern illustrations and digital art often demonstrate this style.
Adapting Techniques for Specific Cartoon Looks
Achieving a specific cartoon look requires adjusting several techniques within Photoshop. The approach depends on the style’s characteristics. For example, creating a comic book style involves increasing line weight and employing a limited color palette. A manga style requires specific shading techniques and detailed character design.
Table of Cartoon Styles
| Cartoon Style | Illustrative Image Description |
|---|---|
| Classic Animation | A character with large eyes, exaggerated features, and bold colors, evoking a familiar cartoon character. |
| Comic Book | A character with thick black Artikels, dynamic pose, and vibrant colors, suggestive of a comic book panel. |
| Manga | A character with large eyes, expressive face, and detailed hairstyle, reminiscent of a manga or anime character. |
| Stylized and Modern | A character with simplified shapes, unique color palette, and a contemporary aesthetic, highlighting the style’s individuality. |
Last Point: How To Turn A Photo Into A Cartoon With Photoshop
This comprehensive guide to photo cartoonization using Photoshop equips you with the knowledge and skills to create visually engaging cartoon images. By mastering the techniques Artikeld, you can transform ordinary photos into extraordinary cartoon artworks. Remember to experiment with different styles and effects to develop your own unique artistic vision.
FAQ Insights
What software is needed for this tutorial?
Adobe Photoshop is required.
Can I use this tutorial for personal projects?
Absolutely, feel free to use the knowledge and techniques learned in this tutorial for your personal creative projects.
Are there any specific file formats recommended for input photos?
Any common image format like JPG, PNG, or TIFF should work well.
What if I encounter a problem during the process?
Refer to the “Common Mistakes and Troubleshooting” section for guidance on resolving issues that might arise.


