How to sharpen images in Photoshop is a crucial skill for any image editor. This guide dives deep into various sharpening techniques, from the fundamental Unsharp Mask to the advanced Smart Sharpen filter. Understanding image details and the nuances of resolution are key to achieving optimal results.
We’ll explore the specifics of each method, highlighting their strengths and weaknesses, and how to select the best approach for different image types and desired outcomes. From portraits to landscapes, this comprehensive guide provides a tailored strategy for every situation.
Introduction to Image Sharpening in Photoshop
Image sharpening in Photoshop is a crucial technique for enhancing the detail and clarity of digital images. It’s often used to boost perceived sharpness, particularly in images that have lost some detail during capture or editing. Various methods exist, each with its own set of advantages and disadvantages. Understanding these techniques and their impact on image quality is essential for achieving optimal results.
Sharpening Techniques Overview
Photoshop offers several methods for sharpening images, each with distinct characteristics. Understanding the differences between these techniques is key to choosing the right approach for a specific image. Unsharp Mask, for example, is a classic method that can create a noticeable, often artificial, edge enhancement. Other methods, like Smart Sharpen, offer more nuanced control over the sharpening process, often providing more natural results.
Comparison of Sharpening Methods
The effectiveness of different sharpening techniques depends on the specific image characteristics and the desired outcome. This table provides a concise overview of common methods and their strengths and weaknesses.
| Method | Strengths | Weaknesses |
|---|---|---|
| Unsharp Mask | Fast and easy to use; provides a significant boost in sharpness; relatively straightforward to adjust. | Can introduce noticeable artifacts, especially halos and edges; less control over the sharpening process; may oversharpen, leading to a harsh look. |
| Smart Sharpen | More control over the sharpening process; less likely to introduce artifacts; preserves image quality better than Unsharp Mask. | Slightly more complex to use; potentially less effective at increasing sharpness compared to Unsharp Mask in some cases; may require more experimentation to achieve the desired result. |
| High-Pass Filter | Provides more precise control over edge enhancement. Can be used to selectively sharpen certain areas of the image. | Requires more technical understanding and skill to use effectively. Can be challenging to achieve a natural-looking result. |
Image Resolution and Quality Considerations
The quality of an image significantly impacts the results of sharpening. A high-resolution image, rich in detail, will respond better to sharpening techniques than a low-resolution image with less detail. Attempting to sharpen a low-resolution image will likely amplify noise and imperfections rather than enhancing details. Furthermore, the original image’s quality before sharpening is crucial. Images with significant noise or artifacts are less likely to benefit from sharpening and may worsen when processed.
Consider the source image’s quality before applying sharpening techniques.
Understanding Image Details and Sharpness

Image sharpness isn’t a singular property; it’s a composite effect derived from various image elements. Understanding these elements is crucial for effective sharpening techniques in Photoshop. This section delves into the contributing factors, from contrast to noise, providing a comprehensive view of image detail.Image sharpness is perceived through a combination of factors that interact with each other. The clarity of fine details, the crispness of edges, and the overall contrast within the image all contribute to the overall perception of sharpness.
Effectively sharpening an image involves a careful understanding and manipulation of these individual elements.
Image Detail and Perceived Sharpness, How to sharpen images in Photoshop
Image detail encompasses the subtle variations in tones and textures across the image. Sharpness, therefore, is a result of the interplay between these details and the surrounding elements. A high degree of contrast between adjacent areas and well-defined edges contribute significantly to the perception of sharpness.
Contrast and Edge Definition
Contrast is the difference in luminance between adjacent areas in an image. Higher contrast generally leads to a sharper appearance, as the distinct differences between light and dark areas provide visual separation and definition. Edge definition, related to contrast, refers to the sharpness of transitions between different tones or colors. Well-defined edges contribute significantly to the impression of detail and sharpness.
Impact of Noise on Sharpness
Noise, random variations in pixel values, can obscure fine details and detract from perceived sharpness. High levels of noise create a grainy appearance that diminishes the clarity of subtle details, making the image look less sharp. Mitigating noise is an important step in image sharpening.
Assessing Image Detail for Sharpening
Proper assessment of image detail before applying sharpening filters is essential. This allows for the selection of appropriate sharpening techniques and parameters, optimizing the results. A well-executed assessment helps to avoid over-sharpening, which can lead to undesirable artifacts.
| Step | Action | Description |
|---|---|---|
| 1 | Visual Inspection | Carefully examine the image for areas with subtle details and edges. Note the presence of noise. |
| 2 | Contrast Analysis | Evaluate the difference in tones between adjacent regions. Identify areas with low contrast and potential need for contrast enhancement. |
| 3 | Edge Detection | Assess the sharpness of transitions between different colors or tones. Identify areas with soft or blurry edges. |
| 4 | Noise Evaluation | Determine the level of noise present. High noise levels will affect the perceived sharpness and clarity of the image. |
| 5 | Determination of Sharpening Method | Based on the analysis, choose the sharpening method most suitable for the image’s characteristics. |
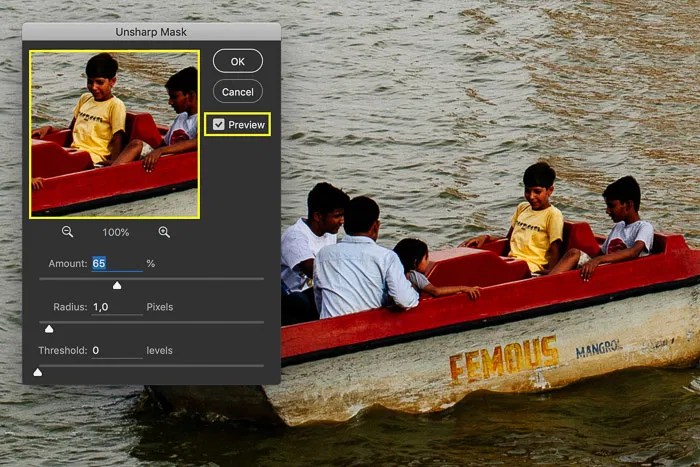
Applying Unsharp Mask: How To Sharpen Images In Photoshop
The Unsharp Mask filter is a popular technique for enhancing the sharpness of images in Photoshop. It works by creating a high-pass filter effect, amplifying the contrast between the edges of details and the surrounding areas. This process can significantly improve the perceived sharpness and clarity of an image, making fine details stand out more prominently. This filter is particularly effective for images that lack a crisp look, enhancing the details without overly harsh results.
Step-by-Step Application
The Unsharp Mask filter allows for a degree of customization to optimize results. Following these steps ensures you achieve the desired level of sharpness effectively.
- Select the Unsharp Mask filter from the Filter menu. This will open the Unsharp Mask dialog box.
- Adjust the Amount slider. This controls the intensity of the sharpening effect. A low value typically produces a subtle enhancement, while a higher value can result in a more pronounced, potentially harsh, sharpening. Begin with a moderate setting and adjust incrementally.
- Adjust the Radius slider. This determines the width of the area around the edges that are sharpened. A smaller Radius is suitable for images with smaller details, preventing the blurring of fine details. Larger Radius values will affect larger areas and are suitable for coarser details or textures.
- Adjust the Threshold slider. This slider controls the sensitivity of the filter. A higher Threshold value will sharpen areas with greater contrast, potentially causing haloing or artifacts. A lower value will sharpen more subtle details and edges.
- Click OK to apply the filter. Evaluate the results and adjust the settings as needed.
Optimizing Settings
Careful adjustment of the Amount, Radius, and Threshold values is crucial for achieving optimal results. The following guidelines offer insights into achieving a balanced level of sharpness without artifacts.
- Amount: Begin with a low Amount value, then incrementally increase it until you achieve the desired sharpness. Overuse can lead to a harsh and unnatural look. Start low and gradually increase the Amount until you notice the desired level of sharpening.
- Radius: Use a low Radius for images containing fine details. A smaller Radius will sharpen the finer elements without affecting the overall smoothness of the image. For instance, if sharpening a portrait, a low Radius will focus on the eyes, lips, and other subtle features without blurring the overall image quality. Higher values will increase the sharpness of larger features, but may also create undesirable artifacts.
Experiment with different values to achieve the best result for the image.
- Threshold: A higher Threshold value can create haloing around edges. Begin with a low Threshold and incrementally increase it to sharpen only the most pronounced details. If you encounter haloing, reduce the Threshold value.
Suitable Scenarios
Unsharp Mask is an effective sharpening tool in various situations.
- Improving image clarity: This filter can significantly enhance the clarity of images, particularly those that appear soft or lack sharpness.
- Enhancing fine details: A low Radius value is especially useful for bringing out intricate details in images like portraits or photographs with small elements.
- Increasing perceived sharpness: It is often used to improve the overall impression of sharpness, making the image appear more crisp and detailed.
- Balancing sharpness with detail: Adjusting the settings carefully allows for the enhancement of image sharpness while preserving the integrity of the fine details.
Utilizing Smart Sharpen
Smart Sharpen is a sophisticated image sharpening filter in Photoshop, offering a more controlled and often superior alternative to the traditional Unsharp Mask. It’s designed to enhance detail while minimizing the introduction of artifacts, making it a valuable tool for a wide range of image editing tasks. It leverages a more intelligent approach to sharpening, making it a powerful option for professional and amateur photographers alike.Smart Sharpen boasts several advantages over Unsharp Mask.
It’s inherently more user-friendly, with intuitive controls and an automatic noise reduction feature. This streamlined approach allows for faster and more predictable results, which is particularly beneficial when working with complex images.
Features and Advantages of Smart Sharpen
Smart Sharpen provides a nuanced approach to sharpening, adjusting the image based on local contrast and detail density. This targeted approach ensures that subtle details are enhanced without introducing harsh artifacts. The filter’s intelligent noise reduction effectively minimizes the risk of introducing undesirable grain or halos, maintaining a clean, sharp result.
Comparison with Unsharp Mask
Unsharp Mask, while a time-tested method, can be prone to introducing noticeable halos or edge enhancement artifacts. Smart Sharpen’s intelligent noise reduction and adaptive sharpening algorithms address these shortcomings. Furthermore, the automated sharpening of Smart Sharpen is more versatile and generally yields superior results, particularly when dealing with images containing a variety of detail levels.
Amount and Radius Settings
The Amount setting in Smart Sharpen controls the intensity of the sharpening effect. A lower amount results in a subtle enhancement, while a higher amount can yield a more dramatic result. The Radius setting determines the area of the image affected by the sharpening process. A smaller radius will sharpen smaller details more precisely, while a larger radius affects larger areas of the image.
Experimentation with these settings is key to achieving the desired level of detail enhancement. For example, if a user needs to enhance the texture of a rough surface in an image, they might choose a higher Amount and Radius to effectively sharpen the surface’s details. Conversely, a lower Amount and Radius would be better suited for sharpening smaller, intricate details without overemphasizing them.
Noise Reduction in Smart Sharpen
Smart Sharpen’s intelligent noise reduction system is designed to detect and mitigate noise without affecting the desired details. This built-in feature is especially beneficial when working with images that contain noise or grain, as it can significantly improve the image’s clarity and overall quality. This automated noise reduction function minimizes the need for manual adjustments, saving time and effort.
Sharpening Specific Image Elements
Fine-tuning image sharpness is crucial for a professional-looking result. While global sharpening methods like Unsharp Mask and Smart Sharpen are valuable, they often introduce undesirable artifacts if applied indiscriminately across the entire image. This section details techniques for sharpening specific image elements, enabling precise control over the level of sharpness for different parts of the image.Selective sharpening allows for greater control over the appearance of various image components.
By targeting specific details, textures, and edges, photographers can achieve a more balanced and visually appealing result without the oversharpening that can detract from the overall image quality. This method emphasizes the need for local adjustments to achieve a tailored and nuanced level of sharpening.
Methods for Sharpening Specific Image Elements
Local adjustments are key to targeted sharpening. Photoshop provides tools that allow you to apply different levels of sharpening to various parts of an image. This allows you to emphasize specific elements while maintaining a natural look in other areas.
- Edge Sharpening: The edges of objects are crucial for clarity and depth. Using a high-pass filter or the Unsharp Mask with a smaller radius and high amount will focus on these edges. For instance, a high-pass filter can be particularly useful for images with sharp, defined edges. A high amount and a small radius will affect only the edges, leaving the rest of the image untouched, enhancing the overall image clarity.
- Texture Sharpening: Textures add depth and visual interest to an image. To sharpen textures without over-sharpening the edges, use a smaller radius and moderate amounts in the Unsharp Mask or Smart Sharpen filters. Adjusting the feathering and radius of the filters helps control the level of sharpening. For example, a high-resolution image of a fabric texture will benefit from targeted sharpening to enhance the intricate weave details without blurring the overall image.
- Fine Detail Sharpening: Fine details, such as hair strands or small objects, require delicate handling. Use the Smart Sharpen filter with a low amount and a small radius. A smaller radius is crucial for targeting these fine details while minimizing any unwanted artifacts or blurring.
Importance of Local Adjustments for Targeted Sharpening
Local adjustments are paramount for achieving targeted sharpening. They allow for the application of different sharpening parameters to various parts of the image. This nuanced approach helps avoid oversharpening, which can lead to a harsh, unnatural look.
- Masking: Using masks enables precise control over where sharpening is applied. A mask allows for a gradual transition between areas of high and low sharpening. For instance, you can use a mask to apply higher sharpening to specific parts of a portrait while keeping the background less sharpened. This approach allows for a focused and tailored look.
- Graduated Filters: Graduated filters offer a smooth transition of sharpening across an image. They are useful for gradually sharpening an area of the image, such as a landscape where the foreground is more detailed than the background. For example, a landscape image might benefit from a graduated filter to enhance the sharpness of the foreground details while maintaining a softer focus on the distant background elements.
Learning to sharpen images in Photoshop is a crucial skill for any photographer. To get started, understanding the fundamental tools and techniques within Photoshop is essential. For a comprehensive overview of the software itself, check out this helpful beginner’s guide: What Is Adobe Photoshop? A Beginner’s Guide. This knowledge will empower you to confidently use sharpening tools like the Unsharp Mask filter to optimize your images.
- Radial Filters: Radial filters are helpful for sharpening a specific area within the image. This approach can be used for portraits to sharpen the subject’s face while keeping the background less sharpened. This can also help isolate details in an image, like an eye in a portrait.
Sharpening Scenarios
The following table demonstrates various scenarios for sharpening specific image elements and the optimal approach for each.
| Image Element | Sharpening Technique | Parameters (Example) | Rationale |
|---|---|---|---|
| Edges of a building | Unsharp Mask | Radius: 0.5, Amount: 150, Threshold: 1 | High edge sharpness without affecting surrounding areas |
| Texture of a fabric | Smart Sharpen | Amount: 50, Radius: 1.5, Detail: 100 | Preserves details while maintaining natural appearance |
| Hair strands in a portrait | Smart Sharpen | Amount: 20, Radius: 0.5, Detail: 150 | Preserves fine details without introducing harshness |
Avoiding Over-Sharpening

Over-sharpening is a common pitfall in image editing. While sharpening enhances detail, excessive sharpening can introduce undesirable artifacts and negatively impact the overall image quality. Understanding the risks and implementing preventative measures is crucial for achieving optimal results.Over-sharpening often manifests as visible artifacts, such as halos or harsh edges around details. This degrades the image’s natural appearance, detracting from its realism and aesthetic appeal.
Recognizing these signs and implementing techniques to avoid them is essential for maintaining a high level of image quality.
Recognizing Over-Sharpening
Over-sharpening can be recognized by a variety of visual cues. The appearance of halos around sharp edges or textures is a strong indicator. These halos are often lighter or darker than the surrounding area, creating an unnatural and distracting effect. Additionally, excessively sharp images may exhibit a pixelated or grainy appearance, particularly in smooth areas. These signs point to an excessive sharpening application.
Mitigating Over-Sharpening
A crucial aspect of image sharpening is understanding the appropriate level of sharpening. Excessive sharpening introduces artifacts that diminish image quality. Employing a gradual approach is essential. Start with a moderate sharpening amount and progressively adjust the settings, evaluating the image’s response after each adjustment. Regularly assess the image for halos and other artifacts to maintain control during the process.
Preventing Loss of Image Quality
Maintaining the original image quality during the sharpening process is a top priority. The goal is to enhance detail without compromising the image’s overall smoothness and natural appearance. A gradual approach, testing and evaluating the results at each step, is essential to avoid over-sharpening. Using lower sharpening amounts is often more effective than applying higher amounts repeatedly.
This iterative approach minimizes the risk of compromising the original image’s quality.
Evaluating and Adjusting Sharpening Settings
A step-by-step procedure for evaluating and adjusting sharpening settings to avoid over-sharpening is presented below:
- Begin with a low sharpening value, typically 25-50% of the maximum recommended value, and gradually increase it if needed. Observe the effect on the image’s details.
- Assess the image closely for halos or other artifacts. Look for unnatural edges or a grainy appearance, particularly in smooth areas. Halos around sharp edges are a key sign of over-sharpening.
- If halos or artifacts appear, reduce the sharpening amount. Experiment with different sharpening methods (e.g., Unsharp Mask, Smart Sharpen) to find the best balance for the specific image.
- Evaluate the image at various zoom levels. Over-sharpening can become more noticeable at higher zoom levels. Pay attention to how the sharpening affects the details at these different zoom levels.
- Save intermediate versions of the image to compare the results and ensure you do not overshoot the desired effect. This allows for easy reversion to previous stages if needed.
- If the image shows no significant improvement after multiple attempts, it might be better to avoid further sharpening.
High-Resolution Sharpening
High-resolution images, boasting a wealth of detail, often present unique challenges when it comes to sharpening. The increased pixel density demands a more delicate touch than sharpening lower-resolution images. A careless approach can lead to artifacts and a loss of image quality.A key consideration when sharpening high-resolution images is the need for a measured and refined approach. Simply applying the same sharpening techniques used on lower-resolution images can result in an oversharpened and undesirable outcome.
The sheer volume of data in these images makes the process more susceptible to unintended consequences.
Considerations for High-Resolution Images
High-resolution images, due to their high pixel density, require a meticulous approach to sharpening. The increased detail and fine lines necessitate a careful balance to avoid harsh artifacts or a loss of smoothness. Over-sharpening, in particular, is more problematic with high-resolution images. The additional detail accentuates these artifacts, making the image appear more pixelated. This is a critical consideration when dealing with high-resolution images.
Reduced Sharpening Amounts
To avoid over-sharpening high-resolution images, a significant reduction in sharpening amounts is crucial. The sharpening algorithms are more effective with a reduced intensity. The finer details in high-resolution images are easily amplified by excessive sharpening. A subtle increase in sharpness is often sufficient to improve the image’s perceived clarity.
Reduced Radius Values
A lower radius value is equally important in sharpening high-resolution images. The radius controls the extent of the sharpening effect. A larger radius will affect a wider area of the image, increasing the potential for over-sharpening and artifacts, particularly noticeable in the fine details of high-resolution images. Using a smaller radius ensures that the sharpening effect is more localized, enhancing only the critical details without impacting the surrounding areas.
Sharpening Techniques for High-Resolution Images
Various techniques are available for sharpening high-resolution images effectively. One effective method is to employ the Smart Sharpen filter, adjusting the amount and radius carefully. The “Smart Radius” feature in Smart Sharpen is useful in high-resolution images as it allows for the sharpening algorithm to adapt to the image’s specifics, providing more targeted results. Another approach is to use the Unsharp Mask filter, but with greatly reduced values for both the “Amount” and “Radius” settings.For instance, a high-resolution image of a landscape might require a sharpening amount of 20-30% and a radius of 0.5-1.0 pixels.
This example demonstrates the significantly lower values needed for high-resolution images compared to lower-resolution ones. A smaller radius value ensures that the sharpening is not overdone and maintains the image’s natural texture. Experimentation and observation are key to finding the optimal settings for a given image.
Sharpening Different Image Types
Optimizing sharpening techniques for various image types is crucial for achieving the best visual results. Different subjects, from portraits to landscapes, require nuanced approaches to avoid over-sharpening, which can lead to artifacts and a loss of natural detail. Understanding these variations is key to producing high-quality images across different genres.Sharpening settings need to be adjusted based on the image content and desired aesthetic.
For example, a portrait might benefit from subtle sharpening to enhance facial features, while a landscape might need more significant sharpening to preserve fine details in the scenery. A careful evaluation of the image’s characteristics and the specific sharpening method is paramount for success.
Portrait Sharpening
Portrait sharpening aims to enhance facial details and skin texture while maintaining a natural appearance. Over-sharpening can lead to a harsh, unrealistic look, whereas insufficient sharpening may result in a soft, blurry appearance. The goal is to find the optimal balance to bring out the subject’s features without introducing artifacts. This typically involves lower sharpening levels and more careful consideration of the sharpening radius to prevent harsh edges around facial features.
Localized sharpening techniques may also be useful in emphasizing certain features, such as eyes or lips.
Landscape Sharpening
Landscape sharpening focuses on preserving fine details and textures within the scenery. High-resolution landscapes often benefit from stronger sharpening to enhance subtle variations in tones and textures. However, careful consideration must be given to avoid introducing harsh edges or artifacts in the sky, clouds, or water. Adjusting the sharpening radius can be crucial to selectively enhance the detail in the foreground, mid-ground, and background of the image without sacrificing overall image quality.
Product Shot Sharpening
Product shots require sharpening techniques that balance detail enhancement with a realistic portrayal of the product. Precise sharpening is important to ensure the product’s features and textures are accurately represented. Too much sharpening can result in a harsh, unnatural look, while insufficient sharpening can make the product appear blurry or less detailed. In product photography, the focus is on clear presentation and highlighting specific details to attract the viewer’s attention.
Sharpening images in Photoshop can be tricky, but mastering blend modes can significantly elevate your results. For example, you could explore how to use blend modes for stunning effects like sharpening, using techniques like overlay or luminosity. Understanding these can provide a unique edge, allowing for more precise control and creative outcomes when fine-tuning your sharpened images. How to Use Blend Modes for Stunning Effects is a great resource for this.
Ultimately, knowing these methods helps you to sharpen images in Photoshop with a more polished and sophisticated approach.
Careful consideration of the sharpening method and settings is critical to achieve a balance between enhancing details and preserving a natural appearance. A good starting point is using Smart Sharpen and adjusting the settings until the desired level of detail is achieved.
Comparison of Sharpening Techniques Across Image Types
| Image Type | Optimal Sharpening Technique | Key Considerations |
|---|---|---|
| Portraits | Subtle sharpening, localized sharpening | Natural appearance, avoid harsh edges, maintain skin smoothness |
| Landscapes | Stronger sharpening, selective sharpening | Preserving fine details, avoiding artifacts in sky/water |
| Product Shots | Precise sharpening, maintaining realism | Highlighting features, avoiding harshness, maintaining natural texture |
Preserving Image Quality
Maintaining the integrity of an image’s quality is paramount in image sharpening. While sharpening enhances visual appeal, the process can also introduce artifacts and degrade the overall image if not handled carefully. Understanding the interplay between sharpening and image compression is crucial to preserving a high-quality output.
Importance of Maintaining Image Integrity
Sharpening, though enhancing details, can inadvertently introduce noise or distortions. This is especially true with aggressive sharpening techniques. Preserving image integrity means maintaining the original image’s subtle details and textures, preventing the introduction of artificial or exaggerated elements that don’t exist in the original data. A sharpened image that retains its natural characteristics is a more pleasing and accurate representation of the original subject.
Relationship Between Sharpening and Image Compression
Image sharpening and compression are closely related. Image compression algorithms often involve discarding or reducing image data to reduce file size. Sharpening, if applied after compression, can amplify any existing compression artifacts, leading to a noticeable reduction in quality. Applying sharpening
before* compression is generally a better practice, as it allows for the preservation of more detail in the original data, minimizing the negative impact of subsequent compression.
Minimizing Image Degradation During Sharpening
Several techniques can help mitigate the risk of image degradation during sharpening. Using a lower sharpening radius and strength are fundamental steps. These parameters control the extent of the sharpening effect, allowing for a more controlled and less aggressive application.
Techniques for Preserving High-Resolution Images
When dealing with high-resolution images, it’s vital to approach sharpening with caution. Applying excessive sharpening can create a “noisy” or “artificial” appearance. Employing a graduated sharpening approach, starting with low intensity and progressively increasing it if necessary, can help prevent over-sharpening and preserve details effectively. It is often advantageous to sharpen in multiple, small steps rather than one large, potentially damaging step.
Considerations for Different Image Types
Different image types require different sharpening approaches. Images with a high level of detail, such as portraits or photographs with intricate textures, might benefit from more targeted sharpening, avoiding the introduction of artifacts. Images with lower detail, such as graphics or illustrations, may require less aggressive sharpening to prevent unwanted effects. An understanding of the original image content is key to selecting the appropriate sharpening strategy.
Image Sharpening Workflow
A well-defined workflow for sharpening images in Photoshop ensures consistent results and preserves image quality. Understanding the nuances of each step is critical for achieving optimal sharpness without introducing artifacts or over-sharpening. This workflow is adaptable to various image types and resolution requirements.A robust sharpening workflow begins with a careful assessment of the image’s characteristics. Factors like the image’s original resolution, subject matter, and desired aesthetic play a crucial role in determining the appropriate sharpening technique.
A tailored approach ensures the best possible outcome.
Initial Assessment and Preparation
Careful evaluation of the image is paramount before any sharpening is applied. Understanding the image’s characteristics dictates the appropriate sharpening method.
- Image Resolution Analysis: Determine the original resolution of the image. High-resolution images generally require less aggressive sharpening compared to low-resolution ones. A lower resolution image will require more attention and care.
- Subject Matter Examination: Consider the subject matter. Smooth textures, like skin or fur, may benefit from different sharpening techniques compared to sharp, detailed elements like foliage or architecture.
- Desired Aesthetic Evaluation: Determine the desired aesthetic. A more subtle sharpening approach might be preferred for a natural look, while a more aggressive approach could be necessary for a sharper, crisper aesthetic.
- Reviewing the Original File: Examining the original file, especially the metadata, provides insight into the image’s source and intended use, further aiding in tailoring the sharpening process.
Applying the Unsharp Mask
The Unsharp Mask is a fundamental sharpening tool. Understanding its parameters is key to achieving a balanced and natural look.
- Setting Radius: The radius determines the width of the sharpening effect. A smaller radius will sharpen finer details, while a larger radius will affect broader areas. Experimentation is crucial to find the optimal balance.
- Setting Amount: The amount controls the intensity of the sharpening. A lower amount creates a subtle effect, while a higher amount will introduce more sharpness. Careful adjustment is important.
- Setting Threshold: The threshold determines the minimum level of contrast needed to apply sharpening. This helps prevent sharpening from being applied to areas with little contrast. This parameter is useful for avoiding excessive noise amplification.
Utilizing Smart Sharpen
Smart Sharpen offers a more controlled and less destructive method of sharpening. Its adaptive sharpening algorithm helps maintain image detail and reduce the risk of over-sharpening.
- Adjusting Radius and Detail: Adjusting the Radius and Detail parameters controls the sharpness and fine detail preservation.
- Utilizing Amount: The Amount parameter controls the overall sharpening strength, requiring careful consideration.
- Selecting the Right Method: Choosing the right method from the dropdown menu, based on the image and desired effect, is critical. This selection influences the algorithm’s behavior.
Sharpening Specific Image Elements
Targeted sharpening can be used to enhance specific parts of an image, such as details in the foreground or background.
- Using Masks: Employing layer masks allows for selective sharpening. This method enables you to isolate the specific elements for precise adjustments.
- Adjusting Sharpening Parameters: Adjust the parameters of sharpening tools (Unsharp Mask, Smart Sharpen) as needed, depending on the specific elements being sharpened.
Avoiding Over-Sharpening
Over-sharpening can lead to harsh artifacts and a loss of image quality. A gradual and iterative approach is essential to maintain image integrity.
- Reviewing the Image: Regularly assess the image for any unwanted artifacts after each sharpening step.
- Adjusting the Intensity: Reduce the sharpening intensity if necessary to avoid over-sharpening.
- Employing a Subtle Approach: A gradual approach, rather than applying a large sharpening adjustment in a single step, is essential to ensure image quality.
End of Discussion
In conclusion, mastering image sharpening in Photoshop involves understanding the intricacies of different techniques and adapting your approach to the specific needs of your image. By meticulously considering factors like image resolution, detail, and desired level of sharpness, you can transform your images into polished masterpieces. This guide equips you with the knowledge and tools to achieve professional-grade results, ensuring your images stand out.
Q&A
What’s the best sharpening method for high-resolution images?
For high-resolution images, use a lower Amount and Radius value with Smart Sharpen to avoid artifacts without sacrificing sharpness. Avoid heavy sharpening, which can introduce unwanted noise and blur.
How can I avoid over-sharpening?
Regularly evaluate your sharpening settings and watch for artifacts like halos or edges that are too harsh. Gradually adjust settings to find the balance between sharpness and natural detail.
What is the role of contrast in image sharpness?
Higher contrast generally leads to a sharper look. Understanding and managing contrast is crucial when sharpening, as it directly impacts the perceived sharpness of details.
How do I sharpen specific elements in an image?
Use a combination of adjustment layers, masking, and selective sharpening techniques. This allows you to apply different degrees of sharpening to various parts of the image, ensuring a more targeted and precise enhancement.


