GIMP, the powerful and versatile open-source image editor, is a fantastic alternative to expensive professional software like Photoshop. It boasts a comprehensive set of tools, from basic image manipulation to advanced techniques like compositing and masking. GIMP’s user-friendly interface and extensive support resources make it accessible to both beginners and experienced users. This guide will explore its capabilities, covering everything from installation to advanced techniques.
Whether you’re a seasoned graphic designer or a student just starting out, GIMP offers a powerful solution for all your image editing needs. Its flexibility allows you to tackle a wide array of tasks, from simple adjustments to complex design projects. It’s also a fantastic choice for those looking for a cost-effective and feature-rich alternative to proprietary software.
Introduction to GIMP
GIMP, or the GNU Image Manipulation Program, is a powerful and versatile free and open-source image editing software. It provides a comprehensive set of tools for manipulating various image formats, from basic adjustments to complex retouching and compositing tasks. Its flexibility and extensibility make it a popular choice for both casual users and professional graphic designers.GIMP’s robust feature set and user-friendly interface make it a viable alternative to proprietary image editing software like Adobe Photoshop.
Its wide array of capabilities encompasses tasks ranging from simple image adjustments to advanced photo editing and graphic design. The program’s commitment to accessibility and its extensive online community further contribute to its widespread adoption.
History and Evolution
GIMP’s development began in the early 1990s, driven by a community of developers seeking a free alternative to commercial image editing software. This open-source nature allowed for continuous improvement and adaptation to evolving user needs. Over the years, GIMP has evolved significantly, incorporating new features, enhancing its user interface, and improving performance. Its constant updates and contributions from the community have ensured its continued relevance in the digital imaging landscape.
Key Features
GIMP stands out due to its extensive feature set, often rivaling or exceeding the capabilities of commercial software. Its ability to handle various image formats, adjust colors, and perform sophisticated retouching makes it a comprehensive tool. This versatility allows users to tackle diverse tasks, from simple adjustments to complex projects. Its comprehensive set of tools caters to a broad spectrum of users.
Types of Users
GIMP’s diverse functionalities attract a wide range of users. Students, hobbyists, and professionals alike find value in its capabilities. Professionals appreciate its capabilities for graphic design, web design, and digital art. Hobbyists use it for image enhancement and personal projects. Even beginners find it accessible due to its intuitive interface and extensive documentation.
Comparison to Adobe Photoshop
| Feature | GIMP | Photoshop |
|---|---|---|
| Image Editing Tools | Extensive set of tools, including retouching, color correction, and layer management | Comprehensive set of tools, with advanced options for image manipulation and compositing |
| Image Formats Supported | Wide range of image formats (JPEG, PNG, GIF, TIFF, etc.) | Extensive support for various image formats |
| Cost | Free and Open-Source | Proprietary software, requiring a license fee |
| User Interface | Intuitive interface, with a customizable layout | Well-established interface, known for its professional features |
GIMP’s open-source nature and rich feature set make it a viable option for users seeking a free alternative to Photoshop, while Photoshop’s advanced features and industry standard status make it popular for professional use. Both programs cater to a diverse range of user needs, each excelling in different areas.
Core Functionality
GIMP’s core functionality revolves around its comprehensive set of tools for manipulating images. This section details fundamental tools, demonstrating their application in common tasks and showcasing GIMP’s versatility. It also explores the wide array of image formats GIMP supports, providing examples of common formats.
Fundamental Image Manipulation Tools
GIMP offers a diverse range of tools for image editing. These tools enable users to perform a multitude of tasks, from basic adjustments to complex transformations. Understanding these tools is crucial for effectively using GIMP.
- Selection Tools: These tools allow users to precisely select areas of an image for further manipulation. This is essential for tasks like cropping, resizing, and applying effects to specific parts of the image. Common selection tools include the Rectangular Marquee, Elliptical Marquee, and Lasso tools. Each tool provides specific functionalities for outlining and selecting different shapes and regions of an image.
- Editing Tools: These tools provide means for altering the pixels within a selected area. They allow users to change colors, remove imperfections, and enhance or modify image elements. Examples include the Paintbrush, Eraser, and Smudge tools. Different tools offer varying levels of precision and control over pixel manipulation, enabling users to tailor the edits to specific needs.
- Transform Tools: These tools enable geometric adjustments to the image. This includes tasks like rotating, scaling, skewing, and flipping images. Transform tools are crucial for aligning images with a design or layout. These tools facilitate precise adjustments for professional-quality image manipulation.
- Color Adjustment Tools: GIMP provides tools for adjusting the colors in an image. These tools allow users to change brightness, contrast, saturation, and hue. They are indispensable for improving the visual appeal and overall quality of an image.
Basic Image Editing Tasks
The fundamental tools can be combined to accomplish basic image editing tasks. This demonstrates how these tools are applied in real-world scenarios.
- Cropping: Select the Rectangular Marquee tool, draw a selection around the desired portion of the image, and press the “Crop” button. This effectively removes unwanted portions of the image, creating a more focused composition.
- Resizing: Select the image, navigate to the “Image” menu, and choose “Scale Image.” Enter the desired dimensions, and GIMP will resize the image accordingly. This is crucial for adapting images to different display sizes or layouts.
- Color Adjustments: Select the desired area with a selection tool. Then, access the “Colors” menu and make adjustments to parameters like brightness, contrast, saturation, or hue. This enhances the image’s visual appeal by improving the color balance and contrast.
Creating a Simple Image Edit
This step-by-step guide illustrates how to combine tools for a simple image edit.
- Open an image in GIMP.
- Select a region for cropping using the Rectangular Marquee tool.
- Crop the image using the “Crop” tool or command.
- Adjust the color balance using the “Colors” menu or relevant tools, ensuring the desired brightness and contrast.
- Save the edited image in the desired format.
Supported File Formats
GIMP supports a wide range of image formats. This allows for seamless compatibility with various sources and destinations.
- GIMP supports common formats like JPEG, PNG, GIF, TIFF, and others. This versatility allows users to work with a broad range of image types.
Image Format Examples
The following are examples of image formats that GIMP can open and edit:
- JPEG (JPG): A widely used format for photographs and images requiring a balance between quality and file size.
- PNG: A popular format for images with transparency and lossless compression, ideal for graphics and illustrations.
- GIF: Suitable for animated images and graphics, and is widely used in web design.
- TIFF: A format that supports layers and high-quality images, often used in professional settings.
Image Manipulation Techniques and Corresponding Tools
This table illustrates the correspondence between common image manipulation techniques and the GIMP tools used.
| Image Manipulation Technique | Corresponding GIMP Tool(s) |
|---|---|
| Cropping | Rectangular Marquee Tool, Crop Tool |
| Resizing | Image > Scale Image |
| Color Adjustment | Colors Menu, Hue/Saturation Tool |
| Rotating | Image > Transform > Rotate |
| Resizing | Image > Scale Image |
Advanced Techniques
GIMP’s advanced features extend beyond basic image manipulation, enabling sophisticated editing and creative control. These techniques leverage compositing, masking, and layer manipulation to achieve complex results. This section delves into these advanced functionalities and demonstrates how to leverage GIMP’s scripting capabilities and extensive plugin ecosystem for powerful image editing.Understanding these advanced techniques allows users to move beyond simple adjustments and craft more nuanced and professional-quality images.
The ability to combine multiple edits in a single workflow, along with GIMP’s adaptability through plugins, empowers users to tailor their workflow to specific needs and projects.
Compositing and Masking
Compositing in GIMP involves combining multiple images or layers to create a new image. Masking, a crucial component of compositing, allows for selective application of effects or layers. These techniques enable users to blend images seamlessly, creating layered effects or extracting specific elements from different pictures. This powerful combination allows for complex manipulations and realistic blending. GIMP’s masking tools range from simple selections to sophisticated alpha channels, offering diverse control over image composition.
Layer Manipulation
GIMP’s layer system is a powerful tool for non-destructive editing. Layers allow for independent manipulation of image elements. Users can apply adjustments to individual layers without affecting others. Combining multiple layers with various blending modes enables users to create intricate effects. Advanced techniques involve creating layers based on selections, using layer masks for intricate edits, and working with different layer blending modes for a wide array of visual effects.
Scripting Capabilities
GIMP’s scripting capabilities enable automation of repetitive tasks and complex operations. Users can write scripts using Python to streamline workflows. These scripts can automate batch processing, implement custom filters, and even create custom tools. This capability enhances efficiency and unlocks a higher level of control for users seeking to automate complex processes.
Plugins
GIMP’s plugin ecosystem expands its functionality significantly. Plugins add specialized tools, filters, and effects, catering to diverse needs. From image enhancement and retouching to specific tasks in areas like 3D modeling, GIMP’s vast collection of plugins allows users to tailor their workflow for specialized projects.
Combining Multiple Edits
Multiple image edits can be combined in a single process through GIMP’s layers and masking capabilities. This involves creating layers for each edit, applying masks for selective edits, and then combining the layers using blending modes. This process allows for complex transformations without compromising the original image data.
Common GIMP Plugins
| Plugin Name | Primary Use Case |
|---|---|
| ImageMagick | Image manipulation and conversion |
| HDR Tools | High Dynamic Range (HDR) image processing |
| G’MIC | Extensive collection of filters and tools |
| Photoshop Plugins | Integration with Photoshop files and tools |
| RawTherapee | Raw image development |
User Interface and Navigation
The GIMP user interface is highly customizable and offers a wide range of tools and options for image manipulation. Understanding its structure and layout is crucial for efficient workflow. This section delves into the various panels, menus, and toolbars, providing a comprehensive overview of navigation techniques.The arrangement of panels and toolbars in GIMP is designed for intuitive interaction, allowing users to easily access the functionalities they require.
By mastering the interface, you can streamline your workflow and significantly enhance your image editing capabilities.
Interface Structure and Layout
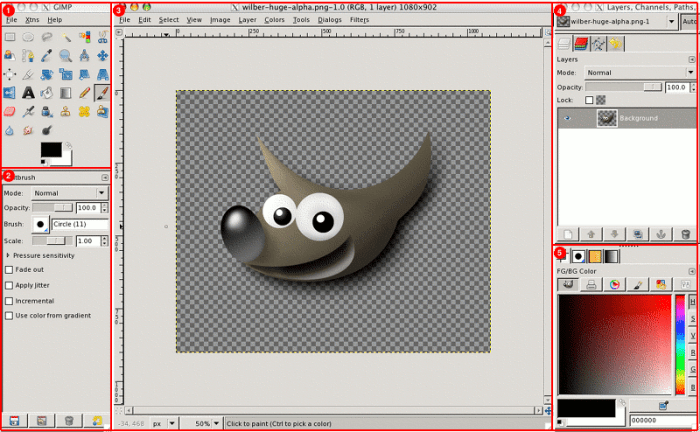
GIMP’s interface is a window-based application with a structured arrangement of panels. The primary panels include the Toolbox, the Image Window, the Layers Panel, the Channels Panel, and various other panels depending on the active tools and operations. These panels provide access to diverse tools, adjustments, and options for image manipulation. The arrangement of these elements can be customized, enabling users to arrange them according to their specific needs and preferences.
Panels and Their Functions
GIMP employs a modular panel system. The Toolbox houses the essential tools for image manipulation, from basic selection tools to advanced painting brushes. The Image Window displays the current image being edited, with options for adjusting the view. The Layers Panel manages the image’s layers, enabling non-destructive editing. The Channels Panel controls image channels, crucial for tasks such as color separation and manipulation.
Additional panels, such as the Paths Panel and the History Panel, provide tools for vector graphics and undo/redo capabilities, respectively. Understanding the function of each panel is key to efficient use of GIMP.
Navigating Menus and Toolbars
GIMP utilizes a hierarchical menu system and toolbars for easy access to functionalities. The menus, organized into categories like File, Edit, Image, and Filters, provide access to numerous options. Toolbars offer quick access to frequently used tools. The interface is structured to allow for rapid switching between different functionalities, enabling users to efficiently navigate through the diverse range of tasks GIMP offers.
For instance, the “File” menu allows you to open, save, and export images, while the “Edit” menu provides options for editing the active image.
Visual Guide to Interface Elements
A comprehensive visual guide, encompassing all elements of the GIMP interface, would be highly beneficial. This guide should depict the arrangement of panels, toolbars, and menus in a clear and organized manner, highlighting the key elements and their functionalities. This would aid users in understanding the layout and navigation of GIMP.
GIMP Menus and Actions
| Menu | Description of Actions |
|---|---|
| File | Opening, saving, exporting images, creating new documents, and printing. |
| Edit | Undo/Redo operations, cut/copy/paste functions, and other editing commands. |
| Image | Image adjustments (resizing, color correction, etc.), settings, and modes. |
| Layer | Managing layers, masks, blending modes, and opacity adjustments. |
| Select | Creating and manipulating selections. |
| Filter | Applying image effects and transformations. |
| View | Controlling the display of the image (zoom, pan, rulers). |
| Windows | Managing open windows and panels. |
| Plugins | Managing and accessing installed plugins. |
This table provides a concise overview of the primary menus and their associated actions in GIMP. Understanding these menus and their functions is crucial for navigating the application effectively.
GIMP for Specific Tasks
GIMP’s powerful features extend beyond basic image editing, making it a versatile tool for a wide array of tasks. Its flexibility and extensive range of features allow users to tackle complex projects, from photo enhancements to intricate graphic designs. This section dives into how GIMP excels in specific areas and provides practical examples to illustrate its capabilities.GIMP’s strength lies in its non-destructive editing capabilities and its extensive range of filters and tools.
This means that you can experiment with different effects and adjustments without permanently altering the original image, allowing for greater creative freedom and iterative improvements.
Photo Retouching
GIMP provides a comprehensive suite of tools for enhancing and correcting photographs. Its precision tools enable users to make precise adjustments to skin tones, remove blemishes, and correct color casts. The sophisticated tools for retouching provide unparalleled control over the image.
- Precise Adjustments: GIMP allows for precise adjustments to skin tones, color balance, and contrast. This detailed control is often not found in simpler photo editing software.
- Removing Blemishes: The Healing Brush tool, along with other spot removal tools, allows users to effectively eliminate blemishes and imperfections from photographs. These tools are particularly helpful for retouching portraits.
- Color Correction: GIMP offers various color correction tools for correcting color casts, adjusting white balance, and enhancing overall image vibrancy. The tools for adjusting color are sophisticated and allow for nuanced control.
Graphic Design
GIMP’s versatility extends to graphic design tasks. Its vector drawing tools, coupled with its robust image manipulation features, provide a powerful combination for creating diverse graphics.
- Creating Logos and Icons: GIMP’s vector tools allow for creating sharp, scalable logos and icons. These designs can be easily resized without losing quality. Using vector tools in GIMP allows for precise control of shape and line.
- Designing Banners and Posters: Combining image manipulation and graphic design capabilities, GIMP empowers users to create visually compelling banners and posters for websites, social media, or print media. The design process in GIMP is iterative, allowing for modifications and enhancements.
- Creating Illustrations: GIMP’s brushes and drawing tools allow for creating intricate illustrations and graphics. These tools offer flexibility and detailed control.
Web Design
GIMP can be a valuable tool in the web design process, particularly for creating and editing images for websites.
- Creating Website Images: GIMP can be used to create and edit images for websites, such as thumbnails, icons, and other graphical elements. This is an efficient way to prepare visuals for a website.
- Editing Existing Images: GIMP is capable of editing existing images for use on websites, adjusting sizes, applying filters, and improving overall quality. The flexibility of GIMP in editing web images is high.
Creating a Banner Image
To illustrate GIMP’s capabilities, let’s create a simple banner image.
- Open a New Image: Create a new image of the desired dimensions. Specify the resolution and color depth.
- Add a Background: Fill the image with a solid color or a background image using the paint bucket tool. This step sets the base color or pattern for the banner.
- Add Text: Using the text tool, add the desired text with specific font, size, and color. This step involves adding the content for the banner.
- Add Shapes or Graphics: Use the shapes or drawing tools to add decorative elements to the banner. This step adds visual interest and enhances the banner’s design.
- Save the Image: Save the image in a suitable format for web use (e.g., JPEG or PNG). This step involves preparing the final image for use on the web.
Community and Support
Staying connected with a robust community is crucial for mastering any software, and GIMP is no exception. This section details how to tap into GIMP’s online resources, find helpful tutorials, and engage with other users for support.Navigating the wealth of GIMP resources can be a powerful tool for learning and problem-solving. Whether you’re a novice or a seasoned user, the online community offers a wealth of knowledge and support.
Accessing the GIMP Online Community
The GIMP community is highly active and supportive. It provides a platform for users to share knowledge, ask questions, and receive assistance. Direct access to this community is vital for expanding your skills.
- The official GIMP website is a primary source for information. It houses documentation, tutorials, and a forum. This central location provides a single point of access for many resources.
- Online forums, like the official GIMP forum, are a dynamic space for discussing specific issues, sharing solutions, and receiving real-time feedback. Users often post questions and receive detailed answers from experienced members.
- Dedicated social media channels (e.g., Facebook groups, mailing lists) foster discussions, allowing users to connect and collaborate on projects or seek assistance.
Locating Tutorials and Documentation
Tutorials and documentation are essential resources for learning GIMP. They guide users through various tasks and functions, enabling efficient workflow development.
- The GIMP website’s documentation section contains comprehensive guides on different GIMP functionalities, encompassing a vast array of techniques and tools. These resources are structured for clear understanding and easy navigation.
- Numerous online tutorials, available on YouTube, websites, and blogs, provide practical demonstrations and step-by-step instructions for specific tasks. These tutorials often cater to various skill levels, offering both introductory and advanced content.
Finding and Using GIMP Forums
Engaging with GIMP forums allows users to connect with other users, ask questions, and find solutions to specific problems.
- Many forums are organized by specific GIMP topics or features. This organization makes it easier to find relevant discussions and solutions to particular issues.
- Searching forums for s related to your specific problem is a useful method for finding existing threads. This can provide a quicker solution compared to starting a new thread if a similar problem has already been addressed.
- Properly formulating your questions is key to receiving helpful answers. Clear, concise descriptions of the problem, steps taken, and desired outcome enhance the chances of receiving suitable solutions.
Step-by-Step Guide to Finding Answers
This detailed approach helps you systematically locate solutions to your specific GIMP problems.
- Clearly define the problem you are encountering in GIMP. A precise description is crucial for identifying the correct solution.
- Utilize the search function on the official GIMP website or forums. Enter relevant s to find potential solutions.
- Review the results from the search. If existing threads or solutions are found, carefully analyze them to determine if they address your problem.
- If a solution is not found, post a new thread in the appropriate forum section. Provide a detailed explanation of the issue, including relevant details like GIMP version, operating system, and steps taken.
- Actively participate in the forum discussion, responding to suggestions and providing further information to clarify the problem. This often leads to quicker resolution.
Resources for GIMP Support
A table listing various resources for GIMP support, categorized for easy reference.
| Resource | Description |
|---|---|
| GIMP Website | Official documentation, tutorials, and forums. |
| Online Tutorials (YouTube, Blogs) | Step-by-step instructions for specific tasks. |
| GIMP Forums | Discussion platform for sharing knowledge and finding solutions. |
| Social Media Groups | Community engagement and collaborative problem-solving. |
GIMP Alternatives and Comparisons

GIMP, while a powerful and versatile image editor, isn’t the only option available. Understanding its strengths and weaknesses, and how they compare to other popular choices, is key to making informed decisions about which tool best suits your needs. This section explores alternatives and highlights situations where each excels.A range of image editing software caters to different skill levels and specific requirements.
From professional-grade tools to simpler, user-friendly options, the market offers a variety of choices beyond GIMP. Understanding the trade-offs between features, ease of use, and cost is crucial when selecting an image editor.
GIMP vs. Photoshop
GIMP and Adobe Photoshop are the two most prominent open-source and proprietary image editors, respectively. Photoshop’s extensive feature set and industry-standard status often make it a top choice for professionals. GIMP, on the other hand, offers a comparable level of functionality while maintaining an open-source approach. This difference is reflected in both their strengths and weaknesses.
GIMP vs. Paint.NET
Paint.NET, a free and user-friendly alternative, is well-suited for basic image editing tasks. It provides a simple interface for common operations like resizing, cropping, and color adjustments. Compared to GIMP, Paint.NET is significantly simpler in its capabilities, focusing primarily on accessibility and ease of use. This makes it a good option for beginners and those needing quick fixes.
Comparative Analysis Table
This table provides a concise overview of GIMP, Photoshop, and Paint.NET, highlighting key features and differences.
| Feature | GIMP | Photoshop | Paint.NET |
|---|---|---|---|
| Ease of Use | Steep learning curve initially, but highly customizable for advanced users. | Generally intuitive for most tasks, with a powerful yet sometimes overwhelming feature set. | Very user-friendly, simple interface perfect for beginners. |
| Cost | Free and open-source | Paid subscription or one-time purchase | Free and open-source |
| Features | Comprehensive suite of tools for various editing tasks, including advanced image manipulation and compositing. | Industry-standard toolset, covering a vast range of professional-level features. Superior for complex retouching and compositing. | Basic set of tools focused on common tasks; limited advanced features. |
| Image Formats Supported | Wide variety of formats, including common ones like JPEG, PNG, GIF. | Vast array of formats, supporting industry-standard ones and proprietary formats. | Standard formats are supported. |
| Layers | Supports layers and non-destructive editing | Robust layer system, crucial for complex editing | Basic support for layers, although not as extensive as GIMP or Photoshop |
| Plugins | Extensible through plugins, allowing users to expand its capabilities. | Limited plugin support, primarily focused on third-party plugins. | Limited plugin support. |
Specific Situations for Each Software
The choice between these programs hinges on individual needs and tasks.
- Beginners: Paint.NET is ideal due to its straightforward interface and minimal learning curve.
- Professionals: Photoshop’s extensive features and industry standards are the preferred choice for demanding projects.
- Open-source enthusiasts and advanced users: GIMP offers a powerful alternative with a large and active community.
- Simple image adjustments and basic editing: Paint.NET offers a practical solution.
Performance and Efficiency
GIMP’s performance is a key consideration for users, especially when dealing with large images or complex editing tasks. Understanding how GIMP handles resources and employing optimization strategies are crucial for a smooth workflow. This section explores GIMP’s performance characteristics, addressing large file management, complex operations, and troubleshooting slowdowns. Efficient use of GIMP tools and techniques will be emphasized.
GIMP’s Performance Characteristics
GIMP, while powerful, can experience performance variations depending on factors like the processing power of the system, the size and complexity of the image, and the plugins or extensions in use. Modern hardware and optimized workflows significantly improve usability. For instance, a powerful CPU and sufficient RAM will significantly enhance the handling of high-resolution images and intricate operations.
Handling Large Files and Complex Operations
GIMP employs a layered approach to image editing, allowing users to work on various parts of an image without loading the entire file into memory. This strategy is crucial for managing large files. Complex operations, such as batch processing or sophisticated filters, may still take time depending on the system’s specifications. GIMP’s architecture is designed to manage these operations efficiently, although complex filters or batch operations on numerous large files may take longer than simpler tasks.
Optimizing GIMP’s Performance
Several strategies can improve GIMP’s performance:
- Using a Powerful System: A computer with a fast processor, sufficient RAM, and a solid-state drive (SSD) can drastically reduce processing time. The speed of your hard drive also plays a role; an SSD is preferable to a mechanical hard drive for GIMP’s operations.
- Choosing Appropriate Tools: Selecting the right tools for specific tasks can save time and resources. For example, using the appropriate selection tools for intricate tasks can reduce processing time. Using GIMP’s built-in tools, rather than external plug-ins, may lead to faster performance.
- Batch Processing: GIMP supports batch processing, allowing users to apply actions to multiple images simultaneously. This can significantly speed up workflows for tasks like resizing or converting a large number of images.
- Image Preprocessing: Preparing images before opening them in GIMP, such as reducing their size or resolution, can significantly speed up the loading and editing process. This is especially helpful for large files.
- Using Layers Strategically: GIMP’s layers allow for non-destructive editing. Using layers efficiently can reduce the processing load on the application. For example, isolating adjustments to specific layers can significantly speed up the process.
Troubleshooting Slow Performance
If GIMP is running slowly, several troubleshooting steps can be taken:
- Check System Resources: Ensure that your system has adequate processing power, memory, and storage space. Insufficient resources can lead to slowdowns. Using task manager or similar tools can identify resource usage.
- Close Unnecessary Applications: Background applications can consume system resources, affecting GIMP’s performance. Closing unnecessary applications can free up system resources.
- Disable Unnecessary Plugins: Some plugins may negatively impact performance. Disabling unnecessary plugins can often improve GIMP’s speed.
- Restart GIMP: A simple restart of the application can often resolve temporary glitches and free up memory.
- Update GIMP: Ensure that GIMP is up-to-date with the latest version. Updates often include performance improvements and bug fixes.
Ensuring Efficiency While Using GIMP
Efficient use of GIMP’s features can drastically improve the overall workflow:
- Keyboard Shortcuts: Utilizing keyboard shortcuts for common tasks can significantly speed up editing.
- Understanding Tool Functionality: A thorough understanding of each tool’s capabilities can help users avoid unnecessary steps and maximize efficiency.
- Non-Destructive Editing: Employing GIMP’s non-destructive editing features, such as layers and masks, prevents unnecessary re-processing.
- Regular Saving: Saving work frequently prevents data loss and allows for easier recovery in case of system issues. Saving in intermediate steps also aids in troubleshooting.
- Organizing Workspaces: Organizing the workspace to optimize workflow can streamline operations and minimize distractions.
Installation and Setup: GIMP
Getting GIMP up and running on your chosen operating system is straightforward. This section details the installation process for Windows, macOS, and Linux, along with configuration options for tailoring GIMP to your workflow. A well-configured GIMP environment can significantly enhance your image editing experience.Proper installation and configuration ensures a smooth workflow, preventing potential issues down the line. This optimized setup allows for efficient image manipulation and minimizes conflicts with other applications.
Installing GIMP on Windows
This step-by-step guide provides a clear path to install GIMP on a Windows system.
GIMP is a powerful image editing tool, great for all sorts of tasks. Its versatility extends to designing product visuals for e-commerce apps, like E-commerce apps , making it a useful asset for online businesses. GIMP’s capabilities are impressive, especially considering its free nature.
- Download GIMP: Visit the official GIMP website (www.gimp.org) and download the appropriate installer for your Windows version. Verify the installer’s integrity by checking the digital signature to ensure it hasn’t been tampered with.
- Run the Installer: Double-click the downloaded installer file to initiate the installation process. Follow the on-screen prompts, selecting the desired installation location and any additional components you wish to include. Common additions include sample images or other supplemental tools.
- Complete Installation: Allow the installation process to complete. This might involve restarting your computer, depending on the installer’s instructions.
- Verify Installation: Open GIMP to verify that the installation was successful.
Installing GIMP on macOS
The macOS installation process is generally user-friendly.
- Download GIMP: Download the GIMP package from the official website (www.gimp.org). MacOS often utilizes packages or installers, rather than traditional executables.
- Open the Package: Double-click the downloaded package file to open it. This will typically involve dragging the GIMP icon to the Applications folder.
- Launch GIMP: Locate the GIMP application within your Applications folder and double-click it to launch the software.
Installing GIMP on Linux
Linux distributions typically offer GIMP through their package managers.
- Update Package List: Update the package list of your Linux distribution to ensure the latest versions are available. This step ensures you have access to the most up-to-date version of GIMP and related dependencies.
- Install GIMP: Use your distribution’s package manager (e.g., apt, yum, pacman) to install GIMP. The exact command varies depending on your Linux distribution. Consult your distribution’s documentation for the precise command syntax.
- Verify Installation: Launch GIMP from your applications menu to confirm a successful installation.
Configuring GIMP
Customizing GIMP’s settings allows users to tailor the interface and workflow to their specific preferences.
- Interface Customization: GIMP allows users to adjust the interface layout, including panel positions, toolbars, and menus. This flexibility ensures the interface aligns with individual workflow preferences.
- Plugin Management: GIMP plugins extend the software’s functionality. Users can enable or disable plugins to optimize system resources and focus on the required tools. Careful management of plugins ensures compatibility and prevents conflicts.
- Preferences: The preferences dialog offers a variety of options to modify aspects like keyboard shortcuts, color management, and more. This ensures that the software’s operation matches individual needs and preferences.
Image Formats and Compatibility
GIMP supports a wide array of image formats, allowing users to work with various types of digital imagery. This versatility is crucial for seamless workflow, enabling the manipulation and conversion of different file types without loss of quality or functionality. Understanding the nuances of these formats is essential for effective use of GIMP.GIMP’s comprehensive support for image formats ensures compatibility with a vast range of digital assets, enabling users to import, edit, and export images in a multitude of formats.
This flexibility is crucial for diverse applications, from graphic design and photo editing to scientific imaging and digital art.
Supported Image Formats
GIMP boasts an extensive library of supported image formats, catering to diverse needs and projects. This broad support allows users to import and export images in various formats without needing additional plugins or converters. This flexibility significantly enhances workflow efficiency and simplifies the handling of diverse image files.
- JPEG (Joint Photographic Experts Group): A highly compressed format suitable for photographs and images requiring a balance between file size and quality. It excels in web-based applications and scenarios where quick loading times are prioritized. However, JPEG compression is lossy, meaning some image data is discarded during saving, potentially leading to a slight degradation in quality with repeated edits. JPEG is a widely used format, ensuring compatibility with most image-handling applications.
- PNG (Portable Network Graphics): A lossless format, ideal for images with sharp lines, text, or graphics. It is commonly used for web graphics and illustrations. PNG supports transparency, making it suitable for images requiring transparent backgrounds. PNG files typically have larger file sizes than JPEGs, but maintain the original image quality.
- GIF (Graphics Interchange Format): A format primarily designed for animations and images with limited color palettes. It’s suitable for simple graphics, logos, and animations. GIFs support animation and transparency, but the limitations on color depth can restrict the complexity of the image.
- TIFF (Tagged Image File Format): A versatile format that supports numerous color modes and image layers. It is frequently used for professional-grade images and graphics. TIFF files are typically large due to their lossless compression and ability to store multiple layers and metadata. TIFF is a standard format for high-quality images and graphic design projects.
- PSD (Adobe Photoshop Document): This format is a proprietary format developed by Adobe, primarily used for storing layered images. It is highly versatile for editing and manipulating complex images. It is often preferred for photo editing projects needing complex layers and adjustments.
- BMP (Windows Bitmap): A simple format that is widely supported by Windows. It is commonly used for simple graphics and images requiring high precision.
Color Modes
GIMP supports various color modes, including RGB, CMYK, grayscale, and indexed color. The choice of color mode influences the color representation and file size of the image. Understanding the implications of different color modes is essential for optimal image editing and output.
- RGB (Red, Green, Blue): The standard color mode for displaying images on screens. It is widely used for photographs, web graphics, and digital art.
- CMYK (Cyan, Magenta, Yellow, Key): A color model used in printing. It is essential for ensuring accurate color reproduction in printed materials.
- Grayscale: Represents images in shades of gray, from black to white. It is frequently used for illustrations, technical drawings, and documents.
- Indexed Color: Represents images using a limited palette of colors. This method is beneficial for reducing file sizes, often used for web graphics and illustrations.
Operating System Compatibility
GIMP is cross-platform, compatible with various operating systems. This flexibility allows users to work on images across different devices and environments.
- Windows: GIMP runs smoothly on various Windows versions.
- macOS: GIMP is fully functional on macOS systems.
- Linux: GIMP is a popular choice on Linux distributions, providing excellent support and performance.
Common Image Formats and Uses
The choice of image format depends on the specific use case.
| Format | Common Uses |
|---|---|
| JPEG | Photographs, web graphics, general use |
| PNG | Web graphics, illustrations, images with transparency |
| GIF | Animations, simple graphics, logos |
| TIFF | High-quality images, professional printing |
GIMP for Beginners
GIMP, a powerful and free image editing software, can seem daunting for newcomers. However, its user-friendly interface and extensive features make it accessible to anyone, even those with no prior graphic design experience. This section provides a structured guide to help beginners navigate GIMP and unleash its potential.Understanding the fundamentals of image manipulation is crucial for anyone using GIMP effectively.
Concepts like layers, selection tools, and color adjustments are key to achieving desired results. This section provides a detailed explanation of these concepts and how they are used in practice.
Getting Started with GIMP
GIMP’s intuitive interface makes it easy to learn. It’s organized into panels and menus, allowing users to quickly access the tools they need. Beginners can focus on the essential tools and menus initially, gradually exploring more advanced features as their skills develop.
Basic Image Manipulation Tutorials
A series of simple tutorials will guide beginners through common image editing tasks.
- Cropping an Image: This involves selecting a rectangular portion of the image to keep and discarding the rest. This is useful for removing unwanted elements or adjusting the aspect ratio. The crop tool allows for precise selection, and the option to resize the cropped image to a specific dimension is available.
- Adjusting Brightness and Contrast: These adjustments modify the overall tone of the image. Increasing brightness makes the image lighter, while increasing contrast enhances the difference between light and dark areas. GIMP offers tools to fine-tune these adjustments to achieve the desired visual effect.
- Resizing an Image: Scaling an image to a different size is frequently required. GIMP allows users to resize images proportionally or to specific dimensions. Maintaining the image’s aspect ratio is important to avoid distortion.
- Adding Text to an Image: This involves placing text directly onto an image. GIMP offers various text styles and fonts to enhance the image. Options for color, size, and alignment are available for customizing the text appearance.
Fundamental Concepts
A solid understanding of fundamental concepts like layers, selection tools, and color adjustments is essential for effectively manipulating images in GIMP.
GIMP is a powerful image editing tool, often overlooked in favor of simpler apps. However, its versatility extends beyond basic photo editing, and its capabilities can be harnessed to create stunning visuals for various applications, including, say, Mobile games. Ultimately, GIMP remains a robust choice for graphic design tasks, whether for personal use or professional projects.
- Layers: Layers are individual parts of an image that can be edited independently. This allows for non-destructive editing, where changes to one layer do not affect others. This is crucial for complex editing tasks.
- Selection Tools: Selection tools enable users to isolate specific areas of an image for editing. Different selection tools cater to various shapes and complexities, ensuring precision in image manipulation.
- Color Adjustments: Color adjustments provide tools for modifying the color palette of an image. Adjusting saturation, hue, and brightness allows users to fine-tune the color representation in the image.
Setting Up GIMP for Beginners
Installing and configuring GIMP is straightforward.
- Download GIMP: Download the latest version of GIMP from the official website. Choose the appropriate installation package for your operating system.
- Installation: Follow the on-screen instructions during installation. Choose appropriate installation options to customize the program’s setup.
- Launching GIMP: After installation, launch GIMP. The GIMP interface will open.
- Familiarization: Take some time to explore the menus and toolbars. Note the locations of key tools.
Benefits of GIMP for Beginners
GIMP offers numerous advantages for beginners.
- Free and Open-Source: GIMP is freely available, eliminating the need for costly software licenses. This makes it accessible to a wider range of users.
- Extensive Features: GIMP provides a comprehensive set of tools for various image editing tasks, empowering users to perform complex operations with ease.
- User-Friendly Interface: The user-friendly interface facilitates intuitive navigation and tool usage, making it easier for beginners to grasp the software’s functionalities.
Closing Notes
In conclusion, GIMP is a robust and user-friendly image editing tool that offers a compelling alternative to commercial software. Its comprehensive features, from fundamental manipulation to advanced techniques, make it suitable for a wide range of users. This guide has explored the core functionalities, advanced techniques, and user interface, offering a holistic understanding of GIMP’s potential. The wealth of resources and community support ensures a smooth learning curve for anyone seeking to master this powerful tool.
Key Questions Answered
What operating systems is GIMP compatible with?
GIMP is compatible with Windows, macOS, and Linux.
What are some common file formats supported by GIMP?
GIMP supports a wide range of image formats, including JPEG, PNG, GIF, TIFF, and more.
Does GIMP offer any tutorials for beginners?
Yes, GIMP has extensive online resources, including tutorials and documentation, specifically designed to help beginners.
How can I get support for GIMP if I encounter issues?
GIMP has a large and active online community, with forums and support groups dedicated to addressing user queries and providing assistance.


