Photoshop selection tips are crucial for any image editor. Understanding and mastering these techniques empowers you to precisely isolate and manipulate elements within your images, unlocking a world of creative possibilities. From basic selections to advanced techniques, this guide provides a comprehensive overview of Photoshop selection tools and their applications.
This guide will cover everything from the fundamental tools like the Magic Wand and Lasso, to more sophisticated methods such as the Pen tool and Refine Edge. We’ll also explore advanced techniques like working with selections in layers, selecting text and complex shapes, and common pitfalls to avoid.
Introduction to Photoshop Selections
Photoshop’s selection tools are fundamental to image editing. They allow precise isolation of portions of an image for manipulation, such as cropping, resizing, color adjustments, or compositing. Mastering these tools unlocks a wide array of creative possibilities.Selection tools are crucial for precise image editing. They empower users to isolate specific parts of an image, enabling a wide range of operations from simple adjustments to complex compositing tasks.
Without precise selections, many image editing tasks become significantly more challenging and time-consuming.
Selection Tool Types
Various selection tools cater to different needs and image characteristics. Each tool offers a unique approach to defining the desired area. Understanding the strengths and weaknesses of each tool is vital for efficient image editing.
Comparison of Selection Tools
Different selection tools excel in different situations. This table provides a comparison of common tools, highlighting their strengths and weaknesses.
| Tool | Description | Strengths | Weaknesses |
|---|---|---|---|
| Magic Wand | Selects contiguous pixels with similar color values. | Fast for selecting large areas of uniform color. | Struggles with complex shapes or subtle color variations. May select unintended areas. |
| Lasso | Freehand selection tool; draws a free-form path around the desired area. | Ideal for complex, irregular shapes; highly customizable. | Less precise than other tools; time-consuming for intricate selections. |
| Polygonal Lasso | Draws a series of straight line segments to define a selection. | More precise than the Lasso tool, better for shapes with straight edges. | Less flexible than the Lasso for curves and irregular shapes. |
| Quick Selection | Intuitive tool that automatically selects similar pixels based on a brush stroke. | Good for selecting complex shapes and areas with gradual color transitions. | May require adjustments and refinement to achieve a perfect selection. |
Using Selection Tools Effectively
Understanding the nuances of each selection tool empowers users to select the most suitable tool for the task. Selecting the correct tool saves significant time and effort, leading to more effective image editing. Regular practice and experimentation are key to mastering these tools.
Mastering Basic Selection Techniques
Effective selection is fundamental to Photoshop’s workflow. Mastering these techniques will allow you to isolate and manipulate specific elements within your images, opening up a world of creative possibilities. From precise object isolation to complex color-based selections, these techniques empower you to refine your images with ease.Understanding how to leverage the various selection tools is critical to achieving desired results.
The Magic Wand, Lasso, Polygonal Lasso, and Quick Selection tools each offer unique advantages for different types of selections.
Using the Magic Wand Tool for Similar Colors
The Magic Wand tool is your go-to for selecting areas of similar color. Its efficiency comes from its ability to quickly identify and isolate regions based on color similarity. Adjusting the tolerance setting is crucial for refining the selection’s accuracy. A lower tolerance value yields a more precise selection, while a higher value encompasses a wider range of colors.
For instance, a lower tolerance will accurately select a specific shade of blue in a complex image, whereas a higher tolerance may include slightly different shades of blue.
Employing Lasso Tools for Precise Selections
Lasso tools offer unparalleled precision for selecting free-form shapes. The standard Lasso tool allows for manual tracing, while the Polygonal Lasso tool provides sharper selections by connecting points with straight lines. This method is particularly useful for selecting objects with intricate shapes. For example, you can accurately select a complex leaf shape or a curved object with precise edges.
Utilizing the Polygonal Lasso Tool for Sharp Selections
The Polygonal Lasso tool provides a powerful method for creating sharp, controlled selections. By clicking points along the Artikel of the desired selection, the tool connects them with straight lines, generating a precise selection. This tool excels at defining the boundaries of objects with well-defined edges. Its advantage lies in generating precise selections for objects with straight or angled edges.
For instance, selecting a specific portion of a building’s facade, or a geometric shape within a graphic design.
Employing the Quick Selection Tool for Complex Selections
The Quick Selection tool is particularly well-suited for complex selections involving irregular shapes or gradients. This tool utilizes intelligent algorithms to select similar colors or areas, while allowing for adjustments through refinement and feathering. This feature is crucial for selecting intricate objects like people or natural forms. For instance, in selecting a person from a photo, the Quick Selection tool can identify and select the person’s Artikel while enabling you to refine the selection as necessary.
Selecting Different Types of Objects
| Object Type | Selection Tool Recommendation | Reasoning |
|---|---|---|
| People | Quick Selection or Lasso Tools | Complex shapes, often with irregular edges, making Quick Selection or Lasso tools ideal. |
| Text | Magic Wand or Polygonal Lasso | Text often has a consistent color; the Magic Wand can be efficient. Polygonal Lasso allows for precision when dealing with intricate fonts. |
| Objects | Any of the above | The most appropriate tool depends on the object’s shape and color consistency. |
Advanced Selection Techniques
Beyond the basics, Photoshop offers a powerful arsenal of advanced selection tools for precise and complex edits. These techniques allow for intricate selections that go beyond simple shapes or color ranges, enabling users to achieve highly detailed and accurate results. Mastering these methods is crucial for achieving professional-level image manipulation.The advanced selection tools provide a level of control previously unavailable in simpler methods.
Understanding their application opens up a vast realm of possibilities in image editing, allowing for more intricate and accurate results. The following sections detail these advanced techniques.
Using the Pen Tool for Complex Selections
The Pen tool in Photoshop is a vector-based tool, meaning it creates paths rather than pixel-based selections. This offers unparalleled flexibility for creating complex shapes and selections, especially when dealing with intricate or irregular forms. It’s particularly useful for selections that require precise control over the shape’s edges, such as isolating a subject from a background with complex curves or intricate details.
By defining anchor points and adjusting the path’s curvature, you can precisely define the Artikel of any subject. The resulting selection is smooth and precise, ideal for intricate subjects.
Utilizing the Magnetic Lasso Tool for Automatic Selections
The Magnetic Lasso tool automatically traces edges, making selections easier and faster, especially for subjects with well-defined edges. This tool is particularly beneficial when dealing with subjects that have a clear contrast against their background. It works by identifying edges based on color and luminance differences. This feature is particularly useful when the background’s color and the subject’s color have a clear difference.
The tool automatically traces the edge of the subject, reducing the need for manual adjustments.
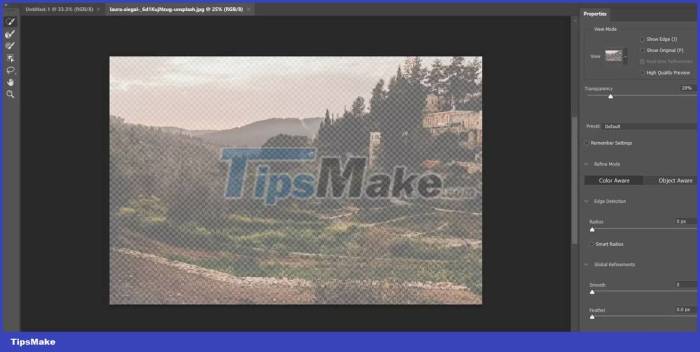
Perfecting Selections with the Refine Edge Tool
The Refine Edge tool is a powerful tool for refining selections that may have imperfections or areas where the initial selection doesn’t accurately capture the subject’s edge. This tool is indispensable for situations where the automatic selection tools aren’t perfect. The tool provides control over feathering, smoothing, and contrast to refine the edges of a selection. This allows for a smoother and more accurate selection, particularly useful for subjects with soft or irregular edges.
It’s crucial for achieving professional-quality results. Adjusting parameters such as feathering, contrast, and smoothing ensures a precise selection.
Creating Selections Based on Color Ranges
Color Range selection is a non-destructive method of selecting pixels based on their color values. This tool is particularly useful for isolating objects based on specific color attributes. By adjusting parameters such as hue, saturation, and luminance, users can precisely select objects with particular colors or a range of colors. This tool is helpful when isolating an object with a specific color or a range of colors.
The resulting selection is precisely based on the chosen color criteria.
Employing Channel Masks for Complex Selections
Channel masks, which utilize the grayscale representations of the color channels in an image, provide an advanced technique for complex selections. These masks allow for a layered approach to selection, enabling you to create highly precise selections based on a combination of color and tonal values. This technique is particularly useful for images with multiple colors or gradients.
By manipulating the channel masks, you can achieve intricate selections that are not easily accomplished using other methods. This technique involves a nuanced understanding of how color channels interact within an image.
Refining and Improving Selections
Once you’ve made a selection in Photoshop, you often need to refine it to achieve a more precise and aesthetically pleasing result. This involves techniques for smoothing rough edges, adjusting the selection’s shape, and fine-tuning the selection’s tolerance to ensure it encompasses the desired area. These methods are crucial for achieving high-quality edits and professional-looking results.The process of refining selections involves several tools and techniques that can significantly improve the accuracy and appearance of your selections.
These methods are essential for producing high-quality edits and professional-looking results. Feathering, masks, and the refine edge tool are critical for achieving precise and aesthetically pleasing results. Adjusting tolerance and using load and modify selection options further enhance control and precision.
Feathering and Masks for Softening Selections
Feathering softens the edges of a selection, creating a gradual transition between the selected area and its surroundings. This is particularly useful when working with images that require a blurred or soft edge, such as when creating a subtle cutout effect or blending an image into another background. The feathering radius determines the softness of the edges. A larger radius creates a more substantial blur, while a smaller radius results in a sharper edge.
Masks provide an alternative and often more precise method for refining selections. By using masks, you can precisely control the areas within the selection that are included or excluded. This gives you granular control over the edges of your selection.
Using the Refine Edge Tool’s Options
The Refine Edge tool is a powerful tool for enhancing selections, particularly when dealing with complex or irregular shapes. It offers a variety of options to adjust the selection’s edges, including smoothing, sharpening, and removing unwanted pixels. This tool’s power lies in its ability to precisely target the edges of a selection and make adjustments without affecting the interior area.
Key features include adjusting the contrast of the edges, removing noise, and changing the feather radius, allowing for precise control over the transition. It’s especially useful for selections that require a delicate touch.
Mastering Photoshop selection tools is crucial, but knowing the right brush techniques can significantly enhance your selections. For instance, exploring photoshop brush tool tips can help you refine your selection edges and get more precise results. Ultimately, the best selection methods combine both these approaches for the most professional outcomes.
Adjusting Tolerance in Selection Tools
The tolerance setting in various selection tools dictates how much variation in color or tone is included within the selection. A higher tolerance value includes more similar pixels within the selection, making it more forgiving of subtle variations in color and texture. A lower tolerance value results in a more precise selection, but may exclude pixels that are subtly different in color or tone.
The appropriate tolerance depends on the image and the desired result. For example, a photo with a consistent background might require a low tolerance, while a photo with a complex texture might require a higher tolerance to encompass the desired area.
Using Load Selection and Modify Selection Options
The “Load Selection” option allows you to load a previously made selection into the current selection. This is beneficial for reusing selections in different parts of an image or for working with different layers or selections in a non-destructive way. “Modify Selection” provides options for expanding, contracting, or intersecting selections, making it easier to refine and adjust the shape and boundaries of your selection.
These options offer flexibility and non-destructive editing capabilities.
Comparing Methods of Refining Selections
| Method | Description | Advantages | Disadvantages |
|---|---|---|---|
| Feathering | Softens the edges of a selection | Easy to use, creates a smooth transition | Less precise control over edges |
| Masks | Precisely controls inclusion/exclusion of pixels | High precision, non-destructive | Steeper learning curve |
| Refine Edge Tool | Precisely adjusts selection edges | Great for complex shapes, diverse options | Can be computationally intensive |
| Tolerance Adjustment | Controls inclusion of similar pixels | Adaptable to various images | Less precise for intricate details |
| Load/Modify Selection | Reuse or modify existing selections | Efficiency, non-destructive editing | Limited edge refinement |
Combining and Manipulating Selections
Mastering the combination and manipulation of selections is crucial for complex image editing in Photoshop. Understanding how to merge, subtract, and intersect selections empowers you to create intricate shapes, isolate subjects with precision, and achieve unique visual effects. These techniques are fundamental for advanced image editing and are often used in conjunction with other Photoshop tools.
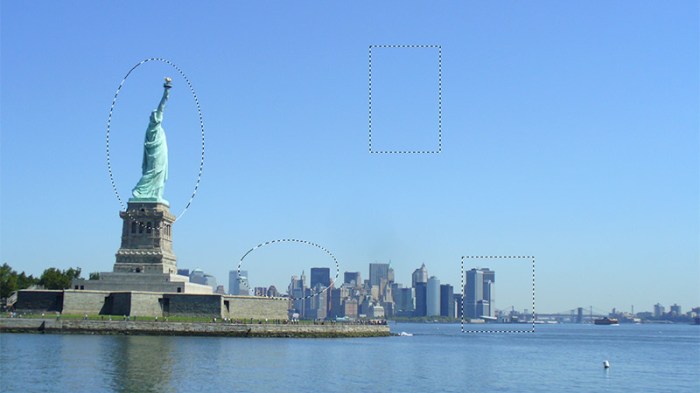
Combining Multiple Selections
Combining multiple selections allows you to create a composite selection encompassing elements from various sources. This process is particularly useful when dealing with intricate objects or when isolating multiple parts of an image. The union of selections encompasses all areas contained within any of the individual selections.
- To combine selections, select the first selection, then hold down the Shift key while selecting subsequent selections. This creates a new selection that encompasses all areas covered by the individual selections.
Subtracting Selections
Subtracting a selection from another is a powerful technique for removing specific areas from a larger selection. This is commonly used for isolating subjects while removing unwanted background elements or parts of a subject itself.
- Selecting the first selection and then holding down the Alt key (or Option key on Mac) while selecting the second selection subtracts the second selection from the first. The resulting selection will exclude any areas encompassed by the second selection from the first.
Intersecting Selections
Intersecting selections is a technique that yields a new selection encompassing only the areas common to all selected regions. This is useful for isolating the shared parts of multiple selections.
- To intersect selections, select the first selection, then hold down the Ctrl key (or Command key on Mac) while selecting subsequent selections. The resulting selection will only contain the areas that are present in all selected regions.
Creating Selections with Multiple Tools
Often, achieving a desired selection requires combining the capabilities of different selection tools. This can be achieved by creating selections using tools like the Lasso, Magic Wand, and Pen tools, and then combining or manipulating these selections as needed.
- For example, use the Lasso tool to roughly select a complex shape, then use the Refine Edge tool to refine the selection. Next, use the Magic Wand tool to select an area that you want to exclude from the previous selection and subtract it using the Alt/Option key.
Selection Shortcuts
Using shortcuts significantly speeds up the selection process, improving efficiency and reducing the time needed for editing. These shortcuts are particularly valuable when working with complex images or when working in a fast-paced environment.
| Action | Shortcut |
|---|---|
| Select All | Ctrl + A (or Cmd + A) |
| Deselect | Ctrl + D (or Cmd + D) |
| Invert Selection | Ctrl + Shift + I (or Cmd + Shift + I) |
| Union of Selections | Shift + Click |
| Subtract Selections | Alt + Click (or Option + Click) |
| Intersection of Selections | Ctrl + Click (or Cmd + Click) |
Manipulating Selection Masks
Selection masks provide a visual representation of the current selection. They are essential for precise adjustments and are often used in conjunction with other editing tools to refine selections or apply effects.
- Selection masks can be manipulated using various tools and features in Photoshop. This allows for precise control over which parts of the image are affected by subsequent edits.
- By editing the selection mask, you can refine the selection’s boundaries or create more complex shapes within the selected area.
Working with Selections in Layers
Mastering selections in Photoshop extends beyond isolating elements; it empowers you to manipulate those elements within a layered environment. This section dives into how selections interact with layers, enabling you to create, move, and refine selections across different layers, which is crucial for complex image editing and design tasks.
Creating New Layers from Selections
Understanding how to create new layers based on selections is essential for non-destructive editing. A selection’s Artikel defines a precise area, and creating a new layer from this selection isolates that area for independent adjustments. This approach allows for changes to the selected region without affecting the rest of the image.
- Select the desired area using Photoshop’s selection tools (e.g., the Rectangular Marquee tool, the Magic Wand tool).
- Navigate to the Layers panel.
- Click the “Create a new layer” icon (usually a new layer icon) within the Layers panel. This will typically be a small box or rectangle representing a new layer.
- Photoshop will automatically create a new layer containing only the selected portion of the image.
Moving Selections Between Layers
Moving selections between layers enables sophisticated image manipulation techniques. Copying the selected content and pasting it onto a different layer creates a duplicate of the selected area on a new layer, enabling independent adjustments. This method is crucial for preserving the original image while making edits to a copy.
- Select the area you want to move using Photoshop’s selection tools.
- Copy the selected content (Ctrl+C or Cmd+C).
- Select the target layer in the Layers panel where you want to place the selection.
- Paste the copied content onto the target layer (Ctrl+V or Cmd+V).
Applying Adjustments to Selections on Different Layers
Adjustments applied to selections on different layers maintain non-destructive editing principles. Using adjustment layers specifically with selections allows you to modify the selected area without impacting the original image.
- Select the desired area using Photoshop’s selection tools.
- Create a new adjustment layer (e.g., Brightness/Contrast, Levels, Curves) in the Layers panel.
- Adjust the settings of the adjustment layer to modify the selected region.
Using Selections for Masking Effects
Selections are powerful tools for creating masking effects, isolating elements for specific treatments. By creating a mask from a selection, you control precisely which parts of the image are affected by adjustments, filters, or other operations.
- Select the desired area using Photoshop’s selection tools.
- Create a new layer mask by clicking the mask icon (a small rectangle with a white circle inside) at the bottom of the layers panel.
- Fill the layer mask with black to hide the selected area or white to reveal it.
Selection Uses in Layers – Table
This table summarizes various selection uses in the layered environment, highlighting their diverse applications in image editing.
| Selection Use | Description | Example |
|---|---|---|
| Creating new layers | Isolates selected areas onto separate layers | Extracting a subject from a background |
| Moving selections | Transferring selected areas to different layers | Duplicating and modifying an object in a new layer |
| Adjustments on layers | Modifying selected areas on different layers without affecting others | Changing the color of a subject on a new layer without impacting other elements |
| Masking effects | Applying edits or filters to specific areas based on selections | Adding a vignette to a specific area of the image |
Selecting Text and Complex Shapes
Selecting text and complex shapes in Photoshop often requires specialized techniques beyond basic selections. Accurate selections are crucial for isolating elements for editing, manipulation, or compositing. This section delves into precise text selection, methods for complex shapes, and strategies for isolating these elements.Selecting text and complex shapes demands a nuanced approach compared to simpler objects. Different text formats and varying complexity of shapes necessitate diverse selection methods.
Understanding these approaches allows for precise isolation and manipulation of these elements within Photoshop.
Precise Text Selection
Accurate text selection is essential for editing individual words, phrases, or entire blocks of text without affecting surrounding elements. Different text formats necessitate different approaches.
- Selecting in Different Formats: Text formatted as Artikels, filled text, or text with various font styles requires careful consideration. For instance, selecting a single character within a complex text layer might involve using the Rectangular Marquee Tool, the Lasso Tool, or the Magic Wand Tool, depending on the layout and surrounding elements. The Magnetic Lasso Tool, particularly helpful for irregular text Artikels, can help achieve precise selections.
The Pen Tool offers unparalleled control for complex paths and intricate selections. Using the Pen Tool can enable a high degree of accuracy and control over the selection.
Selecting Complex Shapes
Complex shapes, such as logos or graphics, require more intricate selection techniques. The selection methods vary depending on the complexity and structure of the shape.
- Approaches for Complex Shapes: For shapes with smooth curves and edges, the Pen Tool is an excellent choice. This tool allows you to create precise paths that define the shape’s Artikel. For shapes with sharp edges, the Polygonal Lasso Tool or the Magnetic Lasso Tool might be suitable. The Magic Wand Tool is beneficial for selecting areas of similar color or tone within a shape.
Combining multiple selection methods, such as using the Pen Tool for the Artikel and the Magic Wand for interior areas, is often the most efficient method. The method employed depends on the shape’s design elements. Careful consideration of the shape’s elements and the desired selection result should guide the selection process.
- Isolating Text for Editing or Manipulation: Isolating text for editing or manipulation is a crucial aspect of Photoshop. Using selection tools allows you to extract the text from the image, enabling separate editing and then merging it back into the image. This technique allows for precise control over font styles, colors, or even the replacement of words. Careful selection avoids accidental inclusion of background elements.
Example of Selecting a Logo
Consider selecting a logo with intricate shapes and gradients. First, identify the Artikel of the logo using the Pen Tool. Next, define the area of the logo that you want to isolate. Finally, use the selection tools to isolate the logo from the rest of the image, enabling you to modify it without affecting the background elements.
Precise selection is crucial for maintaining the logo’s integrity.
Practical Applications of Selections
Mastering selections in Photoshop unlocks a world of image manipulation possibilities. Beyond basic cropping and resizing, selections empower you to precisely target specific areas for intricate editing and creative effects. This section delves into the practical applications of Photoshop selections, demonstrating how they transform images from ordinary to extraordinary.
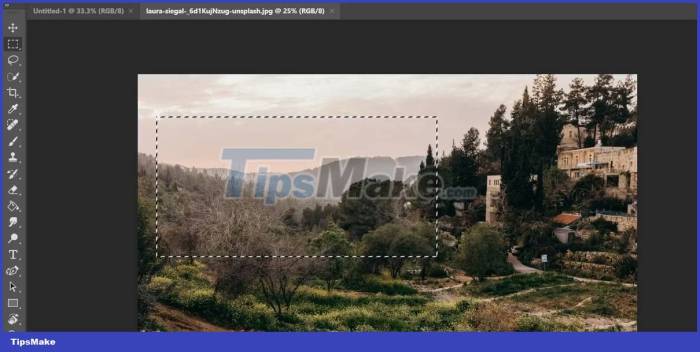
Cropping and Resizing Images
Selections provide a precise method for cropping and resizing images. Instead of relying on the default cropping tools, you can use selections to define the exact area you want to retain. This precision is crucial for maintaining image quality, especially when cropping out unwanted elements or creating specific aspect ratios. Using a selection tool like the Rectangular Marquee, you can precisely define the region to keep.
Then, you can use the crop tool, based on your selection. This approach gives you more control and flexibility over the cropping process, allowing for precise adjustments and improved results.
Selecting Parts of Images for Replacement or Editing
Selections allow for targeted editing and replacement of image components. Imagine needing to replace a damaged section of a photograph. By carefully selecting the damaged area, you can then paste a replacement image or fill the area with a color or texture. Similarly, you can isolate and edit specific elements of an image without affecting others. For example, you can use a selection to edit a person’s expression or alter the background of a photograph without disturbing other parts of the image.
Creating Custom Shapes
Selections are essential for creating custom shapes. Instead of using the shape tools, which often have limitations in complexity, selections enable you to define any shape imaginable. The process involves drawing a selection that matches your desired shape, and then filling it with a color or applying an effect. This method allows for more freedom and control in creating complex and intricate shapes.
The flexibility of selecting allows you to define a complex form and apply colors or patterns precisely within that shape.
Creating Cutout Effects
Selections are fundamental to creating professional-quality cutout effects. By precisely selecting the subject from its background, you can isolate it for use in other projects or to create a dramatic, isolated image. The process involves isolating the subject using a selection tool and then copying and pasting the selected subject onto a new background or layer. This technique is widely used in design and graphic arts to achieve compelling visual effects.
Table of Image Editing Applications of Selections
| Application | Description | Example |
|---|---|---|
| Cropping | Precisely defining the area to retain in an image. | Removing unwanted edges of a photograph. |
| Replacement | Replacing specific parts of an image with different content. | Fixing a damaged portion of an image or changing a sky. |
| Editing | Targeting and altering specific elements within an image. | Adjusting the lighting of a subject in a photo. |
| Shape Creation | Creating custom shapes by defining a selection. | Designing logos or illustrations with unique shapes. |
| Cutout Effects | Isolating a subject from its background. | Creating a photo montage or placing a subject in a different scene. |
Common Selection Pitfalls and Troubleshooting
Navigating Photoshop’s selection tools can sometimes lead to unexpected results. Understanding common pitfalls and their solutions empowers users to achieve precise selections with confidence. This section delves into the most frequent issues and offers effective troubleshooting strategies.Effective selection in Photoshop hinges on understanding the tool’s behavior and image characteristics. Common mistakes often stem from overlooking subtle factors, like image complexity or the specific selection tool’s limitations.
By identifying these errors and learning how to address them, users can avoid frustration and achieve desired outcomes.
Identifying Common Selection Errors
A critical aspect of troubleshooting selections is recognizing the patterns of flawed selections. Several factors can lead to issues, including image quality, complexity, and the tool being used.
- Selection Tool Misuse: Incorrect tool settings or improper usage are primary causes of inaccurate selections. For instance, using the Quick Selection tool on highly detailed textures might result in jagged edges or incomplete selections. Similarly, the Magic Wand tool can produce undesirable results on images with subtle color variations.
- Image Complexity: Images with intricate details, overlapping objects, or subtle color gradients present challenges for selection tools. Precise selections often require a combination of tools and techniques.
- Image Quality Issues: Poor image quality, such as low resolution or noise, can interfere with accurate selection. The tool may struggle to differentiate subtle details, leading to incomplete or inaccurate selections. This is particularly true for high-contrast areas or textures.
- Incorrect Tolerance Settings: The tolerance value in selection tools dictates the range of colors or tones included in the selection. Setting an inappropriately high tolerance can select unwanted areas. Likewise, an overly low tolerance might miss desired areas.
Correcting Selection Errors
Troubleshooting and fixing selection problems often involves iterative refinement. Understanding the nature of the error is crucial to choosing the right solution.
- Refining with the Selection Brush Tool: The Selection Brush tool allows users to add or subtract areas from a selection. Users can carefully paint over areas to include or exclude them from the selection. This tool is invaluable for fine-tuning selections, especially on images with intricate details.
- Using the Refine Edge Tool: The Refine Edge tool provides advanced control over selection edges. This tool is especially useful for complex images or those with fine details. Users can adjust settings to smooth or sharpen edges, thereby correcting problems like feathering or jagged edges.
- Using the Mask Mode: Photoshop’s mask mode offers a powerful method for modifying selections. Using masks allows users to make subtle adjustments and refinements. This can be an efficient approach for removing unwanted areas from the selection, especially when combined with other tools.
- Recreating the Selection: Sometimes, the best approach is to start over and recreate the selection with a different tool or method. This is especially relevant when previous attempts have yielded unsatisfactory results.
Preventing Selection Issues
Proactive measures can greatly reduce the likelihood of selection problems.
- Careful Tool Selection: Choosing the appropriate selection tool for the image type is essential. Consider the image’s complexity and the desired level of precision when selecting a tool. For instance, the Magic Wand tool might not be suitable for highly detailed images.
- Understanding Image Characteristics: Thoroughly examine the image before making a selection. Look for color gradients, textures, and other elements that could influence selection accuracy.
- Appropriate Tolerance Values: Adjusting tolerance values appropriately can significantly affect the selection process. Carefully consider the image’s characteristics and desired outcome to select the optimal tolerance values. Testing different values is often necessary.
- Iterative Refinement: Applying multiple refinement steps, rather than attempting a single perfect selection, often leads to better results. Break down the process into smaller, more manageable steps.
Tips and Tricks for Efficiency
Boosting your Photoshop selection workflow is crucial for productivity. These tips and tricks will streamline your process, saving you time and frustration, especially when dealing with complex selections. Mastering efficient techniques allows you to focus on creative tasks rather than endless editing steps.Leveraging keyboard shortcuts, utilizing the history panel, and implementing efficient workflows can significantly improve your Photoshop experience.
Employing actions for repetitive selections further automates your process, increasing your productivity.
Keyboard Shortcuts for Selection Tools
Efficient use of keyboard shortcuts is fundamental to speeding up selection tasks. These shortcuts bypass the need to repeatedly click on the mouse, saving precious time and reducing errors. Memorizing these shortcuts significantly enhances your workflow.
- Marquee Tools: M (Rectangular Marquee), M + Shift (Elliptical Marquee), M + Alt (Single Row/Column Marquee), M + Alt + Shift (Single Row/Column Marquee).
- Lasso Tools: L (Lasso Tool), L + Shift (Polygonal Lasso), L + Alt (Magnetic Lasso).
- Quick Selection Tool: W (Quick Selection Tool).
- Magic Wand Tool: W (Magic Wand Tool).
- Pen Tool: P (Pen Tool).
Using the History Panel with Selections
The history panel acts as a time machine for your edits, allowing you to revert to previous states. This is particularly valuable for selections, enabling you to quickly experiment with different selection techniques without permanently altering the image.The history panel provides a visual representation of edits, including selection changes. You can easily step back and forth through these modifications, ensuring you have options to rectify errors or explore alternative selection strategies.
- Clicking on a specific history state in the panel will immediately revert the selection to that point.
- Using the “History Brush” allows you to selectively restore parts of the image to a previous selection state.
- The panel allows for quick experimentation with selection tools without fear of permanent changes, especially useful in complex scenarios.
Efficient Selection Workflows
Establishing efficient workflows for different tasks is vital. A structured approach minimizes unnecessary steps and ensures consistent results. This allows for a streamlined workflow, reducing wasted time and improving overall productivity.A well-defined workflow will help you achieve your desired selection outcome in a predictable and efficient manner.
- Complex Selection: Begin with a rough selection using the quick selection tool, refine using the lasso tool, and finally use the refine edge tool for precision.
- Subject Isolation: Utilize the pen tool to create a precise selection, ensuring that only the desired subject is isolated.
- Background Removal: Employ the magic wand tool to initially select the background, followed by refining with the lasso or quick selection tool.
Using Actions for Repetitive Selections
Actions in Photoshop automate repetitive tasks, saving significant time and effort. This automation is particularly beneficial for tasks involving multiple selections with similar characteristics.Creating actions for common selection tasks enables you to repeat these processes with a single click, boosting your overall productivity.
- Create a New Action: Open the Actions panel and click “Create New Action”.
- Record Steps: Perform the desired selection process, including any refinement steps. The action will record every step.
- Save the Action: Name and save the action for future use.
- Apply the Action: Select the action from the Actions panel and apply it to your desired image(s).
Photoshop Selection Shortcuts
Here’s a comprehensive list of keyboard shortcuts for Photoshop selection tools.
| Tool | Shortcut |
|---|---|
| Rectangular Marquee Tool | M |
| Elliptical Marquee Tool | M + Shift |
| Single Row/Column Marquee Tool | M + Alt |
| Single Row/Column Marquee Tool (Shift) | M + Alt + Shift |
| Lasso Tool | L |
| Polygonal Lasso Tool | L + Shift |
| Magnetic Lasso Tool | L + Alt |
| Quick Selection Tool | W |
| Magic Wand Tool | W |
| Pen Tool | P |
Selection in Different Photoshop Versions
Photoshop’s selection tools have evolved significantly across its various versions, reflecting advancements in image processing technology and user interface design. These enhancements aim to improve both the precision and efficiency of selecting areas within an image. From basic selections to sophisticated algorithms, the tools have become more versatile and user-friendly over time.The selection tools in Photoshop have undergone a series of updates and improvements, leading to enhanced capabilities in each successive version.
These enhancements focus on refining accuracy, increasing speed, and adding more sophisticated features to cater to the growing complexity of image editing tasks. The core functionality remains, but newer versions introduce new tools and refinements, making the selection process more efficient and precise.
Comparison of Selection Tools Across Photoshop Versions
Different Photoshop versions offer varying selection tool functionalities. Early versions focused on simpler tools, while later versions incorporated more advanced features. This evolution allows for more nuanced selections, catering to a wider range of image editing needs. The enhancements reflect the ongoing quest for more sophisticated and user-friendly tools.
Improvements in Selection Tools Over Time, Photoshop selection tips
The evolution of selection tools in Photoshop is evident in the increasing accuracy and speed of selection. Initial versions primarily relied on simple tools like the Rectangular Marquee Tool and the Lasso Tool, which offered limited precision and control. Subsequent versions introduced sophisticated algorithms and advanced features, such as the Magnetic Lasso Tool and the Quick Selection Tool, significantly enhancing the accuracy and efficiency of the selection process.
The addition of Content-Aware Fill, for instance, in later versions is a testament to these improvements.
Features Specific to Newer Versions
Newer Photoshop versions often include features not found in earlier releases. One notable example is the addition of the Object Selection Tool, allowing for the precise selection of complex shapes and objects. Furthermore, AI-powered features like the Select Subject tool, which automatically detects and selects subjects within an image, are significant improvements. This technology simplifies the selection process, especially when dealing with intricate or complex images.
Mastering Photoshop selections is crucial, and understanding non-destructive editing techniques, like those detailed in Non-Destructive Editing: Best Practices in Photoshop , significantly elevates your workflow. By employing these methods, you can easily refine your selections without permanently altering the original image, ensuring maximum flexibility and control during the editing process. Ultimately, these non-destructive techniques empower you to make informed decisions when refining your selections, ultimately leading to a superior final product.
Examples of Selection Tool Enhancements
The introduction of the Pen Tool, a vector-based selection tool, revolutionized the way complex shapes are selected and manipulated. This tool offers unparalleled precision in selecting intricate shapes. Another enhancement is the ability to use the selection tools with smart objects, allowing non-destructive editing of images. These enhancements showcase a commitment to providing more powerful and versatile selection tools.
Comparison Table of Selection Tools in Different Photoshop Versions
| Photoshop Version | Key Selection Tools | Notable Improvements | Specific Features |
|---|---|---|---|
| Photoshop CS6 | Rectangular Marquee, Lasso, Magic Wand | Improved accuracy and speed | Basic selections, limited AI assistance |
| Photoshop CC 2018 | Rectangular Marquee, Lasso, Magic Wand, Quick Selection, Pen | Enhanced accuracy with Quick Selection, introduction of Content-Aware Fill | Improved efficiency, better handling of complex images |
| Photoshop CC 2023 | Rectangular Marquee, Lasso, Magic Wand, Quick Selection, Pen, Object Selection, Select Subject | AI-powered selection tools like Select Subject, improved accuracy and speed | Automated selection, complex object selection |
Final Conclusion
In conclusion, mastering Photoshop selection tools opens up a vast array of image editing possibilities. By understanding the various tools, techniques, and shortcuts, you can enhance your image editing workflow and achieve professional-level results. Remember to practice these techniques to solidify your understanding and develop your own efficient workflow.
Questions Often Asked: Photoshop Selection Tips
What’s the difference between the Magic Wand and Quick Selection tools?
The Magic Wand tool selects contiguous pixels with similar colors, while the Quick Selection tool allows for more flexible and less precise selections. It’s great for quickly selecting areas, but the Magic Wand is faster for homogeneous areas.
How do I combine multiple selections?
You can combine selections using the ‘Add to Selection’ and ‘Subtract from Selection’ options in the Selection menu. There are also shortcuts for combining using Boolean operations (union, intersection, difference). Using the shortcuts is faster.
What are some common pitfalls when using selection tools?
Common mistakes include not adjusting tolerance levels appropriately, not using the refine edge tool effectively, and forgetting to create a selection mask.


