Skin smoothing Photoshop is a powerful technique used to enhance images, but it’s crucial to understand the methods and avoid over-processing. This guide will delve into various skin smoothing methods in Photoshop, from subtle adjustments to significant transformations. We’ll explore the tools, techniques, and considerations for achieving natural-looking results.
This comprehensive guide will cover everything from basic skin smoothing techniques to advanced methods, ensuring you master the art of skin enhancement while maintaining realism.
Introduction to Skin Smoothing in Photoshop
Skin smoothing in Photoshop encompasses a range of techniques aimed at refining skin textures in digital images. These techniques often involve reducing the appearance of pores, wrinkles, blemishes, and other imperfections, leading to a more flawless, polished complexion. This process is widely used in portrait photography, advertising, and digital retouching to enhance the visual appeal of individuals in images.Skin smoothing is a crucial aspect of image editing, particularly in portraiture and advertising, where a flawless complexion is often desired.
The application of these techniques can significantly alter the perceived appearance of a subject, and thus careful consideration of the desired outcome and the ethical implications of altering images is important.
Common Tools and Filters
Skin smoothing techniques leverage various tools and filters within Photoshop. These tools can range from simple adjustments to more complex algorithms. Understanding the diverse capabilities and limitations of these tools allows for targeted application and creative control over the final result.
Tools for Skin Smoothing
| Tool | Description | Explanation |
|---|---|---|
| Liquify Filter | This filter allows for non-destructive manipulation of image pixels, enabling the user to distort and reshape areas. | Useful for subtle adjustments to skin texture, such as smoothing out wrinkles or blemishes. |
| Patch Tool | The Patch Tool allows users to select and replace areas of an image with a different part of the image or with a solid color. | Effective for removing blemishes, scars, or other localized imperfections. |
| Spot Healing Brush Tool | This tool is designed to remove blemishes and imperfections with a smooth transition. | Ideal for minor imperfections that don’t require significant alteration to the overall skin tone or texture. |
| Healing Brush Tool | This tool allows for more precise removal of imperfections by sampling the surrounding pixels for a seamless blend. | More versatile than the Spot Healing Brush, suitable for complex or larger imperfections. |
| Clone Stamp Tool | This tool allows users to sample pixels from one area and apply them to another. | Useful for replicating areas of smooth skin to cover blemishes, often used in conjunction with other smoothing techniques. |
Purpose and Application
Skin smoothing is frequently employed to enhance the aesthetic appeal of a subject. This can range from subtle improvements to more dramatic transformations. The purpose is to enhance the image and make the subject appear more visually appealing. This could include removing minor imperfections, refining skin texture, and creating a more polished complexion.
Examples of Skin Smoothing Effects
Skin smoothing effects can vary greatly depending on the chosen tools and the desired outcome. A subtle smoothing effect might enhance the appearance of skin without drastically altering its natural texture. Conversely, a more aggressive approach could create a highly polished, flawless appearance, potentially creating a significant departure from the subject’s natural look. The degree of smoothing employed depends on the intended use of the image and the overall aesthetic.
For instance, a magazine advertisement might require a more significant level of smoothing than a candid portrait.
Methods of Skin Smoothing
Skin smoothing in Photoshop involves techniques to reduce the appearance of imperfections and enhance skin texture. Various methods are available, each with its own set of advantages and disadvantages. Understanding these methods is crucial for achieving the desired aesthetic outcome while maintaining a natural look.
Using the Blur Tool
The Blur tool is a fundamental method for softening skin textures. It works by averaging the pixel values within a specific radius, effectively blurring the details. This approach can smooth out fine lines and blemishes, but excessive blurring can lead to a loss of detail and create an unnatural appearance.
- Steps: Select the Blur tool from the toolbar. Adjust the brush size and blur radius to control the level of smoothing. Paint over the areas requiring smoothing, gradually increasing the radius until the desired effect is achieved.
- Parameter Adjustments: Reducing the brush size will allow for more precise application of smoothing. Increasing the blur radius smooths a larger area but risks over-blurring. Experiment with these settings to achieve a balanced effect.
- Advantages: Quick and easy to use, especially for subtle smoothing. Can be applied to small areas with precision.
- Disadvantages: Can lead to a loss of detail, especially if the radius is set too high. Not ideal for severe imperfections or areas requiring a significant level of smoothing.
Using the Healing Brush Tool
The Healing Brush tool is designed to repair or remove imperfections while preserving the surrounding skin tone. It works by sampling pixels from a source area and applying them to a target area. This approach can be highly effective for removing blemishes and scars while maintaining the natural texture.
- Steps: Select the Healing Brush tool. Sample a clean area of skin using the Alt key (or Option key on Mac) and paint over the imperfection. Adjust the brush size and sample area for precise application.
- Parameter Adjustments: Experiment with the sample size and opacity to find the balance between effective repair and a seamless blend. Adjust the brush size to precisely target the area to be repaired.
- Advantages: Preserves the surrounding skin tone and texture, resulting in a natural-looking result. Excellent for removing blemishes and scars.
- Disadvantages: Can be time-consuming for extensive smoothing, especially on complex areas. May not be as effective for very large imperfections.
Using the Patch Tool
The Patch tool is useful for larger areas needing smoothing or for removing significant imperfections. It creates a selection around the area to be repaired and replaces it with a sampled area. This is a versatile option that offers significant control for complex or widespread issues.
- Steps: Select the Patch tool. Draw a selection around the area needing smoothing. Drag the selection to a clean area of skin. Adjust the sample area and the size of the patch to precisely target the desired result.
- Parameter Adjustments: Adjust the size of the patch and the sample area to control the extent of smoothing. Adjust the opacity to blend the repaired area with the surrounding skin seamlessly.
- Advantages: Effective for large areas of smoothing and the removal of noticeable imperfections. Offers good control for precise manipulation of the affected region.
- Disadvantages: Can be more complex to use than the Healing Brush tool. Requires more careful consideration of the selection and blending to avoid noticeable seams.
Comparison Table
| Method | Effect | Complexity |
|---|---|---|
| Blur Tool | Subtle smoothing, loss of detail possible | Low |
| Healing Brush Tool | Natural smoothing, good for blemishes | Medium |
| Patch Tool | Significant smoothing, good for large areas | High |
Levels of Skin Smoothing
Skin smoothing in Photoshop allows for a range of adjustments, from subtle improvements to significant alterations. Understanding the different levels of smoothing is crucial for achieving the desired aesthetic outcome without overprocessing. This section will detail various smoothing levels and their application using Photoshop adjustments.Achieving a natural and polished look requires careful consideration of the level of smoothing.
Excessively aggressive smoothing can lead to a distorted or unnatural appearance. A subtle level of smoothing is often preferred for enhancing skin tone while maintaining the subject’s natural characteristics. Adjustments can be made incrementally to progressively refine the results, allowing for greater control over the final output.
Different Levels of Smoothing
Different levels of skin smoothing cater to various artistic intents and desired results. A subtle level of smoothing is often preferred to maintain the subject’s natural appearance, whereas significant smoothing can alter the subject’s look considerably. The ideal level depends on the specific image and the desired outcome.
Examples of Smoothing Levels
- Subtle Smoothing: This level of smoothing aims to reduce minor imperfections while preserving the skin’s texture. A subtle approach can enhance the skin’s overall smoothness without altering its natural characteristics. This can be achieved using a low intensity filter or adjustment. An example would be smoothing skin imperfections, such as fine lines or pores, without significantly altering the skin’s natural contours.
It is often achieved with low-intensity blurring filters or subtle adjustments to the clarity or contrast settings.
- Moderate Smoothing: This level of smoothing goes beyond subtle adjustments, aiming to reduce more visible imperfections while still retaining some natural skin texture. It’s a step up from subtle smoothing and can address slightly more pronounced flaws. An example would be reducing visible blemishes or redness without causing a significant change in the skin’s natural structure. This could involve a moderate intensity blur or adjustment of the clarity or contrast sliders.
- Significant Smoothing: This level of smoothing substantially alters the skin’s texture and appearance. It’s intended to minimize all visible imperfections and potentially create a more uniform and polished look. An example would be smoothing out acne scars or large blemishes, resulting in a noticeable reduction in visible imperfections. This is often achieved with higher intensity blurring filters, or significant adjustments to clarity or contrast, potentially leading to a more artificial appearance.
Careful consideration of the impact on the subject’s natural features is vital in this case.
Achieving Various Levels of Smoothing Using Adjustments
Photoshop offers a variety of adjustments to achieve different levels of skin smoothing. These adjustments provide precise control over the degree of smoothing. A range of tools can be utilized, including blurring filters, the clarity adjustment layer, and other adjustment tools.
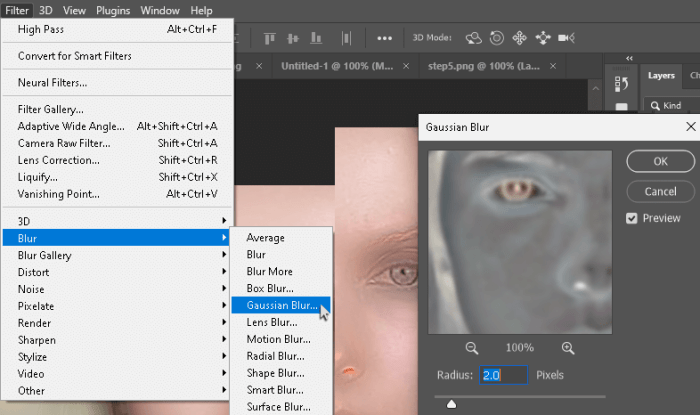
- Blurring Filters: Gaussian Blur, Motion Blur, and other blurring tools can be used to reduce the visibility of imperfections. The intensity of the blur directly correlates to the level of smoothing. Lower values produce subtle smoothing, while higher values result in more significant smoothing.
- Clarity Adjustment Layer: Increasing the clarity setting can effectively reduce the appearance of fine details and imperfections, resulting in a smoother appearance. Gradually increasing the clarity value will provide a noticeable improvement in smoothing, with a potential for over-processing if the increase is excessive.
- Other Adjustment Layers: Other adjustment layers, such as Curves or Levels, can also be employed to adjust the tonal range and contrast, leading to a smoother visual appearance. Careful manipulation of these layers can enhance the smoothing effect without drastically altering the overall image.
Table of Smoothing Examples
| Smoothing Level | Image Description | Photoshop Settings (Example) |
|---|---|---|
| Subtle | Reduces fine lines and pores without altering natural skin texture. | Gaussian Blur: Radius 0.5 pixels; Clarity: +5 |
| Moderate | Reduces visible blemishes and redness while maintaining some natural texture. | Gaussian Blur: Radius 1 pixel; Clarity: +10 |
| Significant | Minimizes all visible imperfections, potentially altering the natural skin structure. | Gaussian Blur: Radius 2 pixels; Clarity: +20; Mask applied to avoid excessive smoothing in other areas. |
Adjusting Skin Tone and Texture
Fine-tuning skin tone and texture is crucial for achieving a natural and polished result in skin smoothing. Beyond simple blurring, adjusting these elements allows for a more realistic and less artificial appearance. This involves manipulating color, contrast, and the overall surface quality of the skin to enhance its natural beauty.Careful adjustments in skin tone and texture are vital to avoid a noticeably altered look.
This process refines the smoothing effect, ensuring the final image appears seamlessly enhanced rather than overtly manipulated.
Adjusting Skin Tone
Adjusting skin tone involves altering the overall color balance and intensity of the skin. This can be achieved through various tools and techniques, ensuring a natural and consistent skin tone across the image. The goal is to create a harmonious and realistic color representation, avoiding harsh or unnatural transitions.
Skin smoothing in Photoshop is a popular technique, but for truly impressive results, consider exploring advanced color grading techniques. Learning how to manipulate color tones and contrasts in Photoshop, as detailed in Advanced Color Grading with Photoshop , can elevate your skin smoothing workflow. Ultimately, these combined approaches yield a more polished and natural-looking final image for skin smoothing in Photoshop.
Adjusting Skin Texture
Fine-tuning skin texture involves manipulating the surface details to reduce imperfections and create a smooth, even appearance. This can be achieved through a combination of techniques, aimed at enhancing the natural appearance of the skin while minimizing blemishes or pores. Understanding these techniques helps achieve a realistic and appealing smoothing effect.
Skin smoothing in Photoshop can be a useful tool, but it’s important to use it judiciously. Consider techniques like how to turn a photo into a cartoon with Photoshop, as those methods can sometimes achieve a similar effect without the potentially unnatural look of excessive smoothing. For a deeper dive into that, check out this tutorial: How to Turn a Photo into a Cartoon with Photoshop.
Ultimately, the best approach to skin smoothing in Photoshop depends on the desired outcome and the specific photo.
Photoshop Tools for Skin Tone and Texture Adjustment
Several Photoshop tools facilitate precise skin tone and texture adjustments. Understanding their applications and limitations allows for effective manipulation and avoids undesirable side effects.
- Curves: Curves adjustment layers allow for precise control over the tonal range of the skin, enabling adjustments in both highlights and shadows. This tool offers a wide range of control for fine-tuning skin tones and avoids over-saturation or under-exposure. For example, if the skin appears too pale, you can increase the mid-tone values in the curves adjustment layer to create a more natural and even skin tone.
- Levels: Similar to Curves, Levels provide a way to adjust the overall tonal range of the skin, potentially addressing issues like contrast or uneven brightness. For example, if the skin has inconsistent lighting, you can use the Levels adjustment layer to correct the highlights and shadows, leading to a more uniform and natural skin tone.
- Selective Color: Selective Color enables targeted adjustments to specific colors within the image. This allows for adjustments in skin tones, such as correcting warm or cool undertones, without affecting other colors in the image. This approach ensures natural-looking color correction specific to the skin.
- Gradient Map: A gradient map applies a smooth gradient to the image, which can be used to create subtle tonal transitions within the skin, adjusting its overall color and intensity. A gradient map allows for a more nuanced approach to skin tone enhancement, as the transition is smooth and gradual.
Examples of Adjustments and Their Effects, Skin smoothing Photoshop
Adjusting skin tone and texture significantly impacts the overall smoothing effect. These examples demonstrate how different adjustments alter the final result.
- Over-smoothing: Applying excessive blurring or smoothing techniques can lead to a loss of detail and a mask-like appearance, making the skin look unnatural. This can create a noticeable artificiality, particularly when the adjustments are excessive.
- Subtle Adjustments: Applying subtle adjustments to the skin’s texture and tone can create a more natural and polished appearance, while preserving the details and avoiding an overly smooth result. This method aims to maintain the natural characteristics of the skin.
- Color Correction: Correcting skin tone issues, such as uneven color or inaccurate undertones, using adjustment layers like Selective Color, helps to create a more natural and balanced skin tone, crucial for achieving a realistic smoothing effect.
Achieving a Natural-Looking Skin Smoothing Effect
A key technique is to avoid drastic changes and instead focus on subtle enhancements. This approach is essential to create a natural-looking smoothing effect. Carefully selecting the appropriate adjustment layers and techniques ensures the outcome aligns with the original image’s aesthetic.
Adjustment Layers for Skin Tone and Texture
The table below Artikels common adjustment layers in Photoshop for skin tone and texture adjustment.
| Adjustment Layer | Description | Effect on Skin Smoothing |
|---|---|---|
| Curves | Adjusts tonal range | Provides precise control over highlights and shadows, crucial for correcting uneven skin tones. |
| Levels | Adjusts tonal range | Effective for correcting uneven lighting and brightness, improving overall skin tone consistency. |
| Selective Color | Adjusts specific colors | Enables targeted color correction, allowing for precise adjustments in skin undertones and hues. |
| Gradient Map | Applies a gradient | Creates smooth tonal transitions, useful for subtle skin tone adjustments. |
Avoiding Over-Smoothing
Over-smoothing in Photoshop, while tempting for achieving a flawless look, can often lead to unnatural and undesirable results. Understanding the pitfalls of excessive smoothing is crucial for maintaining a natural and appealing image. This section will detail the dangers of over-smoothing, its consequences, and practical techniques to avoid it.Excessive smoothing can erase important details, making the skin appear overly smooth and artificial.
This can have a negative impact on the overall aesthetic quality of the image, potentially detracting from its realism.
Dangers of Over-Smoothing
Over-smoothing in Photoshop can lead to a loss of natural skin texture, making the subject appear unrealistic. This effect can be particularly noticeable in areas with natural variations in skin tone and texture.
Consequences of Over-Smoothing
The consequences of over-smoothing can range from subtle to dramatic, depending on the degree of smoothing applied. The loss of subtle details in skin texture can result in an unnatural appearance. Furthermore, the removal of fine lines and wrinkles can erase evidence of age and character, potentially altering the subject’s identity in the image.
Techniques to Avoid Over-Smoothing
Maintaining natural skin features is key to avoiding an over-smoothed appearance. Utilizing a light touch, and working in small increments when adjusting smoothing parameters, is recommended. Experimentation is vital; observe the effects of each smoothing step carefully. Always prioritize the preservation of natural skin texture and variations. The use of a non-destructive editing approach, such as adjustment layers, is beneficial for this purpose.
This method allows for adjustments to be made without permanently altering the original image. It is also prudent to adjust the smoothing settings based on the specific characteristics of the skin in different areas of the image.
Examples of Over-Smoothed Images and Their Negative Impacts
| Over-Smoothed Image Example | Negative Impact |
|---|---|
| An image of a woman with visible pores and fine lines, where smoothing has been applied excessively, resulting in a smooth, almost featureless complexion. | The image loses its natural realism, and the subject appears unnatural. The character and identity of the subject are diminished. |
| A portrait where smoothing has removed natural wrinkles and lines, leading to a face that appears overly smooth and youthful. | The image loses its authenticity, as the natural aging process and characteristics are not represented. The viewer may perceive the image as artificial. |
| A close-up image of a person’s skin, where smoothing has erased all texture and blemishes, leaving the skin looking overly perfect. | The image loses its natural appeal and becomes unnatural. The texture and natural variations of the skin are absent. |
Specific Techniques for Smoothing Different Skin Types
A crucial aspect of skin smoothing in Photoshop is understanding and adapting techniques to diverse skin types. Different skin tones and textures necessitate tailored approaches to achieve natural-looking results without compromising the subject’s unique characteristics. Recognizing the inherent variations in skin types is key to successful and respectful image editing.
Understanding Skin Type Variations
Skin types exhibit a spectrum of characteristics, including tone, texture, and the presence of pores and fine lines. These variations influence how smoothing techniques should be applied. For instance, a person with oily skin might require a different approach than someone with dry skin. Recognizing these distinctions helps avoid over-smoothing, which can result in an unnatural appearance.
Adjusting Smoothing for Different Skin Types
The choice of smoothing technique should be context-sensitive. A delicate approach is vital for individuals with sensitive or easily irritated skin. Techniques that minimize the impact of pores or fine lines are crucial. Conversely, individuals with more pronounced wrinkles or blemishes might benefit from a more targeted approach to enhance their natural appearance.
Examples of Skin Types and Appropriate Techniques
A person with dry skin, exhibiting fine lines and a matte texture, might benefit from a combination of softening filters and careful adjustments to local contrast, avoiding over-smoothing. On the other hand, a person with oily skin, characterized by larger pores and a sheen, might find success with techniques that reduce the prominence of pores without altering the overall skin tone.
A person with darker skin might require specific color adjustments to maintain skin tone integrity during smoothing.
Table of Recommended Smoothing Techniques
| Skin Type | Recommended Smoothing Techniques | Description |
|---|---|---|
| Dry Skin | Gentle softening filters, local contrast adjustments, reduced sharpening | Focuses on minimizing fine lines and wrinkles while maintaining natural texture. |
| Oily Skin | Pores reduction filters, subtle smoothing, selective blurring | Aims to reduce the appearance of pores without altering skin tone or creating an unnatural smoothness. |
| Combination Skin | Targeted smoothing for specific areas (e.g., T-zone), gentle adjustments to other areas | Addresses different needs of various zones of the face. |
| Mature Skin | Targeted smoothing in areas with wrinkles or lines, avoiding over-smoothing, selective blurring | Enhances the natural appearance while diminishing wrinkles without creating an artificial look. |
| Darker Skin Tones | Color adjustments during smoothing, preservation of skin tone, avoiding color shifts | Preserves the natural color and tones of the skin while enhancing smoothness. |
Understanding Skin Structure for Smoothing: Skin Smoothing Photoshop
Skin smoothing in Photoshop requires a nuanced understanding of skin’s anatomical structure. A superficial knowledge of how the skin is built can significantly improve the realism and naturalness of your edits. This understanding helps to identify areas where smoothing can enhance the image without appearing unnatural or distorted. Considering the skin’s three layers—epidermis, dermis, and hypodermis—is crucial for achieving subtle and believable results.
Skin Anatomy and Image Editing
The skin, a complex organ, is comprised of three primary layers. The epidermis, the outermost layer, is thin but crucial for protection. It’s composed of multiple layers of cells, and its texture directly influences the overall appearance of the skin. The dermis, the middle layer, contains collagen and elastin fibers that give skin its strength and elasticity. Variations in the density and arrangement of these fibers contribute to the skin’s texture.
The hypodermis, the deepest layer, contains fat and connective tissue. It provides insulation and cushioning. Knowing the relative thicknesses and characteristics of these layers helps in selecting appropriate smoothing techniques and avoiding overly smoothed areas.
Effects of Smoothing on Skin Texture
Smoothing techniques, when used effectively, can reduce the appearance of fine lines, wrinkles, and pores, creating a more even skin tone. However, excessive smoothing can create a plastic or unnatural look. Careful consideration of the skin’s natural variations is key to achieving a realistic outcome. The smoothing process should mimic the effects of natural light and shadow on the skin’s surface, avoiding any drastic changes that disrupt the skin’s overall shape and structure.
Using Anatomical Knowledge in Photoshop
In Photoshop, applying smoothing tools should be guided by the understanding of skin anatomy. The epidermis’s uneven texture can be addressed by using smoothing tools with lower intensity. The dermis, with its collagen and elastin fibers, may require a more subtle approach, focusing on the texture and overall tone, rather than obliterating it entirely. Areas of the skin that are thicker or denser in texture may need less smoothing than those that are thinner or more delicate.
Realistic Skin Smoothing Techniques
To create realistic results, start with a low smoothing intensity and gradually increase it as needed. Pay close attention to the skin’s natural contours and shadows. Use the “Brush” tool with a soft edge and adjust the smoothing radius accordingly to target specific areas. Observe the skin’s natural imperfections to identify areas that may require more or less smoothing.
A good rule of thumb is to mimic natural skin imperfections in the smoothed area to ensure the edited image appears realistic.
Real-World Applications of Skin Smoothing
Skin smoothing, a technique employed in various fields, offers a range of applications, from enhancing photographic portraits to improving the appearance of digital media. Understanding these applications is crucial for both professionals and individuals seeking to use skin smoothing tools effectively and ethically. Its use extends beyond simple aesthetic enhancement, impacting professional industries and even raising ethical considerations.This section details the real-world use cases for skin smoothing, emphasizing the importance of responsible application and ethical considerations.
It explores its application in portraiture, fashion photography, and other industries, highlighting both the potential benefits and the need for mindful use.
Professional Use Cases in Portraiture
Skin smoothing plays a crucial role in portrait photography, enabling photographers to refine skin texture and tone. This can be particularly useful in capturing a desired aesthetic, whether that’s a flawless, polished look or a more natural appearance. For instance, a photographer might use skin smoothing to remove blemishes and fine lines from a client’s portrait, enhancing the overall aesthetic appeal.
Such adjustments can help create a harmonious image and create a pleasing visual effect.
Applications in Fashion Photography
In fashion photography, skin smoothing is frequently used to achieve a particular look and feel. It can be instrumental in conveying the desired mood or style of the shoot. For example, in high-fashion campaigns, smoothing can help models appear flawless, enhancing their portrayal as perfect representations of the brand. This is important in creating an image that embodies the brand’s intended message.
Use in Other Industries
Skin smoothing extends beyond portraiture and fashion photography. In advertising, it can be used to present products in an appealing way. In digital media production, it can help refine video and image quality. This is often done to achieve a consistent aesthetic across a brand’s various marketing materials.
Ethical Considerations
The use of skin smoothing necessitates careful consideration of ethical implications. While it can enhance images, it’s essential to avoid creating unrealistic beauty standards that can negatively impact self-esteem or societal perceptions of beauty. Moreover, it is important to ensure that any smoothing applied is done subtly and not to the extent that it distorts reality. It’s crucial to maintain transparency and avoid misleading consumers with overly manipulated images.
Examples of Skin Smoothing in Different Industries
- Advertising: Skin smoothing can be used to enhance the appearance of models in advertisements, making products seem more desirable. A well-known example is smoothing out blemishes and fine lines on models in commercials for cosmetics, making the product seem more accessible to the average consumer.
- Film and Television: In post-production, smoothing can be used to refine actors’ appearances, ensuring a consistent visual quality across the project. For instance, skin smoothing can help maintain a flawless look for actors in a film throughout the production process.
- Social Media: Many social media users employ skin smoothing filters to enhance their online presence. The effect can vary from a subtle refinement to a more dramatic transformation, and this can have a significant impact on how others perceive the user.
Importance of Subtlety and Transparency
The key to ethical skin smoothing lies in maintaining subtlety and transparency. Over-smoothing can lead to unrealistic expectations and potentially negative impacts on self-image. Therefore, careful consideration of the level of smoothing is essential. Professionals should be mindful of the impact their work can have and ensure that the alterations are not excessive. Transparency about the use of skin smoothing is also crucial, particularly in commercial settings.
Comparison of Different Photoshop Versions
Photoshop’s skin smoothing tools have evolved significantly across various versions. Understanding these changes allows users to leverage the most appropriate tools for their specific needs and desired outcomes. This evolution is driven by advancements in image processing technology, user feedback, and the constant need to improve workflow efficiency.The comparison of skin smoothing features across different Photoshop versions highlights the progression of this functionality.
Early versions offered basic tools, while later iterations introduced more sophisticated techniques and options. The advancements reflect an increasing understanding of skin complexities and a desire to provide more nuanced control over the smoothing process.
Evolution of Skin Smoothing Tools
The early versions of Photoshop primarily relied on blurring and Gaussian blur filters. These techniques provided a general smoothing effect but lacked the precision and control needed for sophisticated skin retouching. Subsequent versions incorporated more targeted options, like the Liquify filter and various adjustment layers, allowing users to manipulate skin textures with greater accuracy. Recent versions have introduced more sophisticated AI-powered tools, leading to more realistic and natural-looking results.
Comparison of Smoothing Tools Across Versions
| Photoshop Version | Key Smoothing Features | Advantages | Limitations |
|---|---|---|---|
| Photoshop CS6 | Basic blurring filters, adjustment layers (Levels, Curves). Limited control over specific areas. | Ease of use, accessibility for basic retouching. | Lacks precision, potentially creates unnatural results, difficult to control intensity and avoid over-smoothing. |
| Photoshop CC 2015 | Improved Liquify filter, more nuanced adjustment layers. Introduction of a limited selection of smart filters. | Increased precision in manipulating skin textures, improved control over smoothing intensity. | Still requires careful manual adjustment, AI-powered smoothing not yet available. |
| Photoshop CC 2020 | Advanced adjustment layers, introduction of AI-powered content-aware tools, and further improvements to smart filters. | Greater realism, automated features reduce manual effort, and enhance efficiency. | Learning curve for new tools, potentially a steeper learning curve for advanced features. |
| Photoshop CC 2023 | AI-powered skin smoothing tools, more advanced smart filters, and precise control over specific areas. | Natural-looking results with reduced manual effort, precise and accurate manipulation of textures. | Potential for over-smoothing if not used cautiously, learning curve for new AI-powered tools. |
The table above illustrates the evolution of skin smoothing tools from simple blurring techniques to advanced AI-powered tools. Each version builds upon the previous one, offering improved precision, control, and realism. This progression reflects the ongoing advancements in image processing technology and the evolving needs of professional retouchers.
Troubleshooting Skin Smoothing Issues

Troubleshooting skin smoothing in Photoshop often involves identifying the root cause of undesirable results. Careful analysis of the workflow and the image’s characteristics can lead to effective solutions. Understanding potential pitfalls and the steps to rectify them is crucial for achieving optimal smoothing results.Effective skin smoothing hinges on a nuanced approach. Blindly applying techniques can lead to unnatural or distorted results.
A systematic process, combining understanding of the image with specific Photoshop tools, is essential to avoid common problems.
Common Skin Smoothing Problems and Solutions
Troubleshooting skin smoothing often involves understanding the interplay between various factors. Careful consideration of the image’s characteristics and the applied techniques is vital. The table below Artikels common problems and their corresponding solutions.
| Problem | Description | Solution |
|---|---|---|
| Over-Smoothing | The skin appears overly smooth, losing natural texture and detail, resulting in an unnatural, plastic look. | Reduce the strength of the smoothing tool or filter. Adjust the brush size and hardness to maintain subtle smoothing and natural texture. Use a low-intensity smoothing filter, if available, to avoid extreme effects. |
| Unnatural Skin Tone | The skin tone after smoothing appears inconsistent or artificially altered, deviating from the original or desired look. | Use the color correction tools to fine-tune the skin tone after smoothing. Adjust levels or curves to match the skin tone’s natural variations. Consider using the “Match Color” tool for more accurate adjustments. Carefully examine the results after every step to prevent unwanted alterations. |
| Halo Effect | A visible halo or glow appears around sharp edges or transitions after smoothing, creating an artificial border. | Reduce the radius or strength of the smoothing tool. Use a soft-edged brush for smoothing to avoid harsh transitions. Employ the “Feather” or “Blur” tools to mitigate the halo effect before applying the smoothing tool. |
| Texture Loss | Fine details and textures on the skin are lost after smoothing, resulting in a flat or featureless appearance. | Lower the smoothing intensity to retain the subtle textures. Use a smaller brush size for more targeted smoothing. Try different smoothing methods (e.g., Gaussian Blur, Unsharp Mask) to retain the desired details. |
| Skin Looks Mask-like | The skin exhibits a mask-like or unnatural appearance due to over-processing. | Reduce the smoothing intensity gradually. Apply smoothing in multiple passes, each with a lower intensity, to achieve a subtle result. Avoid excessive use of the same smoothing tool or filter. Gradually refine the adjustments to avoid a drastic change. |
Analyzing the Root Cause of Issues
Effective troubleshooting hinges on understanding the root causes of problems. Careful observation of the image and the smoothing process can reveal the underlying issue.
Specific Troubleshooting Techniques
For complex smoothing issues, a systematic approach is essential. Identifying the source of the problem and applying appropriate corrective measures can help achieve optimal results.
Using Adjustment Layers for Smoothing
Adjustment layers provide a non-destructive way to adjust skin smoothing. This approach allows for flexibility and easy reversal of changes.
Illustrative Examples of Skin Smoothing
Skin smoothing in Photoshop is a versatile technique with applications ranging from enhancing portraits to retouching blemishes. Understanding the various methods and their visual impact is crucial for achieving desired results. This section provides illustrative examples of skin smoothing, demonstrating different approaches and levels of refinement.
Examples of Subtle Skin Smoothing
Subtle skin smoothing is often preferred for maintaining a natural look. It focuses on reducing minor imperfections without significantly altering the skin’s texture or tone.
- Example 1: A before-and-after image pair showcases a subject with mild redness and small pores. The after image utilizes a combination of the “Gaussian Blur” filter and a “Luminosity Mask” adjustment layer to soften the appearance of these imperfections while preserving the overall skin tone and texture. The techniques involved a low-intensity Gaussian blur and subtle adjustments to the curves for better skin smoothing.
- Example 2: A similar example, this time focusing on uneven skin tone. The retouching was achieved through a combination of the “Patch Tool” for localized adjustments and a “High Pass Filter” to fine-tune the skin texture. The technique used here was to isolate the areas with uneven skin tone, carefully matching the surrounding skin tone and texture with the patch tool.
Then, the high-pass filter was used to bring out subtle details while preserving the overall smoothness.
Examples of Moderate Skin Smoothing
Moderate skin smoothing aims to significantly reduce visible imperfections while maintaining a natural appearance.
- Example 3: A subject with noticeable acne scars is retouched using a combination of the “Healing Brush Tool” and the “Spot Healing Brush Tool”. The Healing Brush Tool is employed to match the surrounding skin color and texture to the scars, and the Spot Healing Brush Tool is used for more precise spot retouching. A key aspect of this technique is careful blending to avoid harsh transitions between the retouched and untouched skin areas.
- Example 4: The subject displays mild wrinkles and fine lines. To address this, the “Liquify” filter is used, with precise brush strokes to gently smooth the skin without distorting the facial features. The techniques involve applying very light pressure to the liquefy tool, focusing on specific areas, and carefully adjusting the skin to create a natural smooth effect.
This method requires a high degree of skill to maintain a natural appearance.
Examples of Advanced Skin Smoothing
Advanced skin smoothing is used to dramatically improve the skin’s appearance and may involve significant alterations to the skin’s texture and tone.
- Example 5: A subject with visible blemishes and uneven texture is retouched using a combination of the “Clone Stamp Tool”, “Content-Aware Fill”, and “Selective Color” adjustment layers. The Clone Stamp Tool is used to replace the blemishes with surrounding skin, while the Content-Aware Fill Tool fills in areas with larger imperfections. A crucial step in this technique is to use a soft brush and blending options to ensure the retouching blends seamlessly with the surrounding skin.
- Example 6: A before-and-after image pair demonstrates how a subject with pronounced wrinkles and deep lines is smoothed using the “Liquify” filter and “Dodge and Burn” techniques. The liquify tool, used in conjunction with dodge and burn tools, is employed to enhance and smooth the skin while carefully preserving facial features. Careful attention to detail and the use of non-destructive editing techniques are crucial to prevent over-smoothing and maintain a natural appearance.
Final Wrap-Up
In conclusion, mastering skin smoothing in Photoshop involves understanding the various techniques, tools, and levels of adjustments. Careful consideration of skin type and avoiding over-smoothing is paramount for creating natural-looking results. By applying the knowledge presented in this guide, you can effectively enhance images while preserving the subject’s unique features.
User Queries
What are the common tools used for skin smoothing in Photoshop?
Common tools include the Healing Brush, Patch Tool, Spot Healing Brush, and various adjustment layers like Curves, Levels, and Color Balance. Filters like the Gaussian Blur can also play a role.
How can I avoid over-smoothing in Photoshop?
Using a light touch, carefully adjusting the parameters, and always previewing the changes are key. Look for subtle improvements rather than drastic alterations.
What are the differences between subtle and significant skin smoothing?
Subtle smoothing focuses on minor imperfections, while significant smoothing alters the overall texture more noticeably. Adjusting brush sizes and intensity levels in tools like the Healing Brush control the degree of smoothing.
What are the ethical considerations when using skin smoothing?
Maintaining a natural look is crucial. Avoid excessive smoothing that can lead to an unrealistic appearance. Be mindful of the impact on the subject and consider the context of the image.


