Top 10 Photoshop Tools You Need to Know sets the stage for a deep dive into the essential tools that power image manipulation. From fundamental selection tools to advanced color adjustments, this guide provides a comprehensive overview, perfect for beginners and experienced users alike. Mastering these tools unlocks a world of creative possibilities.
This exploration will cover the crucial selection tools, essential editing techniques, and powerful layer management methods. We’ll also delve into the artistry of filters, effects, and text, along with advanced features like smart objects. Finally, understanding color models and their application will round out this journey.
Introduction to Photoshop Tools
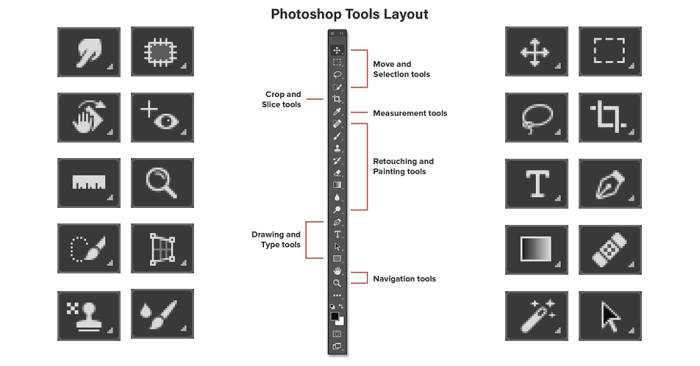
Unleashing the power of digital imagery requires a deep understanding of Photoshop’s versatile tools. From basic image adjustments to complex manipulations, Photoshop empowers users to transform ordinary photos into extraordinary works of art. Mastering these tools unlocks a world of creative possibilities, allowing you to refine details, enhance composition, and seamlessly blend creativity with technical proficiency. This journey into the world of Photoshop tools will equip you with the fundamental knowledge and practical skills to confidently navigate the software and achieve your desired visual outcomes.Image editing with Photoshop hinges on understanding the core principles of digital manipulation.
Understanding how layers, selections, and adjustments work together is crucial. Knowing how to apply filters, blend modes, and color corrections allows you to achieve a wide range of effects, from subtle enhancements to dramatic transformations. Photoshop’s vast array of tools provides precise control over every aspect of the image, enabling you to tailor it to your specific vision.
Essential Tools for Image Editing
Photoshop’s core strength lies in its comprehensive collection of tools, each designed for a specific task. Understanding the purpose and function of these tools is paramount to efficient image manipulation. Knowing how to use these tools effectively allows for precise control over every element of the image.
- Selection Tools: These tools allow you to isolate specific parts of an image for editing or manipulation. Different selection tools, such as the Rectangular Marquee Tool, Elliptical Marquee Tool, and Magic Wand Tool, provide various ways to isolate elements based on shape, color, or proximity. Precise selection is critical for tasks like cropping, resizing, and removing unwanted elements.
- Editing Tools: Tools like the Move Tool, the Crop Tool, and the Eraser Tool provide basic editing functions. The Move Tool allows for precise repositioning of elements within the image. The Crop Tool allows for cropping and resizing images. The Eraser Tool allows for removing portions of the image. These tools are fundamental for basic image adjustments.
- Adjustment Layers: Adjustment layers allow non-destructive editing of an image’s properties, such as brightness, contrast, and color balance. Applying these adjustments to layers preserves the original image data, enabling iterative refinements without compromising the original image quality. This approach allows for experimentation without risk of irreversible changes.
- Painting and Drawing Tools: These tools, such as the Brush Tool, Pen Tool, and Gradient Tool, enable the creation of artistic elements and fine details. The Brush Tool allows for the application of textures and colors, the Pen Tool for precise vector-based drawing, and the Gradient Tool for smooth transitions between colors. These tools are essential for enhancing or altering the aesthetic appeal of an image.
Understanding Layer Management
Mastering layers is essential for sophisticated image editing. Layers are individual components of an image that can be edited independently. This non-destructive approach enables the creation of complex images by combining multiple elements, and allows for experimentation and revisions without affecting other parts of the image. Using layers effectively helps to organize and manage the different components of an image, providing flexibility and control.
- Layer Creation: Creating new layers allows for separating different elements of an image, enabling independent adjustments. New layers facilitate non-destructive editing, enabling adjustments and refinements without altering the original image data.
- Layer Masking: Layer masks are a crucial tool for selectively revealing or hiding portions of a layer. This allows for precise control over which parts of the layer are visible in the final image. Using layer masks allows for subtle transitions and smooth blends between different layers.
- Layer Styles: Layer styles add visual effects to layers, such as drop shadows, inner shadows, and glows. Applying these styles enhances the visual appeal of the image and allows for the creation of unique artistic effects. Layer styles provide creative tools to enhance the visual impact of an image.
Selection Tools
Precise selections are fundamental to effective image editing in Photoshop. They allow you to isolate specific areas of an image for adjustments, enhancements, or removal. Without accurate selections, manipulating specific elements becomes cumbersome and prone to errors. Mastering selection tools empowers you to achieve intricate edits with precision and control.
Lasso Tool
The Lasso tool offers flexibility in selecting free-form shapes. Its various modes, including the Polygonal Lasso and Magnetic Lasso, cater to different selection needs. The Polygonal Lasso is best for creating angular shapes, while the Magnetic Lasso tool automatically follows edges, streamlining selections around complex shapes. However, achieving smooth, curved selections with the Lasso tools can be challenging, requiring careful control and numerous points.
Magic Wand Tool
The Magic Wand tool is a straightforward option for selecting areas with similar colors. It’s rapid and intuitive for simple selections where color variations are clear and consistent. Its tolerance setting controls the range of colors included in the selection, allowing for adjustments based on the image’s complexity. However, it struggles with subtle color gradients or variations in lighting, leading to imprecise selections in complex images.
Precise color matching is critical for the Magic Wand tool to work effectively.
Quick Selection Tool
The Quick Selection tool blends the simplicity of the Magic Wand with the flexibility of the Lasso. It offers a more intuitive approach to selecting complex shapes by allowing you to refine selections interactively with brush-like strokes. It’s particularly effective for selecting areas with subtle color variations or gradual transitions. However, fine-tuning selections with the Quick Selection tool can still be challenging in highly intricate areas.
It’s essential to use the Refine Edge tool to refine selections and improve precision.
Pen Tool
The Pen tool is a powerful tool for creating precise selections, allowing you to define paths with anchor points to create vector shapes. It provides unparalleled control over the selection, allowing for precise manipulation of complex shapes, such as logos or illustrations. The Pen tool is best used for intricate designs or situations where pixel-perfect accuracy is critical.
Creating complex paths with the Pen tool requires careful placement and manipulation of anchor points. The Pen tool is the gold standard for precise selections when dealing with sharp edges.
Other Selection Methods
Advanced selections often involve combining multiple tools or using the Refine Edge tool to enhance the precision of initial selections. This approach allows for greater control and accuracy, especially when dealing with complex or intricate images. Combining the Quick Selection Tool with the Lasso tool is a common strategy to obtain a more accurate selection. Using these tools in combination is particularly effective when dealing with complex images or shapes.
Importance of Precise Selections
Precise selections are crucial for various image editing tasks, such as removing unwanted objects, making intricate adjustments to specific parts of an image, and applying effects selectively. The accuracy of the selections directly impacts the quality and integrity of the edited image. This precision ensures the edits are seamlessly integrated and maintain the overall visual integrity of the image.
A precise selection is essential for accurate image manipulation and seamless integration of edits.
Editing Tools
Photoshop’s editing tools are crucial for refining images, enhancing visual appeal, and correcting imperfections. These tools allow for precise adjustments to color, brightness, contrast, and other crucial aspects, leading to professional-quality results. Mastering these tools empowers users to transform raw images into polished, impactful visuals.Color adjustments are fundamental to achieving a desired aesthetic. Brightness and contrast controls allow for subtle or dramatic modifications to the overall tonal range, highlighting details or softening shadows as needed.
These adjustments are vital for ensuring images appear natural and engaging. Image retouching tools address imperfections, enabling the removal of blemishes and the enhancement of features for a polished final product.
Color Adjustments
Color adjustments in Photoshop offer a wide array of tools for fine-tuning the visual characteristics of an image. These adjustments are vital for achieving a desired aesthetic or correcting inaccuracies in the original image. Understanding these tools is critical to achieving professional-quality results.
- Hue/Saturation: This tool independently adjusts hue, saturation, and lightness, enabling precise control over color tones. A user can selectively adjust the intensity and vibrancy of specific colors without affecting others.
- Curves: This tool offers a highly versatile method for adjusting tonal values and color curves, providing precise control over color balance and contrast. It allows for non-linear adjustments that can achieve nuanced results.
- Color Balance: This tool is useful for adjusting the balance between the red, green, and blue channels in an image. It enables users to fine-tune the overall color cast and create a more balanced or stylized look.
Brightness and Contrast Adjustments
Brightness and contrast adjustments are fundamental to image enhancement, allowing users to control the overall tonal range. Adjusting these values can significantly impact the visual appeal and impact of an image.
- Levels: This tool offers precise control over the tonal range of an image, enabling adjustments to the highlights, midtones, and shadows. It allows users to fine-tune the image’s overall brightness and contrast, which is useful for making an image pop.
- Brightness/Contrast: This tool provides a straightforward method for adjusting the overall brightness and contrast of an image. It’s ideal for quick adjustments, providing a more accessible alternative to more complex tools.
Image Retouching Tools
Image retouching tools in Photoshop are vital for removing blemishes, enhancing features, and achieving a polished look. These tools are essential for transforming raw images into polished, impactful visuals.
- Spot Healing Brush: This tool is excellent for removing small imperfections, such as blemishes or dust particles. It seamlessly blends the surrounding pixels to create a natural-looking repair.
- Healing Brush: This tool allows for more complex retouching, enabling the removal of larger imperfections or the blending of areas with varying tones. It samples pixels from a specified area to create a more natural repair.
- Clone Stamp: This tool is ideal for replicating a specific area of the image to cover imperfections or fill in missing parts. This is especially useful for removing scratches or damage.
- Patch Tool: This tool is used to correct larger areas of the image, such as a damaged section or a large blemish. It creates a selection and replaces the area with a seamless blend of surrounding pixels.
Examples of Image Edits
Illustrative examples demonstrate the impact of these tools.
- Example 1: A portrait image with a noticeable blemish on the cheek. Using the Spot Healing Brush, the blemish is removed, resulting in a clean and polished look. The image demonstrates a marked improvement in the overall visual appeal, as the blemish is seamlessly removed without leaving any noticeable artifacts.
- Example 2: A landscape photograph with a muted color palette. Using the Hue/Saturation tool, the colors are adjusted to enhance the vibrancy and saturation of the landscape, creating a more visually appealing image. This example shows how color adjustments can transform a muted image into a more vibrant and engaging piece.
Effective Use of Tools
Effective use of editing tools involves understanding the specific needs of each image and employing the most appropriate tools for achieving the desired outcome. Careful consideration of the tools and techniques used can lead to significant enhancements in image quality.
- Understanding Image Characteristics: Assess the specific image characteristics to determine the best approach. Consider the overall tonal range, color balance, and presence of imperfections.
- Layer Management: Using layers is crucial to preserve the original image and allow for non-destructive edits. Experimentation with different tools on separate layers allows for easy reversal or adjustment.
- Gradual Adjustments: Begin with subtle adjustments and gradually increase the intensity as needed to avoid drastic or unnatural results. This ensures a controlled approach and avoids unwanted alterations.
Layers and Masking
Layers are the cornerstone of non-destructive editing in Photoshop. They allow you to build up images in separate, editable components, which dramatically improves workflow and control. This modular approach is crucial for complex projects, enabling you to make changes to one element without affecting others. Masking further enhances this flexibility, allowing precise control over the visibility and blending of layers.Layers are essentially independent image planes stacked one atop another.
They can contain different elements like backgrounds, foreground objects, text, and adjustments. This layered structure enables sophisticated image compositing and retouching by allowing for the alteration of individual layers without affecting the others. By utilizing layers and masking techniques, complex images can be assembled and manipulated with precision and ease.
Understanding Layers
Layers are crucial in Photoshop for organizing and manipulating image elements. They facilitate non-destructive editing, allowing for changes to one element without affecting others. The core principle is that each layer functions as a self-contained unit, enabling users to easily edit, move, or delete elements without impacting the entire image. This granular control is pivotal for intricate image manipulation and compositing.
Types of Layers
Photoshop offers a diverse range of layer types, each catering to specific editing needs. Basic layers are used for images and objects, but there are also adjustment layers that apply non-destructive effects, such as brightness, contrast, or color adjustments, to the entire image or a specific area without altering the original image data. Smart objects enable editing of raster and vector data without loss of quality, and vector shapes are used for creating and manipulating geometric forms.
Further, there are text layers, enabling the creation and editing of text within the image.
Compositing with Layers
Layers empower image compositing by allowing you to assemble multiple elements into a cohesive whole. For instance, you could place a photograph of a person in front of a backdrop or add a graphic overlay. This approach allows for the manipulation of individual elements without affecting the overall image. Furthermore, you can easily adjust the blending modes of layers, creating a wide range of effects.
Masking Techniques
Masking in Photoshop provides refined control over the visibility and blending of layers. Using masks, you can precisely define areas of a layer that are visible or hidden, creating intricate and subtle effects. For example, a layer mask can be used to selectively apply effects, blend colors, or create intricate cutouts within an image. A layer mask is a grayscale image that acts as a stencil, with white areas revealing the underlying layer and black areas hiding it.
The gray tones create gradual transitions, allowing for smooth blends between layers.
Non-Destructive Editing
Layers and masks are the foundation of non-destructive editing in Photoshop. This method of image manipulation ensures that original data remains unaltered, and changes are applied to a copy. This approach prevents data loss and allows for repeated editing and adjustments without affecting the original file. This characteristic is essential for iterative refinement, as modifications can be made, and the original image remains untouched, ensuring you have the option to revert back to the initial state if needed.
This ability to undo or redo edits without altering the original data streamlines the workflow significantly.
Filters and Effects
Photoshop’s filter and effects tools provide a powerful arsenal for transforming images. These tools can dramatically alter the visual character of an image, enabling the creation of unique artistic styles and enhancing existing images for greater impact. Mastering these tools allows for creative exploration and the ability to elevate images beyond their original form.Filters in Photoshop offer a wide array of possibilities, from subtle adjustments to dramatic transformations.
They are a key component in achieving specific visual outcomes, ranging from stylized looks to realistic enhancements. Understanding the capabilities of these tools empowers the user to achieve diverse creative objectives, from simple image adjustments to complex artistic manipulations.
Available Filters
Photoshop boasts a comprehensive collection of filters categorized for various effects. These filters are organized into different groups, allowing for efficient navigation and selection. The categories generally include but are not limited to: Artistic, Blur, Distort, Pixelate, Sketch, Stylize, Texture, and others.
Unique Filter Effects
Many filters offer unique capabilities that go beyond basic adjustments. Some filters, such as the “Crystallize” filter, can introduce a mosaic-like effect, while the “Pinch” filter can distort images in a captivating manner. These effects, and many more, are designed to transform the visual appearance of images, offering a wealth of possibilities for artistic expression. These tools are not limited to merely altering colors or textures, but also fundamentally change the image’s structure.
Artistic Effects
The use of filters can produce a wide spectrum of artistic effects. The “Oil Paint” filter, for instance, can transform a photo into a realistic oil painting, capturing the texture and brushstrokes of the medium. Similarly, the “Glowing Edges” filter can produce a luminous halo around the subject, lending a dramatic and artistic touch. The “Stylize” category offers numerous other options, including “Emboss,” “Feather,” and “Find Edges,” each capable of generating distinct visual results.
Experimentation is key to discovering the unique artistic potentials inherent in these tools.
Creative Uses for Enhancement
Filters can be employed creatively to enhance images in diverse ways. A filter might be used to subtly adjust the contrast of a photograph, making it stand out more clearly. Alternatively, a filter can be employed to create a completely different artistic style, transforming a portrait into a stylized graphic. The creative application of filters is not limited to specific genres or subjects; their adaptability allows for limitless possibilities.
This adaptability allows photographers and graphic designers to produce a multitude of visual outcomes, from subtle enhancements to dramatic transformations.
Creative Uses of Filters and Effects
Filters can be combined for even more striking results. Applying a “Gaussian Blur” filter followed by a “Sharpen” filter can be used to achieve a specific aesthetic. Similarly, a “Distort” filter can be combined with a “Texture” filter to create a surreal or abstract effect. The combination of filters enables a vast array of outcomes, transforming the image beyond its initial state and revealing new possibilities for visual storytelling.
This approach allows for unique and personalized effects.
Image Adjustments: Top 10 Photoshop Tools You Need To Know
Image adjustments are fundamental to refining and enhancing photographic and graphic designs in Photoshop. These tools allow you to modify aspects like size, perspective, and overall visual impact, crucial for professional-grade results. Effective use of these tools ensures the final image aligns perfectly with the intended aesthetic and message.Image adjustments are essential for professional design because they allow designers to fine-tune elements like color, contrast, and sharpness, making images more visually appealing and impactful.
This precision is crucial for marketing materials, web design, and print media, where the visual presentation often directly influences the viewer’s perception and reaction.
Resizing, Cropping, and Rotating Images
Resizing, cropping, and rotating images are fundamental image adjustments that alter the dimensions and orientation of an image. These adjustments are crucial for composition and ensuring images fit within specific layouts or formats. They enable precise control over the visual presentation of the image.
- Resizing involves changing the dimensions of an image, either by scaling it up or down. This is useful for adapting images to different screen sizes, print layouts, or specific design requirements. Resizing can affect the image’s resolution and quality, so understanding the implications is important.
- Cropping allows you to remove unwanted portions of an image, focusing attention on the desired subject matter. It’s often used to improve the composition, eliminate distracting elements, or to create a more balanced and aesthetically pleasing image.
- Rotating is used to adjust the orientation of an image. This is helpful for correcting images that were captured sideways or for aligning them with the overall design.
Adjusting Image Perspectives
Image perspective adjustments allow for modifying the apparent depth and spatial relationships within an image. This is useful for correcting distortions, creating unique visual effects, and enhancing the realism of a photograph.
- Perspective Correction in Photoshop helps adjust the perceived depth of an image by correcting warping or skewing. This is useful for architectural photography or any situation where a straight line is not actually straight.
- Vanishing Point Adjustment tools help refine the perspective in an image by manipulating the vanishing points. This is useful for creating more accurate and realistic representations of 3D objects.
Effective Image Manipulation Techniques
Utilizing image adjustments effectively requires understanding the tools and their specific functions. A well-thought-out strategy for manipulating images is critical for producing professional-quality results.
- Understanding the Image’s Context: Before making any adjustments, thoroughly understand the intended use of the image. This will inform your choices regarding resizing, cropping, rotation, and perspective adjustments.
- Applying Adjustments Strategically: Carefully consider how each adjustment will impact the overall image. Experimentation and iteration are crucial for achieving the desired visual effect.
- Maintaining Image Quality: Be mindful of the potential impact of adjustments on image quality, especially when resizing or cropping. Consider using appropriate settings to mitigate unwanted artifacts or loss of detail.
Importance of Image Adjustments in Professional Design
Image adjustments are essential in professional design for producing polished, visually engaging content. These adjustments refine the aesthetic, ensuring the final product meets the desired standards. Effective image adjustments contribute to a professional and polished final design.
Drawing and Painting Tools
Photoshop’s drawing and painting tools provide a versatile approach to creating illustrations and enhancing images. These tools empower users to add intricate details, textures, and artistic flair to digital creations. They are indispensable for both graphic design and photo manipulation.The selection and refinement of these tools depend on the desired aesthetic. From delicate line art to bold brushstrokes, Photoshop offers a wide range of tools for achieving various artistic styles.
The ability to blend and layer these elements with other image editing techniques further expands creative possibilities.
Brush Tools
The Brush tool is central to many digital painting tasks. Its versatile nature allows for a wide array of strokes and textures. Different brush settings, including size, hardness, and opacity, significantly impact the appearance of the final work. Custom brush creation opens up the possibility of unique artistic expressions.
Pen Tools
The Pen tools in Photoshop are essential for creating precise paths and shapes. These tools enable vector-based illustrations with sharp edges and clean lines. Paths can be modified and adjusted with ease, facilitating detailed design elements. The Pen tool, along with its associated tools, facilitates the creation of complex illustrations, logos, and other vector graphics.
Gradient Tools
Gradient tools in Photoshop are powerful for creating smooth transitions between colors. These tools are crucial for achieving realistic effects, such as gradients within an image, or for creating stylistic backgrounds and transitions. Gradient tools provide a straightforward way to add depth and visual interest to any project.
Other Drawing Tools
Other drawing tools in Photoshop extend the range of possibilities. The Airbrush tool allows for smooth, blended effects, while the Mixer Brush tool provides a means for blending colors dynamically. The Clone Stamp and Healing Brush tools can be used for repairing or masking imperfections in images, as well as for adding elements in a non-destructive manner. Their combination of efficiency and precision is invaluable in a variety of editing situations.
Applying Tools for Image Enhancement
The drawing tools can significantly enhance images by adding details, textures, and a desired artistic style. By carefully selecting the appropriate tool and adjusting its settings, users can add intricate patterns to a photograph, create a stylized portrait, or even entirely reimagine an image.
Comparison of Drawing Tools
| Tool | Strengths | Weaknesses ||————–|——————————————————————————————————————————————————————————————————————-|—————————————————————————————————————————————————————————————————————–|| Brush | Wide range of styles, textures, and effects.
Excellent for adding details, blending, and general painting. | Can be less precise than other tools for very specific tasks.
|| Pen | Precise control over shapes and paths.
Ideal for vector-based illustrations and intricate designs. | Requires more technical skill to master.
Can be less versatile for general painting. || Gradient | Creates smooth color transitions.
Effective for background gradients, fills, and stylistic elements. | Less suitable for detailed drawings or textured effects.
|| Airbrush | Smooth, blended effects.
Excellent for creating soft highlights and shadows. | Can lack the precision of other tools for detailed line work.
|| Mixer Brush | Dynamic color blending capabilities.
Provides a means for creating complex and blended textures. | Less suitable for simple, sharp lines.
|| Clone Stamp | Non-destructive image repair.
Can be used for adding details and elements in a controlled way. | Can be tedious for extensive use.
Might not be the most creative tool. || Healing Brush| Non-destructive image repair.
Can be used to smooth out imperfections. | Less effective for complex image repairs.
Not ideal for adding entirely new elements. |These tools provide a spectrum of control, allowing for both detailed work and broader creative effects.
Text Tools

Adding text is fundamental for enhancing images, providing context, and making them more engaging. Whether you’re adding captions, titles, or even intricate text effects, Photoshop’s text tools offer a wealth of possibilities. Mastering these tools unlocks a powerful way to communicate visually.Text tools in Photoshop are versatile, allowing for the precise placement and customization of text within an image.
From simple captions to elaborate typography, these tools empower you to convey information and create visually appealing compositions. Understanding how to manipulate text attributes is crucial for achieving desired results.
Text Tool Usage for Image Enhancement
The text tools in Photoshop are more than just simple word processors; they’re essential components for effective image composition. They enable the integration of descriptive captions, meaningful titles, and aesthetically pleasing text elements, transforming images from static visuals to engaging narratives. The precision and versatility of these tools allow for a wide array of text styles and placements, enhancing visual communication.
Modifying Text Attributes, Top 10 Photoshop Tools You Need to Know
Precise control over text attributes is essential for crafting compelling visual narratives. This involves modifying elements such as font, size, color, and alignment to ensure the text effectively complements the image. Careful selection of these attributes significantly impacts the visual hierarchy and overall impact of the image.
- Font Selection: A wide range of fonts are available in Photoshop, allowing for diverse stylistic choices. Choosing a font that aligns with the overall theme and message is crucial for visual coherence. Consider the readability and impact of different fonts when making your selection.
- Font Size: Adjusting the size of text is crucial for ensuring visibility and readability. Consider the surrounding image elements and the overall visual hierarchy when determining the optimal font size. Too small and the text will be hard to read; too large, and it might overwhelm the image.
- Font Color: The color of text is a key aspect of visual design. Select a color that contrasts with the image background for optimal readability. Color choices can also contribute to a specific mood or theme, such as using a warm color palette for a friendly image or cool colors for a more professional image.
- Text Alignment: Adjusting text alignment—left, right, center, justified—can significantly impact the visual flow and readability of the text within the image. The choice of alignment often depends on the desired visual balance and the overall aesthetic of the image.
Creating a Detailed Guide for Effective Text Tool Usage
A comprehensive guide to effective text tool usage involves careful consideration of the following steps. These steps, when followed meticulously, result in high-quality text placement and formatting within images.
- Select the Text Tool: Choose the appropriate text tool from Photoshop’s toolbar. Select the Horizontal Type Tool for standard text or the Vertical Type Tool for vertical text.
- Define Text Box: Use the text tool to create a text box or area where you’ll input your text. Adjust the size and shape of the text box to fit your needs.
- Enter Text: Type the desired text into the text box.
- Modify Attributes: Adjust font, size, color, and alignment to achieve the desired aesthetic and readability. This is an iterative process of refinement and adjustment.
- Placement and Positioning: Position the text within the image carefully, considering the overall composition and visual hierarchy.
- Text Effects (Optional): Apply various text effects (e.g., drop shadows, glows) for visual enhancement and impact. This adds a layer of visual interest and differentiation.
Styling and Formatting Text in Photoshop
Photoshop provides a multitude of ways to style and format text. This encompasses options like adding special effects and manipulating text appearance. Mastering these formatting techniques enables the creation of visually engaging and informative images.
- Adding Styles: Photoshop’s character styles allow for consistent application of formatting across multiple text elements. This streamlines the design process and ensures a cohesive visual theme.
- Text Effects: Photoshop offers a variety of text effects, such as drop shadows, glows, and Artikels, to enhance the visual impact of the text. Applying these effects adds a layer of sophistication and visual interest.
- Word Wrap: Use word wrap to ensure that text fits within the designated area without disrupting the layout or appearance. This crucial step maintains visual coherence and prevents text from overlapping or appearing truncated.
Designing a Layout Incorporating Text for Visual Appeal
Effective text layout in Photoshop is critical for creating a visually engaging image. The placement and styling of text significantly contribute to the overall aesthetic and impact of the image. This careful consideration ensures the text enhances the image rather than detracting from it.
- Whitespace: Strategically use whitespace around text elements to create visual balance and improve readability. This principle of visual hierarchy is crucial for effective communication and comprehension.
- Visual Hierarchy: Employ text sizes and styles to establish a clear visual hierarchy, drawing the viewer’s eye to important elements. This is an essential design principle to guide the viewer’s focus and understanding of the message.
- Alignment and Spacing: Appropriate alignment and spacing between text lines and paragraphs enhance the readability and visual appeal of the image. This is essential for creating a well-structured and balanced layout.
Smart Objects
Smart objects in Photoshop offer a powerful way to edit images non-destructively. They act as containers for images, allowing you to apply edits without altering the original. This is crucial for maintaining the integrity of your files and enabling iterative adjustments without losing data. They are especially useful for complex manipulations and when working with images that will need further adjustments in the future.Smart objects are linked to the original file.
Any changes you make to the smart object are reflected in the layer, but the original image remains untouched. This ensures that if you need to return to the original image, you can. This is a significant advantage over traditional image editing methods, where changes are permanently applied to the original file.
Benefits of Using Smart Objects
Smart objects are invaluable for their non-destructive editing capabilities. This approach allows you to apply various adjustments and effects without altering the original image data. This means that you can experiment with different edits without fear of permanently damaging your original image. It’s like having a backup copy of the original image that remains untouched. This feature is particularly beneficial for complex editing tasks or when multiple people need to work on the same file.
Editing Images with Smart Objects
Smart objects can be used for resizing, sharpening, and applying filters without affecting the original image. When you resize a smart object, Photoshop re-samples the image within the smart object, preventing pixelation and maintaining image quality. This is a crucial advantage over resizing a regular image, where the image quality might degrade.
Resizing and Editing Smart Objects
Resizing a smart object is relatively straightforward. Simply select the smart object layer and then use the resize tools available in Photoshop. This is a critical aspect of working with smart objects, as it allows you to easily adjust the size of an image without compromising its quality. For example, if you need to change the size of an image for a website or print design, you can do it directly on the smart object layer.
Editing tools, like those for adjustments and filters, also work seamlessly within smart object layers.
Non-Destructive Editing Examples
Using smart objects for non-destructive editing is key. For instance, if you need to resize an image for multiple uses, you can resize the smart object layer without affecting the original image. This method is vital when working on images that require multiple iterations of resizing, adjustments, or filters. It also makes it easy to experiment with different editing styles.
Another example is using filters on a smart object. Applying a filter to a smart object will only change the layer, and the original image will remain unaffected.
Complex Image Manipulations
Smart objects are invaluable for complex image manipulations. If you need to apply multiple filters or adjustments, you can create smart objects for each step. This allows you to apply changes to the layer without altering the original image. This approach is essential for projects requiring intricate modifications, like creating elaborate composites or applying intricate effects.
Comparison with Traditional Image Editing
Traditional image editing often involves making permanent changes to the original image. Smart objects offer a stark contrast by allowing for non-destructive editing. If you need to revert to the original image, you can simply discard the changes applied to the smart object layer. This is a significant advantage, especially when working on intricate projects. For example, when designing a logo, you can test different versions without permanently altering the original design.
Working with Color

Color is fundamental to image design, influencing mood, aesthetics, and overall impact. Mastering color in Photoshop allows you to manipulate and enhance images effectively, from subtle adjustments to dramatic transformations. Understanding different color models and their corresponding tools is key to achieving desired visual results.
Color Models in Photoshop
Photoshop employs various color models, each representing color in a unique way. Understanding these models is crucial for precise color manipulation. The RGB (Red, Green, Blue) model, commonly used for digital displays, is additive, meaning colors are created by combining varying intensities of red, green, and blue light. CMYK (Cyan, Magenta, Yellow, Key/Black) is subtractive, used primarily in print media, where colors are created by subtracting light from white.
HSL (Hue, Saturation, Lightness) is a more intuitive model, allowing adjustments based on color tone, intensity, and brightness. Lab (Lightness, a, b) is a device-independent model, crucial for accurate color representation across different devices and mediums.
Color Selection Tools
Precise color selection is vital for targeted adjustments. Photoshop provides several tools for this purpose. The Eyedropper Tool allows you to sample colors directly from the image. The Color Picker provides a more detailed selection interface, enabling adjustments within the chosen color model. The Magic Wand Tool, while primarily for selecting similar colors, can be helpful for quickly choosing a large area of a specific color.
These tools, combined with the ability to specify tolerances, facilitate precise and controlled color selection.
Color Adjustment Tools
Photoshop offers a variety of tools to modify colors in images. The Hue/Saturation adjustment layer allows you to control the hue, saturation, and lightness of colors, providing flexibility for subtle or significant changes. The Color Balance tool enables fine-tuning of color tones by adjusting the balance between red, green, and blue channels. The Levels adjustment layer allows precise control over the tonal range, influencing color intensity and distribution.
These tools, used strategically, facilitate color correction and enhancement.
Color Correction Techniques
Color correction is essential for achieving accurate and visually appealing images. One technique involves using the Curves adjustment layer to fine-tune the tonal range and color balance. Another technique utilizes the Color Lookup adjustment layer to apply color grading effects from pre-defined color palettes or custom ones. The selective color adjustment layer allows specific color adjustments to parts of the image, such as a subject’s skin tone.
These techniques, when used correctly, significantly improve image quality and visual impact.
Creating Color Palettes
Creating effective color palettes is crucial for cohesive and visually engaging images. A color palette should complement the overall theme and message of the image. A monochromatic palette uses shades of a single color, often evoking a sense of calm and elegance. A complementary palette uses colors opposite each other on the color wheel, creating a vibrant and contrasting effect.
Using tools like the Color Picker and Hue/Saturation adjustment layers, one can effectively generate and refine a color palette.
Importance of Color in Image Design
Color significantly impacts the visual perception of an image. It can evoke emotions, create a mood, and communicate a message. Warm colors, such as reds and oranges, can convey energy and excitement, while cool colors, such as blues and greens, can evoke a sense of calm and serenity. Color contrast can also be used to highlight key elements and draw attention to specific areas within the image.
Understanding and utilizing color effectively is vital for effective image design.
Summary
In conclusion, mastering these top 10 Photoshop tools empowers you to transform images, from basic adjustments to complex creations. This comprehensive guide has equipped you with the knowledge to confidently navigate the world of image editing. Whether you’re a seasoned professional or a curious beginner, the power of Photoshop is now at your fingertips.
Questions Often Asked
What are the different types of selection tools available in Photoshop?
Photoshop offers various selection tools, including the Lasso tool for freehand selections, the Magic Wand tool for selections based on color similarity, and the Quick Selection tool for a more intuitive approach. Each tool has its strengths and weaknesses, making the choice dependent on the complexity of the selection task.
How can I use layers effectively for non-destructive editing?
Layers in Photoshop allow you to work on different elements of an image independently. This non-destructive approach means you can easily adjust, modify, or remove layers without affecting the original image. This makes layers a cornerstone of professional image editing.
What are some common image flaws that can be fixed using Photoshop’s editing tools?
Common flaws include uneven lighting, inaccurate color representation, and blemishes. Photoshop’s editing tools allow you to address these issues, enhancing the overall quality and appeal of your images.
How can I use Photoshop to create artistic effects on my images?
Photoshop’s filters and effects can be creatively applied to transform images. Experimentation with different filters and effects will reveal the vast artistic possibilities.


