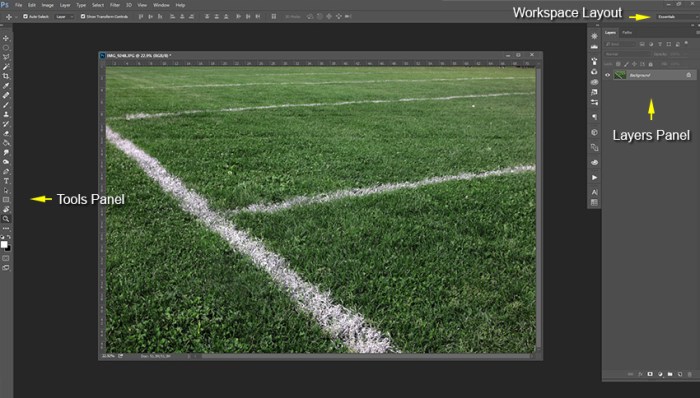
Understanding Layers in Photoshop: A Simple Explanation provides a straightforward guide to mastering this fundamental aspect of image editing. Layers in Photoshop are the building blocks of complex images, allowing for independent manipulation and non-destructive editing. This comprehensive guide will walk you through creating, managing, and working with layers, including advanced techniques like layer masks, styles, and grouping.
This guide breaks down the concept of layers into digestible steps, from the basics of creation to advanced techniques. Each section is designed to progressively build your understanding, enabling you to confidently wield layers in your own creative projects.
Introduction to Photoshop Layers
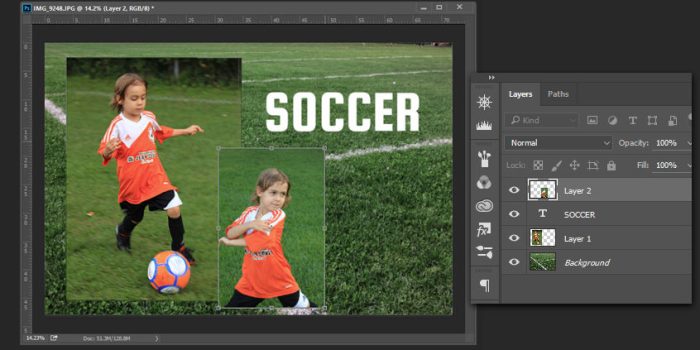
Photoshop layers are the cornerstone of the program’s image manipulation capabilities. They act as independent containers for different elements of an image, allowing for non-destructive editing. This means you can modify one layer without affecting the others, offering a flexible and powerful way to build complex images. This approach is crucial for professional-level image editing, enabling revisions and adjustments without losing original data.Layers are essentially transparent sheets stacked on top of each other.
Each layer contains its own elements, like a specific object, color, or effect. The order of these layers determines how they visually interact, with those higher in the stack appearing on top of those below. You can easily rearrange, duplicate, or delete layers to control the final composition. The flexibility of layers allows for detailed editing and complex image creations.
Key Benefits of Using Layers
Layers offer a multitude of advantages for image editing. They enable non-destructive editing, meaning changes to one layer do not affect others. This is crucial for iterative processes, allowing for experimentation and easy reversion to previous states. This non-destructive approach protects the original image data, preventing accidental loss or damage.
| Benefit | Explanation |
|---|---|
| Non-destructive Editing | Changes to one layer do not affect others. This allows for easy experimentation and revisions. |
| Independent Elements | Layers act as separate entities within a document. This allows for editing individual elements without impacting the entire image. |
| Easy Editing and Revisions | Modifications to layers can be made and undone easily without affecting the original image. |
| Complex Image Creation | Layers allow for the creation of complex images by combining various elements. |
| Flexibility and Control | Adjustments and manipulations can be performed on specific elements without altering the rest of the image. |
Understanding Layer Interactions
Layers interact in a predictable manner, based on their stacking order. The topmost layer is always visible above the layers below it. This stacking order is fundamental to the way images are composed and edited in Photoshop. Adjustments to the opacity or blending modes of layers further control how these layers interact. For example, a layer with lower opacity allows the underlying layers to show through, while a layer with a blending mode like “multiply” darkens the underlying layers.
Creating and Managing Layers
Layers in Photoshop are like individual sheets of transparent paper, each holding a separate element of your image. This modular structure allows for non-destructive editing, enabling you to modify or remove parts of an image without affecting the rest. Understanding how to create, manage, and organize layers is crucial for effectively composing and refining your digital artwork.
Creating New Layers
Several methods exist for generating new layers in Photoshop. These methods provide flexibility in adding elements to your image.
- Using the “Create New Layer” Option: From the Layers panel, you can click the icon designated for creating a new layer. This is a straightforward approach for adding a blank canvas to work with.
- Duplicating Existing Layers: To quickly produce a copy of an existing layer, right-click on the layer in the Layers panel and select “Duplicate Layer.” This preserves the original layer and its settings.
- Creating a Layer from a Selection: Select the area of your image you want to isolate. Then, from the Layers panel, select “Layer > New > Layer From Selection”. This method is ideal for isolating a portion of the image for independent manipulation.
- Using Keyboard Shortcuts: Keyboard shortcuts such as Ctrl + Shift + Alt + N (Windows) or Command + Shift + Option + N (Mac) provide quick access to creating a new layer.
Duplicating Layers
Duplicating a layer is a vital aspect of image manipulation. This process creates an exact copy of the original layer without affecting its contents. This is particularly useful for experimenting with different styles or effects.
- Right-click on the layer in the Layers panel and select “Duplicate Layer”.
- Select “Layer > Duplicate Layer” from the menu bar.
- Using keyboard shortcuts (e.g., Ctrl + J on Windows or Command + J on Mac) is a faster way to achieve the same outcome.
Renaming Layers
Renaming layers is an essential part of organizing your Photoshop workspace. It enhances the clarity and structure of your image by providing context for each layer.
- Double-click the layer name in the Layers panel.
- Type the desired name and press Enter.
Deleting Layers
Removing unnecessary layers is crucial for maintaining a streamlined workflow. It helps to maintain a clean and organized Layers panel.
- Select the layer you wish to delete in the Layers panel.
- Click the “Delete” button (often a trash can icon) in the Layers panel.
- Select “Layer > Delete Layer” from the menu bar.
Organizing Layers
A well-organized layer structure enhances your workflow, making complex projects more manageable. Proper organization enables efficient editing and modification.
- Grouping Layers: Group related layers for better organization. This is useful for managing sets of objects or effects.
- Stacking Order: Layers are displayed in the order they appear in the Layers panel. Adjust the stacking order to control the visibility and overlap of elements.
- Using Layer Masks: Layer masks allow you to selectively reveal and hide portions of a layer, enabling sophisticated control over layer visibility.
Layer Creation Methods Comparison
| Method | Description | Pros | Cons |
|---|---|---|---|
| Create New Layer | Creates a blank layer | Simple, versatile | Requires manual input |
| Duplicate Layer | Creates a copy of an existing layer | Preserves original layer | May require adjustments to settings |
| Layer from Selection | Creates a layer from a selected area | Efficient isolation | Requires selection |
| Keyboard Shortcuts | Uses keyboard shortcuts | Faster than mouse clicks | Requires memorization |
Layer Properties and Options
Layers in Photoshop aren’t just containers; they possess a range of properties that dramatically influence how your images appear. These properties allow you to fine-tune the look and feel of each element, creating intricate designs and compelling visuals. Understanding and manipulating these properties is crucial for achieving the desired aesthetic in your projects.Adjusting these properties unlocks a wide array of creative possibilities.
By modifying opacity, blending modes, and visibility, you can achieve subtle effects or dramatic transformations to your images. This section will delve into the specifics of layer properties, highlighting their importance and demonstrating their practical application.
Layer Opacity
Layer opacity controls the overall transparency of a layer. It determines how much of the layer’s content is visible, allowing you to blend elements seamlessly or create subtle highlights. Adjusting opacity is a fundamental tool for achieving visual harmony and depth in your artwork. Values range from 0% (completely transparent) to 100% (completely opaque).
Blending Modes
Blending modes dictate how a layer interacts with the layer beneath it. They influence the way colors and tones combine, producing a variety of visual effects. Blending modes are a powerful tool for enhancing the visual impact of your artwork, ranging from subtle color adjustments to dramatic transformations.
Layer Visibility
Layer visibility determines whether a layer is displayed in the image. This is essential for organizing and controlling the visual elements in your compositions. Toggling layer visibility allows you to quickly hide or reveal specific elements for editing, experimentation, or presentation.
Adjusting Layer Properties
Adjusting layer properties is straightforward. In the Layers panel, you can directly modify opacity and visibility settings. Blending mode selection involves clicking the blending mode dropdown menu and choosing from the available options. Photoshop’s intuitive interface makes these adjustments simple and accessible.
Blending Mode Examples
Blending modes significantly impact the appearance of layers. For example, using the “Multiply” mode darkens the underlying layer, while “Screen” mode lightens it. “Overlay” combines both, producing a more complex result. The following table provides a concise overview of several blending modes and their typical effects.
| Blending Mode | Typical Effect | Description |
|---|---|---|
| Normal | No change | Layers blend as if no special effect is applied. |
| Multiply | Darkens the underlying layer | Multiplies the colors of the top layer with the underlying layer, resulting in a darker image. |
| Screen | Lightens the underlying layer | The opposite of Multiply; screens the colors of the top layer over the underlying layer, producing a lighter image. |
| Overlay | Darkens or lightens depending on underlying layer | Combines the effects of Multiply and Screen, darkening darker areas and lightening lighter areas of the underlying layer. |
| Soft Light | Subtle darkening or lightening | Produces a softer, less intense effect than Overlay, darkening or lightening the underlying layer depending on the colors. |
| Hard Light | Strong darkening or lightening | Creates a stronger effect than Soft Light, resulting in more pronounced darkening or lightening. |
Working with Multiple Layers
Layers in Photoshop are not just individual elements; they form a hierarchical structure. Understanding this stacking order is crucial for controlling how elements interact and appear in your final image. Proper manipulation of the stacking order ensures that objects are precisely positioned and layered according to your creative vision.
Stacking Order and its Importance
The stacking order of layers dictates the visual precedence of elements in your image. A layer positioned higher in the layer stack appears on top of layers below it. This is essential for creating complex images, where elements need to be precisely layered. For example, a foreground object like a flower should appear in front of a background like a landscape.
Misplaced stacking order can lead to unexpected visual results, where elements obscure each other or appear in the wrong context.
Adjusting Layer Stacking Order
Photoshop provides several methods to adjust the order of layers. The most common approach involves dragging and dropping layers in the Layers panel. Simply click and drag the layer’s thumbnail to the desired position within the stack. Alternatively, you can use the “Move Up” and “Move Down” options in the Layers panel’s context menu, which provide more precise control.
These actions allow for efficient reorganization of the layer stack, ensuring the correct order of elements.
Effects of Stacking Order on Visibility and Interactions
The stacking order directly influences visibility. A layer positioned below another will be hidden by the layer on top. This can be used for masking and creating complex visual effects. Furthermore, layer interactions, such as blending modes, are affected by stacking order. For instance, a layer set to a blending mode like “Multiply” applied to a layer below will affect the visibility and color of the layer underneath it.
This relationship enables the creation of unique visual effects and subtle changes to the image’s overall tone and feel.
Procedure for Correcting Stacking Order
To rectify an incorrect stacking order, identify the layer that needs repositioning. First, locate the layer in the Layers panel. Next, click and drag the layer thumbnail to the desired position in the stack. Observe the effect of this adjustment on the image and repeat the drag-and-drop process as needed. For more complex arrangements, use the “Move Up” and “Move Down” options to fine-tune the positioning.
Careful observation of the results at each step is crucial for accurate and precise placement of layers.
Layer Masks and Adjustments
Layer masks are a powerful tool in Photoshop for selectively modifying areas within a layer without affecting the rest of the image. They allow for non-destructive editing, meaning you can easily revert changes or adjust the mask without altering the original layer data. This makes them crucial for precise retouching, applying effects to specific portions of an image, and creating complex composite images.Layer masks work by creating a separate layer mask that controls the visibility of the underlying layer.
By painting on this mask, you can reveal or hide parts of the layer, essentially masking the areas you want to modify. This approach is far more flexible than traditional methods of masking, allowing for intricate control and gradual transitions.
Understanding Layer Masks
Layer masks are essentially grayscale images that control the visibility of the underlying layer. A white area in the mask reveals 100% of the layer, black hides the layer completely, and shades of gray create gradual transitions. This grayscale representation is intuitive and easy to use for precise control. Using layer masks provides a non-destructive way to adjust images, preserving the original layer for future editing.
Applying Layer Masks
A layer mask is automatically created when you click the layer mask icon, a small thumbnail with a black and white checkered pattern. You can paint on the mask using various brushes and colors to reveal or hide parts of the layer. White reveals, black hides.
Manipulating Layer Masks
You can manipulate layer masks using various tools and techniques. For example, the Brush tool, with different brush sizes and shapes, allows for precise masking. The Eraser tool removes mask pixels, revealing the underlying layer. The Gradient tool can be used to create smooth transitions between masked and unmasked areas. Using the “Fill” option on the mask allows for quick masking of entire sections of the layer.
The “Load” and “Save” options within the mask allow for saving or loading custom masks.
Using Layer Masks for Non-Destructive Editing
Layer masks are fundamental to non-destructive editing. By masking portions of a layer, you can experiment with different adjustments, effects, and modifications without permanently changing the original layer data. This is particularly helpful in retouching, adding effects, or creating composite images. For example, you can mask a portion of a portrait to adjust its lighting without altering the rest of the image.
This allows for a quick change, but also the ability to revert back to the original without any loss of data. This is a key difference between layer masks and other methods, such as using a selection tool.
Layer Styles and Effects
Layer styles in Photoshop are powerful tools that add visual interest and depth to your images. They allow you to apply various effects to layers without having to create separate layers for each effect. This simplifies your workflow and makes it easier to create complex designs. These effects enhance the overall look and feel of your artwork.
Purpose and Application of Layer Styles
Layer styles are pre-programmed effects that can be applied to a layer to instantly enhance its appearance. They dramatically alter the visual characteristics of an image without complex edits. They’re commonly used to add highlights, shadows, glows, and textures, making your designs more dynamic and professional.
Examples of Common Layer Styles
Layer styles offer a diverse range of effects. Some common examples include:
- Drop Shadows: These add a shadow effect below the layer content, creating a sense of depth and dimension. They are crucial for separating layers and creating a three-dimensional appearance.
- Bevels and Emboss: These create a three-dimensional effect by adding highlights and shadows, simulating a sculpted or raised appearance. They mimic the light reflection and shading on a surface.
- Glows: Glows add inner or outer highlights, enhancing the visual appeal and focus on specific areas. They can range from subtle to dramatic, adding a touch of visual flair.
- Inner Shadows: These shadows are cast inward, adding a sense of depth and volume to the layer. They often complement bevels and emboss effects for enhanced 3D realism.
- Gradient Overlay: These add a gradient effect to the layer, providing a smooth transition of color. This is a valuable tool for adding a touch of artistic flair to your images.
- Pattern Overlay: These overlay patterns onto the layer, adding a unique visual texture or aesthetic. This is excellent for adding a decorative element to a layer or a subtle texture.
Modifying and Customizing Layer Styles
The appearance of layer styles can be easily modified. Each style offers numerous options for customization. Adjusting the opacity, size, and position of the effects can significantly change the visual outcome. The style properties are highly adaptable, enabling a wide range of creative possibilities.
Creating a Visually Appealing Layer Style
To create a visually appealing layer style, consider the overall aesthetic you’re aiming for. A subtle drop shadow might enhance a portrait, while a strong bevel and emboss effect could dramatically alter a logo. For example, a complex illustration may benefit from a combination of drop shadow, inner shadow, and a soft outer glow to achieve a visually appealing three-dimensional effect.
The key is to use a combination of styles that work well together. Experiment with different settings and combinations to achieve the desired look.
Grouping Layers
Organizing your Photoshop project effectively is crucial for managing complexity and maintaining a clear workflow. Grouping layers allows you to consolidate related elements, making it easier to move, transform, and manage them as a cohesive unit. This approach significantly streamlines your editing process, especially in intricate projects.Grouping layers is a fundamental organizational technique that helps keep your project structured.
It functions like a container, grouping similar elements for simplified control. Imagine a complex illustration where various parts of a figure are on separate layers; grouping these layers makes the entire figure easier to manage.
Creating Layer Groups
Layer groups act as containers for multiple layers, providing a hierarchical structure for your project. This hierarchical organization facilitates efficient management of large-scale projects, allowing you to control and edit related elements collectively. Creating a layer group is straightforward.
- Select the layers you want to group.
- Right-click on a selected layer and choose “Group Layers” from the context menu.
- Alternatively, use the “Create New Group” option found in the Layers panel.
Managing Layer Groups
Once created, layer groups can be easily managed to enhance your workflow. Renaming groups, adjusting visibility, and moving them within the layer stack are common tasks that contribute to a more organized project.
- Renaming Groups: Double-clicking on a group’s name allows you to rename it, improving clarity and identification.
- Visibility Control: Toggle the visibility of an entire group by clicking the eye icon next to the group name, effectively hiding or showing all the layers within.
- Moving Groups: Drag and drop a group to reposition it in the Layers panel, adjusting the order of elements in your project.
Benefits of Using Layer Groups, Understanding Layers in Photoshop: A Simple Explanation
Employing layer groups offers significant advantages for organizing and managing your Photoshop projects. This systematic approach streamlines your workflow and improves project clarity.
- Organization: Grouping related elements enhances project organization, particularly in complex projects.
- Control: Managing related layers as a group provides precise control over their transformation, visibility, and effects.
- Efficiency: This hierarchical structure simplifies complex projects, making them easier to navigate and edit.
Examples of Scenarios Where Grouping is Useful
Layer groups prove exceptionally useful in various scenarios within Photoshop projects. They contribute to project management, enabling easier manipulation and control of related elements.
- Complex Illustrations: Grouping different parts of an illustration (e.g., body, hair, clothes) keeps them together, enabling easy modification.
- Web Designs: Grouping elements like headers, footers, and navigation bars streamlines editing and updating.
- Composite Images: Grouping layers for background elements, foreground subjects, and special effects makes the image easier to manipulate.
Layer Effects on Other Layers
Layer effects in Photoshop, while primarily applied to a single layer, can sometimes subtly or significantly affect neighboring layers. Understanding these interactions is crucial for achieving desired results and avoiding unintended consequences when working with complex compositions. This section delves into how layer effects can ripple through a document.
Layer Style Impact on Adjacent Layers
Layer styles, such as inner shadows, glows, and bevels, are often applied to a layer but can cast noticeable effects onto neighboring layers. The effects of these styles are dependent on the blending mode and opacity of the layer style itself, and also the blending modes of the layers in the composition. For example, a drop shadow applied to a layer will extend beyond the layer’s borders, potentially affecting the layers beneath it.
The degree of this impact depends on the layer’s opacity and blending mode.
Blending Mode Interactions with Other Layers
Blending modes are fundamental to how layers interact. A layer’s blending mode directly dictates how its pixels are combined with the pixels of the layers beneath it. A layer set to “Multiply” will darken the underlying layer, while a layer set to “Screen” will lighten it. If a layer is set to a blending mode that significantly alters the tone or color of the layer below, that effect will propagate down to subsequent layers.
Demonstration: Layer Style Affecting Others
Consider a scenario where you have a layer containing a graphic design element (e.g., a stylized logo). You apply a layer style, specifically an outer glow with a significant opacity, to this logo layer. If this layer is positioned above other layers in the document, the outer glow will slightly affect the layers beneath. This effect is more pronounced if the underlying layers contain lighter colors.
The extent of the effect depends on the glow’s color, opacity, and size.
Non-Destructive Editing with Layers
Layers in Photoshop are the foundation of non-destructive editing. This approach allows you to make changes without permanently altering the original image data. It’s a powerful workflow that safeguards your work and offers flexibility for future adjustments.Layers achieve this by treating each element as a separate, editable entity. Modifications to one layer don’t affect other layers, preserving the integrity of the entire image.
This contrasts with destructive editing, where changes are applied directly to the image’s underlying data, potentially losing original information.
How Layers Enable Non-Destructive Editing
Layers enable non-destructive editing by creating independent workspaces for each element of an image. Each layer can be treated as a distinct graphic object that is not directly linked to other layers. Changes to one layer, such as adjustments or alterations, do not modify the data of other layers. This isolates changes, allowing you to undo or redo adjustments without affecting the rest of the image.
Examples of Non-Destructive Editing
Non-destructive editing allows for various creative applications. For instance, you can adjust the brightness and contrast of a specific object in the image without affecting other elements, or you can modify the color saturation of a layer without altering the overall color palette of the image. This ability to modify elements independently preserves the original image data, allowing for experimentation and revision without risk of irreversible damage.
A good example is when creating a composite image from multiple photographs. You can adjust the exposure and color balance of each layer without affecting the others, thus achieving a seamless blend. Similarly, you can easily remove a distracting object from a photo without affecting the rest of the image.
Advantages of Non-Destructive Editing
Non-destructive editing offers several advantages in Photoshop:
- Flexibility and Reversibility: Changes made to a layer can be easily undone or redone, providing flexibility in the editing process. This is crucial for experimentation and revision. You can revert to previous versions or try different options without fear of permanently altering the image.
- Multiple Adjustments: You can apply multiple adjustments to the same image without affecting other layers. For example, you can apply various filters or color corrections to one layer without compromising the integrity of other layers. This provides for a wide range of possible adjustments to the overall image.
- Image Integrity: Non-destructive editing maintains the original image data, allowing for multiple iterations and experimentation without losing the original information. This preservation is crucial for maintaining the quality and integrity of the image data, and is crucial for image manipulation and enhancement.
- Non-Linear Workflow: You can work on different layers at different times, adjusting or refining them independently. This allows for a non-linear workflow, providing greater control over the image-editing process.
Preservation of Original Data
Non-destructive editing is fundamentally about preserving the original image data. Modifications are made to copies of the image data, not to the original source data. This means that the original image is never overwritten, preserving it for future use. This approach is a crucial component of a robust workflow for image manipulation and enhancement.
Advanced Layer Techniques
Mastering Photoshop’s layer system unlocks a world of creative possibilities beyond basic adjustments. Advanced techniques, such as layer comps and layer effects, empower designers to efficiently manage complex projects, explore diverse design variations, and create stunning visual effects. These techniques elevate your workflow and enhance the quality of your designs.Layer comps and layer effects, while seemingly different, often work in tandem to deliver polished and multifaceted results.
Layer comps allow for rapid prototyping and exploration of design variations, while layer effects offer a rich arsenal of enhancements for individual elements. Understanding these techniques is crucial for creating compelling and professional-looking graphics.
Layer Compositions (Layer Comps)
Layer comps are essential for visualizing different design variations within a single document. They act as snapshots of various layer states, enabling quick switching between them without permanently altering the original layers. This iterative approach streamlines the design process, making it easier to compare and refine different design options.Using layer comps for design purposes is multifaceted. For example, creating a series of mockups for a website design can be accomplished by creating different layer comps, each representing a specific layout or color scheme.
Presenting these variations to clients is easier and more efficient. Similarly, experimenting with different text styles, images, or overall aesthetics can be managed through layer comps.
Layer Effects
Layer effects offer a wide range of visual enhancements that can be applied to individual layers. These effects, including bevel and emboss, drop shadows, gradients, and more, can dramatically transform the appearance of elements, adding depth, dimension, and visual interest.Mastering layer effects for creative results involves understanding their parameters and how they interact with other elements. A strategic application of layer effects, for example, can create a professional-looking 3D text effect, a subtle highlight on a button, or an impactful shadow behind an image.
Understanding the effect of blending modes and opacity levels is key to achieving desired results.
Summary of Advanced Layer Techniques
| Technique | Description | Use Cases |
|---|---|---|
| Layer Comps | Snapshots of different layer states. | Comparing design variations, creating mockups, and presenting options to clients. |
| Layer Effects | Visual enhancements for individual layers. | Creating 3D text, adding shadows and highlights, and enhancing visual appeal. |
Troubleshooting Layer Issues: Understanding Layers In Photoshop: A Simple Explanation
Troubleshooting layer issues in Photoshop is a crucial aspect of mastering the software. Properly diagnosing and resolving problems with layers prevents frustration and ensures smooth workflow. Efficiently addressing these issues saves time and resources.Common problems like misplaced layers, overlapping elements, or missing layers can disrupt the visual integrity and intended functionality of your projects. Understanding the root causes and applying effective solutions are essential for maintaining a professional workflow.
Identifying Common Layer Problems
Layers can malfunction in various ways, impacting the overall project. Understanding these common problems is the first step to resolving them. Overlapping layers, for example, can obscure the intended visuals, making editing and adjustments more complex. Missing layers can create gaps or inconsistencies in the project’s structure.
Solutions for Layer Problems
Effective solutions are available for the majority of layer problems. These strategies allow for efficient resolution and maintenance of a smooth workflow.
- Overlapping Layers: One of the most frequent issues is overlapping layers. This occurs when two or more layers are positioned on top of each other, obscuring elements. To resolve this, use the “Move” tool or the arrow keys to reposition the layers in the correct stacking order. Alternatively, utilizing the “Layer” panel’s drag-and-drop functionality is also an effective solution.
This technique allows for quick and precise positioning, ensuring the intended elements are visible.
- Missing Layers: If a layer unexpectedly disappears, it may be hidden, deleted, or misplaced. To find the missing layer, meticulously check the “Layers” panel. Look for the layer in the panel, and use the “Show All Layers” option, if necessary, to ensure it is not hidden. If it is not there, ensure you are not working in a separate document or a layer set that contains the missing layer.
If a layer is deleted accidentally, you can often recover it through the “History” panel or using Photoshop’s “Undo” feature.
Correcting Stacking Order Issues
The stacking order of layers directly affects how elements are displayed. Adjusting this order is crucial for achieving the desired visual effects.
- Using the “Move” Tool: The “Move” tool offers precise control over layer positioning. Drag layers up or down in the “Layers” panel to adjust their stacking order.
- Dragging Layers in the Layers Panel: The “Layers” panel provides a visual representation of the layer order. Dragging layers directly within this panel is a simple and intuitive method to rearrange the stacking order.
- Layer Order and Visibility: The order in which layers are stacked directly affects visibility. Layers higher in the stack are displayed on top of those below. Changing the layer order alters how elements appear, providing greater control over the final image.
Table of Common Layer Issues and Solutions
This table provides a concise overview of common layer problems and their solutions.
| Layer Issue | Solution |
|---|---|
| Overlapping Layers | Use the Move tool to reposition layers, or drag them in the Layers panel. |
| Missing Layers | Check the Layers panel, use Show All Layers, or verify that you are in the correct document or layer set. If deleted, use History or Undo. |
| Incorrect Stacking Order | Use the Move tool or drag layers in the Layers panel to adjust the stacking order. |
Closing Summary
In conclusion, understanding Photoshop layers unlocks a world of creative possibilities. This guide has provided a thorough overview of their functionality, from basic manipulation to advanced techniques like layer styles and masks. By mastering these principles, you’ll be well-equipped to create intricate and compelling images with ease and efficiency. We hope this simple explanation has clarified the power and versatility of Photoshop layers for you.
Questions and Answers
What are the common mistakes people make when working with layers?
Common mistakes include neglecting to duplicate layers before making edits, not understanding stacking order, and failing to utilize layer masks for selective adjustments. These errors can lead to unintended results and difficulties in the editing process.
How do layer styles affect other layers?
Layer styles, such as drop shadows and glows, can impact adjacent layers. The effects are dependent on the blending modes applied to the layer styles. Understanding these interactions is crucial for achieving desired visual outcomes and avoiding unwanted effects on other layers.
What is the difference between a layer mask and a layer adjustment?
Layer masks are used to selectively modify areas within a layer, allowing you to reveal or hide parts of the layer’s content without affecting the entire layer. Layer adjustments, on the other hand, modify the overall appearance of a layer by applying filters, color corrections, or other adjustments that affect the entire layer content.
What is the best way to organize layers in a large project?
Grouping layers is a highly recommended strategy for large projects. Grouping layers creates logical divisions within your document, making it easier to manage and edit various elements of your project efficiently. You can also utilize layer names to reflect the purpose of the group.


