What Is Adobe Photoshop? A Beginner’s Guide introduces you to the powerful world of image editing. From basic image manipulation to advanced design techniques, this comprehensive guide will equip you with the knowledge and skills to unlock the potential of Photoshop. Learn about its history, core functionalities, and essential tools to master this industry-standard software.
This guide provides a step-by-step approach, covering everything from navigating the user interface to creating stunning designs. We’ll explore the various tools, techniques, and functionalities, ensuring you’re well-versed in the essentials and ready to embark on your Photoshop journey.
Introduction to Adobe Photoshop
Adobe Photoshop is a raster graphics editor widely used by graphic designers, photographers, and digital artists. It’s a powerful tool for manipulating and enhancing images, enabling users to perform a wide range of tasks from basic adjustments to complex photo editing and graphic design. Its intuitive interface and vast array of features have made it a cornerstone in the digital creative world.Photoshop’s core functionalities include image editing, color correction, retouching, compositing, and graphic design.
Users can manipulate images, adjust colors, remove imperfections, combine multiple images, and create various graphic elements. These functions are combined into a comprehensive suite of tools allowing for comprehensive image manipulation.
Core Functionalities of Photoshop
Photoshop’s core capabilities extend beyond basic image editing. It offers advanced tools for tasks such as creating and editing masks, applying filters, and performing complex selections. These functions enable professional-grade image manipulation, enhancing images for various purposes, from simple enhancements to intricate graphic design.
Different Versions of Photoshop
Various versions of Photoshop cater to different needs and skill levels. Each version introduces new features and improvements over previous releases, aiming to enhance the user experience and functionality. The specific functionalities vary between versions, with newer versions often offering advanced tools and more streamlined workflows.
History of Photoshop’s Evolution
Photoshop’s journey has been marked by continuous innovation and advancements in image manipulation technology. Early versions focused on fundamental image editing tasks, while subsequent versions have incorporated advanced tools and techniques. This evolution has shaped the way digital images are created and manipulated.
Types of Images Photoshop Can Edit
Photoshop is versatile and capable of editing a broad spectrum of image types. From photographs to digital paintings and illustrations, Photoshop allows for a wide range of creative endeavors. It’s capable of handling various file formats and resolutions, ensuring compatibility with different projects and needs. Photoshop’s extensive feature set empowers users to work with diverse image types and create a multitude of visual effects.
User Interface Overview
The Adobe Photoshop interface is a powerful tool, allowing users to navigate and manipulate images with ease. Understanding its layout is crucial for efficient image editing. This section will explore the major components of the Photoshop workspace, highlighting their purpose and location.A well-organized interface streamlines the workflow, minimizing the time spent searching for tools or panels. Familiarizing yourself with the different components allows for quicker adjustments and more refined edits, resulting in more professional-looking results.
Major Interface Components
The Photoshop interface is structured with various panels and tools. Understanding their arrangement and functions enhances the overall editing experience.
| Component | Location | Purpose |
|---|---|---|
| Tools Panel | Typically located on the left side of the workspace | Provides a collection of tools for various image editing tasks, such as selection, painting, and retouching. Each tool has a specific function, from moving objects to changing colors. |
| Layers Panel | Usually located on the right side of the workspace | Manages the layers used to build up an image. Each layer is an independent element, allowing for non-destructive editing. Moving, adjusting, and blending layers are essential for complex projects. |
| Properties Panel | Often located at the bottom or right side of the workspace, its position can vary depending on the selected tool. | Displays options and settings relevant to the currently selected tool. This panel dynamically updates to show relevant parameters for the selected tool, like brush size or color adjustments. |
| Navigator Panel | Typically located in the upper right corner | Offers a zoomed-in or zoomed-out view of the image, allowing precise adjustments. It helps with fine-tuning the image in detail, crucial for precise image editing. |
| History Panel | Often located at the bottom of the workspace | Displays a record of actions performed on the image, allowing users to revert to previous states. This is a vital tool for recovering from mistakes or experimenting with different approaches. |
| Document Window | Central portion of the workspace | Displays the active image or document being edited. It’s the primary area where image manipulation takes place. |
Visual Representation of the Photoshop Interface
Imagine a large window divided into different sections. The left side houses the Tools panel, providing a collection of editing tools. The right side often has the Layers panel, allowing users to manage the layers of the image. The Properties panel, usually located at the bottom or right side, displays options for the active tool, adjusting parameters like brush size or color.
The Navigator panel allows zooming in and out of the image for precise work. The History panel is often located at the bottom, tracking editing steps for easy reversal. The document window is the central area where the image itself is displayed. This structured layout ensures smooth and efficient workflow.
Importance of Understanding Interface Layout
A clear understanding of the Photoshop interface layout significantly impacts workflow efficiency. Navigating the various panels and tools swiftly minimizes wasted time and effort. This proficiency enables users to focus on the creative aspects of image editing rather than searching for specific tools. A strong command of the interface promotes greater control over the editing process, leading to more refined and polished results.
Essential Tools and Techniques
Mastering the essential tools and techniques in Photoshop is crucial for achieving desired image outcomes. This section delves into the core functionalities, equipping you with the knowledge to manipulate and enhance images effectively. From basic adjustments to complex selections, understanding these tools will empower you to transform your digital creations.
Common Photoshop Tools
A diverse range of tools are available in Photoshop, each designed for specific tasks. Understanding their individual purposes streamlines the image editing process. Knowing which tool to use for which task is a key factor in efficiency and precision.
- Selection Tools: These tools allow you to isolate specific areas of an image for editing or manipulation. Common examples include the Marquee, Lasso, and Magic Wand tools.
- Editing Tools: These tools modify the visual aspects of an image, encompassing adjustments like brightness, contrast, and color, as well as filters for unique effects.
- Drawing and Painting Tools: These tools enable you to add new elements or modify existing ones, offering diverse options for illustration and artistic expression.
- Layers Panel: This crucial panel allows you to organize and manipulate multiple images within a single document. Layers enable non-destructive editing, allowing you to change one element without affecting others.
Selection Tools: Precision and Isolation
Selection tools are fundamental for isolating portions of an image for subsequent editing. They are essential for tasks such as cropping, copying, moving, and applying effects to specific areas. The precision of your selections directly impacts the quality of your edits.
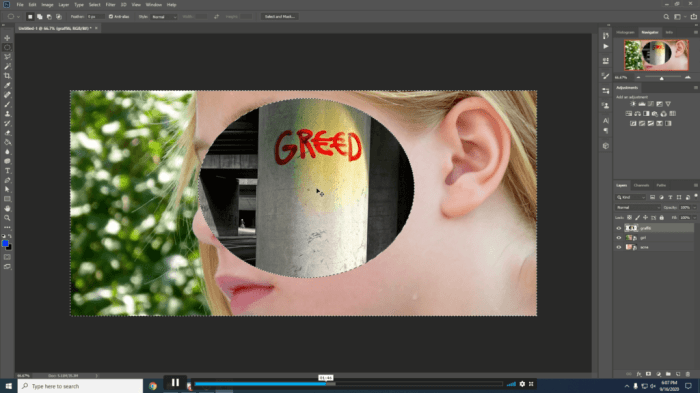
- Marquee Tools: These tools create rectangular, elliptical, single-row, or single-column selections. They are useful for selecting uniform areas, such as a square or circle, from an image. The Rectangular Marquee tool is often used to select entire blocks of color or patterns, while the Elliptical Marquee tool is used for selecting circular or oval regions. The Single Row and Single Column Marquee tools allow for precise selections along a single row or column of pixels, useful for selecting text or other linear elements.
- Lasso Tools: The Lasso tools allow for freehand selections of irregular shapes. The Polygonal Lasso tool is used to create selections with straight lines, while the Magnetic Lasso tool automatically follows edges in the image, making it particularly useful for selecting complex objects with defined Artikels.
- Magic Wand Tool: This tool selects areas of similar color. Its tolerance setting controls the range of colors included in the selection, allowing for varying degrees of precision. This tool is useful for quickly selecting large areas of uniform color.
Editing Tools: Enhancing Images
Editing tools are essential for adjusting and enhancing the visual properties of images. These tools provide a wide range of options for altering colors, contrast, and other visual characteristics.
- Adjustments: Adjustments provide a non-destructive way to modify the color and tonal characteristics of an image. Adjustments include tools like Brightness/Contrast, Levels, Curves, and Hue/Saturation. These tools allow for fine-tuning of an image’s appearance, enabling you to enhance or correct various aspects of the image.
- Filters: Filters apply special effects to images, adding artistic flair or creating unique visual styles. Filters can be categorized into various types, each with distinct effects, ranging from stylized effects to image transformations. Examples include blurring, sharpening, and artistic effects.
Layers: The Foundation of Non-Destructive Editing
Layers are a fundamental concept in Photoshop. They allow for the separation of different elements within an image, enabling non-destructive editing. By organizing elements on separate layers, you can modify one element without affecting others. This approach is crucial for maintaining the original image while experimenting with various edits.
- Layer Organization: Layers provide a flexible structure for organizing multiple elements within an image. This allows you to easily adjust, modify, or delete specific elements without affecting others. You can group layers for even more complex editing.
- Layer Styles: These styles apply effects to a layer without changing the underlying pixels. They allow for a wide range of visual enhancements, from drop shadows to inner glows. This functionality facilitates quick and versatile design enhancements without altering the original image data.
Basic Image Manipulation
Photoshop offers numerous tools for basic image manipulation. These tools are used for resizing, cropping, color adjustments, and more. Mastering these tools allows you to prepare your images for various applications.
- Resizing: The Image > Image Size command allows for precise resizing of images. This is essential for adjusting images to specific dimensions for various purposes.
- Cropping: The Crop tool allows you to remove unwanted portions of an image, enhancing the focus on the desired subject. This tool is essential for improving composition and aesthetics.
- Color Adjustments: Photoshop provides a variety of tools for adjusting colors. This includes tools for changing the overall color balance, enhancing specific colors, or removing unwanted colors.
Image Editing Fundamentals
Mastering image editing in Photoshop involves a suite of essential techniques. These techniques, from basic file management to advanced color correction, allow for precise control over visual aspects of an image. Proficiency in these fundamentals unlocks a wide array of creative possibilities.Image manipulation, a crucial aspect of digital photography and graphic design, hinges on these core techniques. Effective use of these tools enables users to transform images, enhancing aesthetics and correcting imperfections.
Opening and Saving Images
Photoshop supports a diverse range of image formats, each with its own characteristics. Understanding these formats is crucial for maintaining image quality and compatibility. Choosing the right format ensures the image retains its quality and is compatible with other software.
- Opening Images: Photoshop allows opening various image types, including JPEG, PNG, TIFF, and others. Simply navigate to the file location and select the desired image. The program automatically displays the image in the workspace for editing.
- Saving Images: Selecting the appropriate file format is essential for preserving image quality. JPEG is ideal for web use due to its smaller file size, while TIFF is better for high-resolution prints. Users can also adjust quality settings within the save dialogue for optimal results.
Resizing and Cropping Images
Efficient resizing and cropping are vital for adapting images to specific purposes or dimensions. These actions maintain the image’s overall quality and ensure its suitability for various applications.
- Resizing: Resizing an image adjusts its dimensions while maintaining its aspect ratio. Photoshop offers various resizing options, including specifying pixel dimensions or percentage changes. The tool ensures the image maintains its intended visual appeal.
- Cropping: Cropping an image eliminates unwanted portions, focusing on a specific area. Photoshop provides a cropping tool to precisely select the desired area, improving composition and enhancing the image’s visual appeal.
Color Correction Techniques
Color correction in Photoshop enhances image aesthetics by adjusting hues, saturations, and brightness levels. Accurate color correction enhances the image’s visual appeal and overall quality.
- Levels: Levels adjustment allows for precise control over the tonal range of an image. It modifies the highlights, midtones, and shadows to achieve desired color balance. This tool is vital for improving overall image contrast.
- Curves: Curves adjustment provides a more advanced method of tonal manipulation. It offers a graphic representation of the input and output tones. Curves adjustments allow for subtle and complex tonal modifications for specialized effects.
- Hue/Saturation: Hue/Saturation adjustment modifies the color characteristics of an image. It allows for adjustments to the colors’ tones, intensity, and saturation levels. This tool is helpful for color correction and stylistic enhancements.
Removing Blemishes and Unwanted Objects
Photoshop provides tools for effectively removing imperfections and unwanted elements from images. These techniques ensure that the image accurately reflects the desired visual representation.
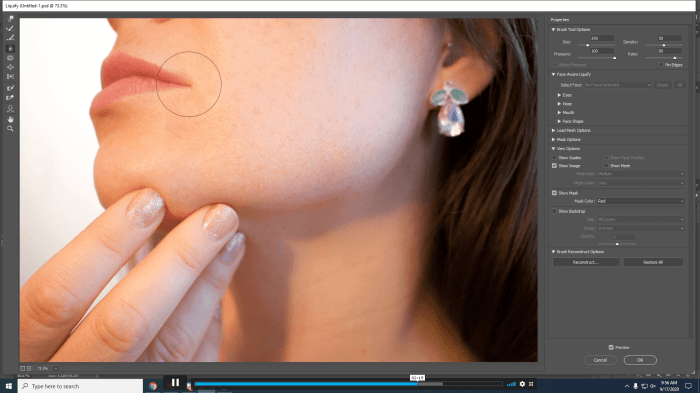
- Spot Healing Brush: This tool is useful for removing small blemishes or imperfections by sampling the surrounding area. It seamlessly blends the corrected area with its surroundings, minimizing visible alterations.
- Clone Stamp Tool: The Clone Stamp Tool is employed for copying and pasting parts of an image to cover blemishes. This technique allows for precise replication, effectively camouflaging unwanted elements.
- Content-Aware Fill: This advanced feature intelligently fills in areas of an image that have been removed. It analyzes the surrounding content to create a seamless replacement, minimizing visual artifacts.
Enhancing Image Quality
Photoshop’s tools empower users to boost image clarity and reduce noise. This enhances the image’s overall visual appeal.
- Sharpening: Sharpness adjustments enhance image detail and clarity, improving visual appeal. This process increases the contrast between edges and improves the overall perceived detail.
- Noise Reduction: Noise reduction tools mitigate graininess or imperfections in images, improving overall image quality. These tools minimize unwanted artifacts, improving image clarity and aesthetics.
Layer Management and Masking
Layers are the fundamental building blocks of image manipulation in Photoshop. They allow you to work on different parts of an image independently, making complex edits easier to manage and non-destructive. This separation is crucial for advanced editing and image compositing, enabling you to modify one element without affecting others. Understanding layers and masking unlocks a vast range of creative possibilities.Understanding how to effectively use layers and masks is essential for creating professional-quality images.
It enables precise control over individual elements, making it possible to add, remove, or modify parts of an image with accuracy. This detailed exploration of layer management and masking will equip you with the tools needed to seamlessly integrate various elements and create stunning composites.
Layer Types and Their Uses
Different layer types offer distinct functionalities, allowing for flexibility in image manipulation. Each type has a specific purpose and unique features. Understanding their characteristics allows for informed choices when building a composite.
- Normal Layers: These are the most common type, used for general image editing. They can contain raster data (pixels) or vector graphics. They can be filled with solid colors, gradients, or patterns. They are the foundation of most Photoshop compositions.
- Adjustment Layers: These layers don’t directly modify the pixel data of the underlying layers. Instead, they apply adjustments such as brightness, contrast, or color corrections to the image. The beauty of adjustment layers is that they are non-destructive; any adjustments can be easily modified or removed without affecting the original image. This is particularly useful when working on complex images.
- Smart Objects: These layers allow for editing vector data or raster images in a non-destructive manner. They are especially helpful when working with complex images or images that require multiple editing steps. Edits made to a smart object layer do not affect the original source file.
Creating, Editing, and Manipulating Layers
Creating, editing, and manipulating layers are fundamental to Photoshop. A deep understanding of these processes is key to constructing intricate and refined images. These steps provide a structured approach to building a composite.
- Creating New Layers: New layers are easily created using the “Layer” menu or by clicking the “Create a new layer” icon in the Layers panel. The specific methods vary slightly depending on the Photoshop version.
- Moving and Arranging Layers: Layers can be moved up or down in the stack using drag-and-drop operations. The order of layers directly influences how they overlap and blend. A higher layer obscures a lower layer.
- Editing Layer Properties: Layer properties, including blending modes, opacity, and fill options, can be modified using the Layers panel. This allows for precise control over how layers interact.
Layer Masks: Unveiling the Power of Partial Edits
Layer masks offer a powerful way to selectively modify parts of an image. They allow for non-destructive masking and are critical for advanced compositing techniques.
- Creating Layer Masks: A layer mask is created by clicking the mask icon in the Layers panel. This creates a separate layer mask that controls the visibility of the pixels within the layer.
- Using Brushes for Masking: Using brushes, you can precisely control which areas of the layer are visible or hidden. This is particularly helpful when dealing with complex shapes or intricate details.
- Using Layer Masks to Refine Edges: Layer masks are essential for refining edges and blending layers seamlessly. This creates a smooth transition between elements.
Using Layers to Create Composite Images
Creating composite images involves strategically combining different layers to achieve a desired visual effect. Understanding how layers interact is critical in creating impressive composites.
- Preparing Source Images: The images used for the composite need to be prepared, including resizing, cropping, and adjustments to match the intended design. This ensures all elements are compatible.
- Placing and Aligning Layers: Precise placement and alignment of layers are vital to achieve the desired aesthetic. Proper alignment prevents misalignment and ensures a seamless look.
- Using Blending Modes for Visual Effects: Blending modes can significantly enhance the appearance of composite images. This allows for the creation of specific visual effects, such as a soft or hard-edged transition.
Working with Images in Different Formats: What Is Adobe Photoshop? A Beginner’s Guide
Understanding the various image formats supported by Adobe Photoshop is crucial for achieving optimal results in image editing and for choosing the best format for different purposes. Different formats cater to diverse needs, from web graphics to high-resolution prints, and understanding their characteristics is essential for achieving the desired outcome.Photoshop supports a wide range of image formats, each with unique properties regarding file size, image quality, and compatibility with various applications and devices.
Mastering these formats allows you to efficiently manage your image workflow and tailor your output to specific needs.
Image File Formats Supported by Photoshop
Photoshop supports numerous image file formats, including common formats like JPEG, PNG, TIFF, GIF, and others. Each format has distinct characteristics that influence its suitability for various applications.
Comparison of Image Formats
Different image formats excel in different scenarios. JPEG, for example, is great for web images, while TIFF is ideal for professional-level prints. PNG excels in graphic design, offering transparency and lossless compression. Understanding these nuances allows for informed choices in image editing and output.
| Format | Compression | Loss | Transparency | Suitable Use Cases |
|---|---|---|---|---|
| JPEG | Lossy | Yes | No | Web images, social media, online photo sharing |
| PNG | Lossless | No | Yes | Graphics, logos, illustrations, images requiring transparency |
| TIFF | Lossless | No | Yes | High-resolution prints, professional photography, photo editing |
| GIF | Lossy | Yes | Yes (limited) | Simple animations, web graphics, images with limited colors |
Exporting Images in Different Formats
Exporting images in Photoshop is a straightforward process. To export in a specific format, select “File” > “Export” > “Save for Web (legacy)” or “Export As…” from the File menu. This opens a dialogue box where you can choose the desired format and settings. Within the “Save for Web” dialog, you can preview the image and adjust compression settings to control file size and quality.
Optimizing Image Quality and File Size
Optimizing image quality and file size is crucial for web and print applications. Consider these tips:
- Choose the appropriate format: Select the format best suited for the intended use. JPEG is optimal for web use, while TIFF is suitable for high-resolution prints. PNG excels for images needing transparency.
- Adjust compression settings: Experiment with the compression settings in the “Save for Web” or “Export As…” dialog boxes to find a balance between file size and quality.
- Use image editing software: Photoshop’s tools can optimize images, reducing file size without sacrificing quality. Consider using the “Save for Web” options for web-optimized images.
- Resize images: Resize images to the appropriate dimensions for the intended use. Reducing dimensions usually reduces file size.
Basic Adjustments and Enhancements
Image adjustments are fundamental to refining and enhancing visual appeal in Photoshop. These adjustments allow you to fine-tune various aspects of your images, from brightness and contrast to color correction and noise reduction. Mastering these techniques will significantly improve your image editing workflow.
Brightness and Contrast Adjustments
Brightness and contrast are crucial for adjusting the overall tone of an image. Brightness controls the overall lightness or darkness, while contrast manages the difference between the lightest and darkest areas. Understanding how to manipulate these settings allows for greater control over the mood and impact of the image. For example, increasing brightness can make a dimly lit scene more visible, while adjusting contrast can accentuate the details and textures within an image.
Color Correction
Color correction tools are essential for fine-tuning the color balance and saturation of an image. These tools allow for adjustments to hue, saturation, and luminance, enabling you to achieve a desired color palette or correct inaccuracies in color representation. For instance, correcting a color cast in an image will significantly improve its overall aesthetic.
Sharpness and Detail Enhancement
Sharpness adjustments enhance the definition and clarity of an image. These adjustments increase the contrast between edges, making fine details more prominent. Detail enhancement techniques, often used in conjunction with sharpness, go beyond just increasing clarity. They can also refine and sharpen subtle textures and patterns, leading to a more polished and appealing image.
Noise Reduction, What Is Adobe Photoshop? A Beginner’s Guide
Noise reduction is a crucial technique for improving the quality of images, particularly those taken in low-light conditions or with digital sensors prone to noise. The process involves removing random variations in pixel color, effectively smoothing out the image and reducing unwanted graininess. Proper noise reduction can significantly enhance the visual appeal of an image.
Artistic Effects
Photoshop offers various filters and techniques for creating artistic effects. These filters allow for a wide range of stylistic transformations, from applying vintage-style tones to creating abstract or surreal imagery. These effects can be used to convey a specific mood or artistic vision in the image.
Adjustment Layers
Adjustment layers are non-destructive editing tools that allow for flexible and layered adjustments to an image. Instead of directly modifying the original image data, adjustments are applied to a separate layer, allowing for easy modification and refinement. This approach allows you to experiment with different adjustments without permanently altering the original image. Furthermore, adjustment layers are highly versatile; they can be combined, grouped, and manipulated to achieve a wide array of effects.
Design Concepts and Principles
Mastering design principles is crucial for creating visually appealing and effective images in Photoshop. These principles, when applied thoughtfully, can elevate your image editing from basic adjustments to compelling visual narratives. Understanding balance, proportion, contrast, and composition will significantly enhance your image editing capabilities.Applying design principles is not just about aesthetics; it’s about communicating a message effectively. By thoughtfully arranging elements within an image, you can guide the viewer’s eye, emphasize key details, and evoke specific emotions.
Understanding these principles empowers you to create images that resonate with your intended audience.
Principles of Visual Design
Design principles, like the building blocks of a structure, provide the framework for creating visually engaging and impactful images. They are fundamental tools that can elevate the aesthetic appeal and communicative power of your work. Understanding these principles allows you to consciously craft images that effectively communicate ideas and evoke emotions.
- Balance: Balance refers to the visual equilibrium of elements within an image. Symmetrical balance creates a sense of order and formality, while asymmetrical balance provides dynamism and visual interest. In image editing, consider the weight and placement of objects, colors, and textures to achieve a balanced composition. For example, placing a large, bright object on one side of the image can be balanced by several smaller, darker objects on the opposite side, creating visual equilibrium.
- Proportion: Proportion refers to the relative size and scale of elements within an image. Maintaining a harmonious proportion between elements creates a sense of visual harmony and order. In image editing, carefully consider the size of objects in relation to each other and the overall image space. An example of poor proportion would be a tiny human figure next to a towering mountain; this would disrupt the image’s harmony.
- Contrast: Contrast refers to the difference between elements in an image, such as color, value, texture, or shape. High contrast creates a strong visual impact, while low contrast creates a more subtle and harmonious effect. In image editing, adjusting contrast levels can dramatically alter the mood and impact of an image. For instance, increasing contrast between light and dark areas can add depth and drama to a portrait photograph.
Composition in Image Editing
Composition is the arrangement of elements within an image. A strong composition guides the viewer’s eye through the image, emphasizing key details and creating a more impactful visual experience. Understanding and applying compositional techniques can significantly enhance the overall appeal and effectiveness of your image edits.
- Rule of Thirds: This guideline suggests dividing the image into nine equal parts using two horizontal and two vertical lines. Placing key elements along these lines or at their intersections often creates a more engaging and dynamic composition. For instance, positioning the subject of a landscape photograph at one of the intersection points can make the scene more visually appealing.
- Leading Lines: Lines within an image can lead the viewer’s eye towards a focal point. Utilizing lines to guide the viewer’s gaze adds dynamism and visual interest to an image. In a photo of a road winding into a valley, the road acts as a leading line, drawing the viewer’s eye towards the distant vista.
- Framing: Using elements within the image to frame the main subject can draw attention and add depth to the image. Examples include using archways, doorways, or branches to frame a subject, creating a sense of enclosure or perspective. Consider using natural elements in a photograph of a bird in a tree’s branches to frame the bird and emphasize it within the composition.
Visual Appeal and Case Studies
Creating visually appealing images involves understanding and applying design principles consciously. Success in image editing often depends on the ability to communicate ideas and evoke emotions through visual storytelling. Examples of successful image edits often showcase the skillful application of design principles.
- Case Study 1: Product Photography: A product photograph designed to showcase a new smartphone features balanced lighting and contrasting colors, creating visual interest and highlighting the product’s features. The use of the rule of thirds draws attention to the smartphone, while leading lines guide the viewer’s gaze across the image. This balance of composition elements successfully conveys the product’s attributes to potential buyers.
- Case Study 2: Portrait Photography: A portrait photograph featuring a subject with well-balanced lighting, enhancing their features and creating a sense of harmony. The contrast between the subject’s skin tone and the background color draws attention to the subject. The use of framing elements like a doorway or window can emphasize the subject’s presence and create a stronger visual impact. The photograph is an excellent example of how design principles create a strong emotional connection with the viewer.
Advanced Techniques (Optional)
Photoshop offers a wealth of advanced techniques that can elevate your image editing and design capabilities beyond basic adjustments. These techniques allow for intricate control over selections, color manipulation, and artistic effects, pushing the boundaries of what’s possible with digital imagery. Mastering these techniques can significantly enhance your workflow and artistic expression.Advanced techniques provide a deeper understanding of Photoshop’s capabilities.
Learning these methods allows for more creative control, producing visually compelling and nuanced results.
Using Masks for Complex Selections
Selection masks allow for non-destructive selection modifications. They are powerful tools for intricate selections that are difficult to achieve with standard selection tools. Mask-based selections enable refined and precise adjustments, enabling precise control over the selection area. This approach avoids altering the original image data.
- Creating a selection mask involves generating a selection using tools like the lasso, magic wand, or pen tool. This selection defines the area to be masked.
- The next step involves converting this selection into a mask layer. This process creates a new layer that isolates the selected area.
- Refining the selection mask is crucial. This can involve using brush tools with different opacity and hardness settings to refine the edges of the selection. This fine-tuning allows for precise control over the selected area, ensuring the desired result.
Channel Mixing
Channel mixing is a powerful technique for creating unique color effects and blending images. It involves manipulating the color channels in an image to create novel effects, providing a creative pathway to modify and enhance images. This approach is valuable in producing diverse artistic outcomes.
- Combining multiple images using channel mixing allows for the blending of elements from various sources, creating composite images with unique characteristics.
- This process allows for specific color adjustments to individual channels. This precise control is useful for achieving subtle color changes or significant color shifts.
- This technique is commonly used to create artistic effects, like adding textures or altering the color palette in a visually appealing way.
Advanced Adjustments
Advanced adjustments provide intricate control over image attributes. These techniques are often used in tandem with other methods, such as masks or channel mixing. They enable a high degree of control over image aspects, like tone and color.
- Using adjustment layers allows for non-destructive edits, providing the flexibility to alter settings without affecting the original image data. This approach is crucial for experimentation and iterative refinements. This flexibility is essential for preserving the original image.
- The use of curves and levels adjustments offers granular control over image brightness and contrast, allowing for precise manipulation of the tonal range. This approach allows for fine-tuning and specific contrast adjustments to specific color ranges, which is essential for high-quality images.
Examples of Artistic Effects
Advanced techniques enable the creation of various artistic effects. These effects can range from subtle enhancements to dramatic transformations, enhancing images in various ways.
- A classic example is creating a high-contrast black and white image from a color photograph. This effect can transform a vibrant image into a striking monochrome representation.
- Applying a unique color gradient to a masked selection can generate a dramatic artistic effect, changing the color palette of an area without altering the rest of the image.
Role in Graphic Design
Advanced techniques play a vital role in graphic design. These techniques are valuable for creating visually engaging and compelling designs. They are particularly beneficial for creating high-quality images for professional projects.
- Advanced techniques allow graphic designers to create complex designs with nuanced details and refine their designs to meet high-quality standards.
- This results in images that are more visually appealing and professional, improving the overall impact of the design.
Resources and Further Learning
Mastering Adobe Photoshop requires ongoing learning and exploration. This section provides valuable resources to enhance your skills and keep you up-to-date with the latest developments. From online tutorials to dedicated learning platforms, these resources will empower you to become a proficient Photoshop user.This section Artikels key resources for further learning, including online platforms, books, and apps. It also addresses common issues and strategies for staying current with Photoshop’s evolving features.
Online Learning Resources
Online resources are an excellent way to supplement your learning. Numerous platforms offer structured courses and tutorials, catering to diverse skill levels. These platforms allow you to learn at your own pace and access a wealth of information.
- Lynda.com/LinkedIn Learning: This platform provides comprehensive Photoshop courses, covering various aspects, from beginner to advanced levels. The courses often feature step-by-step instructions and practical exercises, aiding in hands-on learning.
- Adobe Photoshop Tutorials on YouTube: Numerous channels offer free Photoshop tutorials. These tutorials are often concise and visually engaging, making them a great way to quickly learn specific techniques or concepts.
- Skillshare: Skillshare hosts a range of Photoshop courses, including both introductory and advanced topics. The variety of instructors and styles can cater to different learning preferences.
- Envato Tuts+: This platform offers premium tutorials and courses, focusing on specific niches, like photo editing and graphic design. This is a good option for specialized learning.
Books and Reference Materials
Books offer a structured approach to learning Photoshop, providing in-depth explanations and practical examples. They are valuable for comprehensive knowledge and reference.
- “Adobe Photoshop CC Classroom in a Book” by Adobe Press: This book is often a staple for learning Photoshop’s various tools and techniques. It provides a comprehensive overview of the software and covers a wide spectrum of topics.
- Online Photoshop Manuals and Documentation: Adobe’s official website provides detailed documentation and manuals. These resources are invaluable for finding specific commands and functions.
Apps for Photoshop Practice
Mobile apps can serve as supplementary tools for learning Photoshop principles and experimenting with techniques. They can also be valuable for quick exercises and practicing basic functions.
- Adobe Photoshop Express: This mobile app offers a simplified interface for basic photo editing tasks. It can be a valuable tool for practicing quick adjustments and basic image editing.
Photoshop Resource Table
This table organizes various resources by category, facilitating easy access.
| Category | Resource | Description |
|---|---|---|
| Online Tutorials | YouTube Channels, Lynda.com | Structured courses and tutorials for various skill levels. |
| Books | Adobe Photoshop CC Classroom in a Book | In-depth explanations and practical examples. |
| Apps | Adobe Photoshop Express | Mobile application for basic photo editing and practicing. |
Common Photoshop Problems and Solutions
Troubleshooting is an integral part of the learning process. Here are some common Photoshop problems and their solutions.
- Problem: Difficulty saving files in different formats.
- Solution: Review the save options and experiment with different file formats to understand the optimal format for your project.
- Problem: Layer management issues.
- Solution: Ensure proper layer organization and utilize masking techniques for precise editing.
- Problem: Unwanted artifacts or distortions in images.
- Solution: Use the filter gallery and adjust settings to address these issues, or consult online tutorials for specific troubleshooting.
Staying Up-to-Date
Keeping abreast of the latest features and tools is essential for proficiency. Adobe regularly updates Photoshop, adding new features and improving existing ones. Following industry trends and utilizing online resources can be beneficial.
- Adobe’s Website: Check the official Adobe website for announcements, updates, and new features. Stay informed by subscribing to their newsletter or following their social media channels.
- Online Forums and Communities: Engage in online forums and communities dedicated to Photoshop. This will allow you to stay updated on the latest trends and gain insight from other users.
Examples of Photoshop Use Cases
Photoshop’s versatility extends far beyond simple photo editing. It’s a powerful tool used in diverse fields, from crafting stunning graphics to creating compelling web designs. Understanding its applications allows you to leverage its capabilities effectively.Photoshop empowers users to manipulate images, add creative elements, and refine designs for various purposes. Whether it’s enhancing a personal photo or creating a professional logo, Photoshop provides the tools to achieve desired results.
Photo Editing for Social Media
Effective social media presence often hinges on visually appealing content. Photoshop allows for precise photo adjustments to improve aesthetics and ensure consistency across posts. Techniques include color correction, contrast adjustments, and the addition of filters. For example, a photographer might use Photoshop to enhance a landscape photograph by increasing saturation, sharpening details, and adding a warm tone to create a more inviting and engaging social media post.
Creating a Simple Design in Photoshop
A basic design project might involve creating a banner or poster. First, establish a new document with the desired dimensions. Then, select shapes and colors from the tools palette. Use the drawing tools to create the elements of the design. Next, add text using the text tool.
Finally, arrange and adjust elements until satisfied with the composition. This iterative process allows for experimentation and refinement.
Creating a Logo Using Photoshop
Logo design requires careful consideration of visual elements and brand identity. A designer might start by sketching concepts and then translating them into digital form using Photoshop. Vector shapes provide scalability and clarity. Typography is carefully selected to match the brand’s personality. Color palettes are chosen to evoke the right emotions and communicate the brand’s message.
The design process might include numerous iterations and adjustments until the final logo effectively represents the brand.
Photoshop in Various Fields
Photoshop’s applicability spans across diverse professional domains. In advertising, it’s essential for creating compelling visuals for campaigns. In publishing, designers use it to create high-quality layouts and images. Furthermore, it is widely used in web design to create visually appealing and interactive websites. Its flexibility also makes it a valuable tool in film production, allowing for image manipulation and special effects.
The specific application of Photoshop in each field depends on the needs of the respective profession.
Illustrative Table of Photoshop Use Cases
| Field | Specific Use Case |
|---|---|
| Photography | Enhancing photos, removing blemishes, adjusting colors, creating composites |
| Graphic Design | Creating logos, banners, posters, brochures, and other marketing materials |
| Web Design | Creating website graphics, icons, and other visual elements |
| Film Production | Creating special effects, image manipulation, and compositing |
| Print Media | Creating layouts, images, and illustrations for magazines, newspapers, and brochures |
Concluding Remarks
In conclusion, this guide has provided a foundational understanding of Adobe Photoshop, equipping beginners with the knowledge to confidently navigate its features and functionalities. We’ve covered essential tools, techniques, and concepts, from basic image manipulation to advanced design principles. Now, you’re ready to explore the vast creative potential of Photoshop and unleash your inner designer. Remember to practice regularly to solidify your skills and explore the wealth of online resources to expand your knowledge further.
Commonly Asked Questions
What are the different versions of Photoshop, and what are their key differences?
Adobe Photoshop releases new versions periodically. Key differences often include new tools, features, performance improvements, and compatibility with newer operating systems and file formats. Some versions also have specific design focuses, like those for mobile or web design.
What file formats does Photoshop support?
Photoshop supports a wide range of image file formats, including JPG, PNG, TIFF, PSD, and more. The choice of format depends on the intended use and desired quality/size balance.
How can I enhance image quality in Photoshop?
Image quality enhancement in Photoshop involves techniques like sharpening, noise reduction, color correction, and adjustments to contrast and brightness. Proper use of layers and masking techniques can also help improve image quality.
What are some common problems encountered when using Photoshop, and how can they be solved?
Common Photoshop problems include file corruption, compatibility issues, and tool misapplication. Detailed troubleshooting is available online, addressing specific issues and their solutions.


